OpenGauss基础教程(二)
CentOS7 安装 openGauss
1.安装Docker
1).卸载旧的版本
sudo yum remove docker \
                  docker-client \
                  docker-client-latest \
                  docker-common \
                  docker-latest \
                  docker-latest-logrotate \
                  docker-logrotate \
                  docker-engine
2).需要安装包
sudo yum install -y yum-utils
3).设置阿里云镜像
sudo yum-config-manager --add-repo http://mirrors.aliyun.com/docker-ce/linux/centos/docker-ce.repo
4).安装 docker
yum -y install docker
5).启动Docker
sudo systemctl start docker
6).查看Docker服务是否启动
systemctl status docker
显示以下信息说明Docker启动正常。
 docker.service - Docker Application Container Engine
   Loaded: loaded (/usr/lib/systemd/system/docker.service; enabled; vendor preset: disabled)
   Active: active (running) since 二 2022-05-24 22:33:57 CST; 10h ago
7).查看版本
docker version
8).查看镜像(是空的)
docker images
9).测试 hello-world
docker pull hello-world
10).查看镜像(会看到多了个hello-world)
docker images
REPOSITORY           TAG       IMAGE ID       CREATED        SIZE
hello-world          latest    feb5d9fea6a5   8 months ago   13.3kB
11).运行hello-world
docker run hello-world
Hello from Docker!
This message shows that your installation appears to be working correctly.

To generate this message, Docker took the following steps:
 1. The Docker client contacted the Docker daemon.
 2. The Docker daemon pulled the "hello-world" image from the Docker Hub.
    (amd64)
 3. The Docker daemon created a new container from that image which runs the
    executable that produces the output you are currently reading.
 4. The Docker daemon streamed that output to the Docker client, which sent it
    to your terminal.

To try something more ambitious, you can run an Ubuntu container with:
 $ docker run -it ubuntu bash

Share images, automate workflows, and more with a free Docker ID:
 https://hub.docker.com/

For more examples and ideas, visit:
 https://docs.docker.com/get-started/
12).查看运行的容器
#查看运行的容器
docker ps
#查看所有容器
docker ps -a
看到多了 hello 的容器
CONTAINER ID   IMAGE                       COMMAND                  CREATED         STATUS                     PORTS                                         NAMES
0d11118d7952   hello-world                 "/hello"                 2 minutes ago   Exited (0) 2 minutes ago                                                priceless_benz
13).移除 hello-world 如果容器时运行的需要先停止
#533eaa8e4c79 CONTAINER ID(容器id)
[root@cvhzad8gi7gtlwbz ~]# docker stop 0d11118d7952
0d11118d7952
移除容器
[root@cvhzad8gi7gtlwbz ~]# docker rm 0d11118d7952
0d11118d7952
再次查看容器列表会发现容器没有了.
#查看所有容器
docker ps -a
14).移除镜像 查看镜像
docker images
REPOSITORY           TAG       IMAGE ID       CREATED        SIZE
hello-world          latest    feb5d9fea6a5   8 months ago   13.3kB
移除镜像
#移除容器是 rm  移除镜像是 rmi
#feb5d9fea6a5 IMAGE ID
docker rmi feb5d9fea6a5
再次查看镜像发现没有了
docker images
2.使用Docker安装openGauss
1).拉取镜像
docker pull enmotech/opengauss:latest
2).创建gauss容器
#创建数据存放目录
mkdir -p /opt/opengauss/data

docker run --name opengauss --privileged=true -di -e GS_PASSWORD=Root@123 -v /opt/opengauss/data:/var/lib/opengauss -p 15432:5432 -u root  --restart=always enmotech/opengauss:latest
3).启动容器
如果容器没有启动则开启容器
docker start opengauss
4).检查opengauss是否正在运行
docker ps
CONTAINER ID   IMAGE                       COMMAND                  CREATED        STATUS        PORTS                                         NAMES
10f06f93a9fd   enmotech/opengauss:latest   "entrypoint.sh gauss…"   16 hours ago   Up 16 hours   0.0.0.0:15432->5432/tcp, :::15432->5432/tcp   opengauss
5).docker开启远程连接
# 编辑docker.service
vim /usr/lib/systemd/system/docker.service


ExecStart=/usr/bin/dockerd -H tcp://0.0.0.0:5432  -H unix:///var/run/docker.sock

#重启后台进程和docker
# 重新加载配置
systemctl daemon-reload
# 重启docker
systemctl restart docker
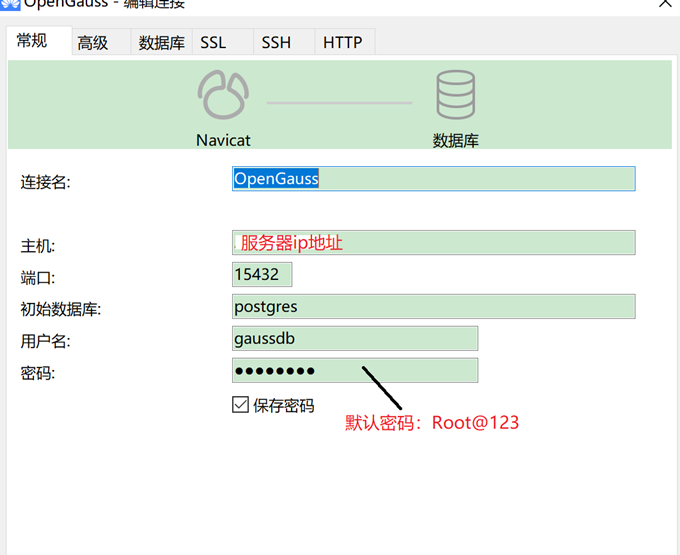
3.使用navicat连接openGauss
4.(Python3)连接调试
安装psycopg2依赖.
pip3 install psycopg2
测试创建表,并插入数据,查询数据。
import psycopg2

# 创建连接对象
conn = psycopg2.connect(database="postgres", user="gaussdb", password="Root@123", host="203.6.234.202", port="15432")
cur = conn.cursor()  # 创建指针对象
# 创建表
cur.execute("CREATE TABLE students(id integer,name varchar,gender varchar);")
# 插入数据
cur.execute("INSERT INTO students(id,name,gender) VALUES(%s,%s,%s)", (1, '张三', 'M'))
cur.execute("INSERT INTO students(id,name,gender) VALUES(%s,%s,%s)", (2, '李四', 'F'))
# 获取结果
cur.execute('SELECT * FROM students')
results = cur.fetchall()
print(results)
# 关闭连接
conn.commit()
cur.close()
运行结果:
[(1, '张三', 'M'), (2, '李四', 'F')]