Spring的两大核心技术就是IOC和AOP。那么什么是IOC呢?
如何理解IOC Ioc—Inversion of Control,即“控制反转”,不是什么技术,而是一种设计思想。在Java开发中,Ioc意味着将你设计好的对象交给容器控制,而不是传统的在你的对象内部直接控制。简而言之,类中要用到的属性不需要自己new出来,而是通过IOC容器自动注入的。
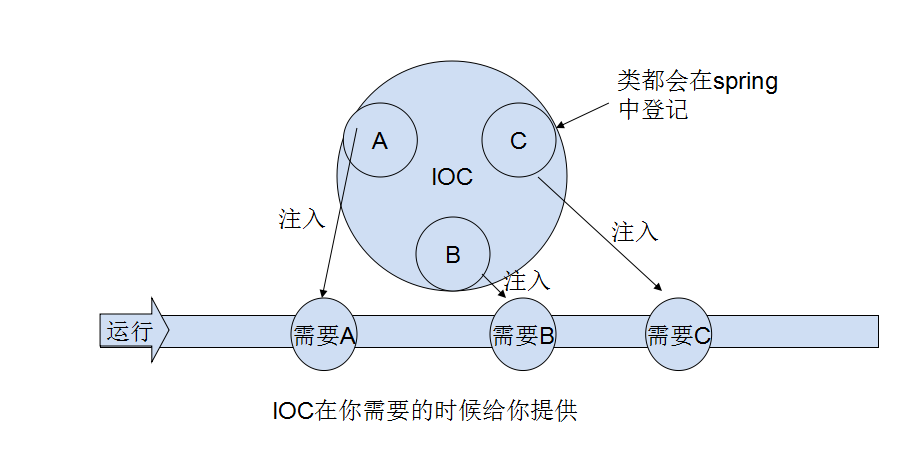
其原理如下图所示:
举个简单的例子,生活中我们是如何找女朋友的?常见的情况是,我们到处去看哪里有长得漂亮身材又好的mm,然后打听她们的兴趣爱好、qq号、电话号、ip号、iq号………,想办法认识她们,投其所好送其所要,然后嘿嘿……这个过程是复杂深奥的,我们必须自己设计和面对每个环节。传统的程序开发也是如此,在一个对象中,如果要使用另外的对象,就必须得到它(自己new一个,或者从JNDI中查询一个),使用完之后还要将对象销毁(比如Connection等),对象始终会和其他的接口或类藕合起来。
那么IoC是如何做的呢?有点像通过婚介找女朋友,在我和女朋友之间引入了一个第三者:婚姻介绍所。婚介管理了很多男男女女的资料,我可以向婚介提出一个列表,告诉它我想找个什么样的女朋友,比如长得像李嘉欣,身材像林熙雷,唱歌像周杰伦,速度像卡洛斯,技术像齐达内之类的,然后婚介就会按照我们的要求,提供一个mm,我们只需要去和她谈恋爱、结婚就行了。简单明了,如果婚介给我们的人选不符合要求,我们就会抛出异常。整个过程不再由我自己控制,而是有婚介这样一个类似容器的机构来控制。Spring所倡导的开发方式就是如此,所有的类都会在spring容器中登记,告诉spring你是个什么东西,你需要什么东西,然后spring会在系统运行到适当的时候,把你要的东西主动给你,同时也把你交给其他需要你的东西。所有的类的创建、销毁都由spring来控制,也就是说控制对象生存周期的不再是引用它的对象,而是spring。对于某个具体的对象而言,以前是它控制其他对象,现在是所有对象都被spring控制,所以这叫控制反转。
下面我们通过实例代码,来演示IOC如何注入属性。
项目目录结构图如下:

在上节实例的基础上完成。 步骤:
1.添加Car实体类。 在com.entity下创建Car实体类。
package com.entity;

public class Car {

    private String brand; //汽车品牌
    private String color; //汽车颜色

    public Car() {
    }

    public Car(String brand, String color) {
        this.brand = brand;
        this.color = color;
    }

    public String getBrand() {
        return brand;
    }

    public void setBrand(String brand) {
        this.brand = brand;
    }

    public String getColor() {
        return color;
    }

    public void setColor(String color) {
        this.color = color;
    }

    @Override
    public String toString() {
        return "Car{" +
                "brand='" + brand + '\'' +
                ", color='" + color + '\'' +
                '}';
    }
}
2.修改 Person实体类,添加car属性。 在com.entity中,修改Person类,添加一个car属性,表示一个人拥有一辆汽车。
package com.entity;

import org.springframework.beans.factory.annotation.Autowired;

public class Person {

    private String name;
    private String gender;
    private int age;
    //根据类型自动注入
    @Autowired
    private Car car;

    public Person() {
    }

    public Person(String name, String gender, int age) {
        this.name = name;
        this.gender = gender;
        this.age = age;
    }

    public String getName() {
        return name;
    }

    public void setName(String name) {
        this.name = name;
    }

    public String getGender() {
        return gender;
    }

    public void setGender(String gender) {
        this.gender = gender;
    }

    public int getAge() {
        return age;
    }

    public void setAge(int age) {
        this.age = age;
    }

    public Car getCar() {
        return car;
    }

    public void setCar(Car car) {
        this.car = car;
    }

    @Override
    public String toString() {
        return "Person{" +
                "name='" + name + '\'' +
                ", gender='" + gender + '\'' +
                ", age=" + age +
                ", car=" + car +
                '}';
    }
}
3.在SpringConfiguration类中,配置一个汽车bean.
package com.config;

import com.entity.Car;
import com.entity.Person;
import org.springframework.context.annotation.Bean;
import org.springframework.context.annotation.ComponentScan;
import org.springframework.context.annotation.Configuration;

@Configuration
@ComponentScan(basePackages=("com"))
public class SpringConfiguration {

    @Bean("p1")
    public Person getPerson(){
        return new Person("zhangsan","男",20);
    }

    @Bean("car1")
    public Car getCar(){
        return new Car("BMW","black");
    }
}
4.运行测试
package com.test;

import com.config.SpringConfiguration;
import com.entity.Person;
import org.springframework.context.ApplicationContext;
import org.springframework.context.annotation.AnnotationConfigApplicationContext;
import org.springframework.context.support.ClassPathXmlApplicationContext;

public class SpringDemo {

    public static void main(String[] args) {

        AnnotationConfigApplicationContext context = new AnnotationConfigApplicationContext(SpringConfiguration.class);
        Person person = (Person) context.getBean("p1");
        System.out.println(person);
    }

}
运行结果:

我们可以看出Person类的car属性值是自动注入的。
IOC和DI的关系
DI—Dependency Injection,即“依赖注入”:组件之间依赖关系由容器在运行期决定,形象的说,即由容器动态的将某个依赖关系注入到组件之中。依赖注入的目的并非为软件系统带来更多功能,而是为了提升组件重用的频率,并为系统搭建一个灵活、可扩展的平台。通过依赖注入机制,我们只需要通过简单的配置,而无需任何代码就可指定目标需要的资源,完成自身的业务逻辑,而不需要关心具体的资源来自何处,由谁实现。
IoC和DI由什么关系呢?其实它们是同一个概念的不同角度描述,由于控制反转概念比较含糊(可能只是理解为容器控制对象这一个层面,很难让人想到谁来维护对象关系),所以2004年大师级人物Martin Fowler又给出了一个新的名字:“依赖注入”,相对IoC 而言,“依赖注入”明确描述了“被注入对象依赖IoC容器配置依赖对象”。