1.什么是MVC
MVC即Model-View-Controller(模型-视图-控制器)是一种软件设计模式,最早出现在Smalltalk语言中,后被Sun公司推荐为Java EE平台的设计模式。
MVC把应用程序分成了上面3个核心模块,这3个模块又可被称为业务层-视图层-控制层。顾名思义,它们三者在应用程序中的主要作用如下:
- 业务层:负责实现应用程序的业务逻辑,封装有各种对数据的处理方法。它不关心它会如何被视图层显示或被控制器调用,它只接受数据并处理,然后返回一个结果。
- 视图层:负责应用程序对用户的显示,它从用户那里获取输入数据并通过控制层传给业务层处理,然后再通过控制层获取业务层返回的结果并显示给用户。
- 控制层:负责控制应用程序的流程,它接收从视图层传过来的数据,然后选择业务层中的某个业务来处理,接收业务层返回的结果并选择视图层中的某个视图来显示结果。
可以用下图来表示MVC模式中三者之间的关系:
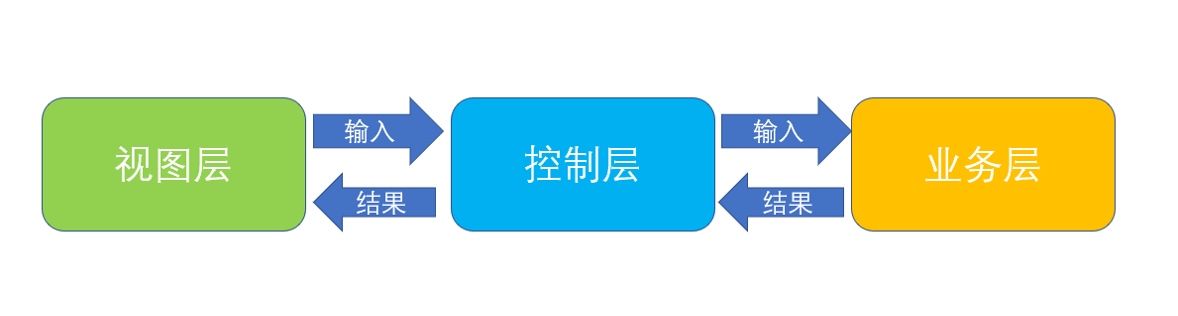
在上图中Servlet用来处理请求的事务,充当了控制器(Controller即“C”)的角色,Servlet负责响应客户对业务逻辑的请求并根据用户的请求行为,决定将哪个视图(jsp或者html页面)发送给客户。静态页面处于表现层,也就是视图(View即“V”)的角色。JavaBean则负责数据的处理,也就是模型(业务层)(Model即“M”)的角色 Servlet+(JSP/HTML)+JavaBean(MVC)模式适合开发复杂的web应用,在这种模式下,servlet负责处理用户请求,静态页面负责数据显示,javabean负责封装数据实现业务逻辑。 Servlet+JSP+JavaBean模式程序各个模块之间层次清晰,web开发推荐采用此种模式。
2.MVC实现用户登录的小例子
实现步骤:
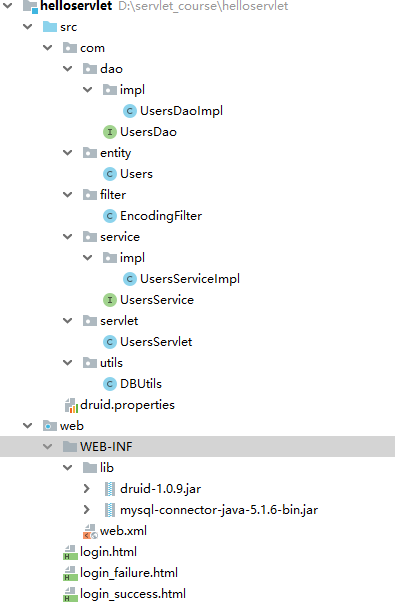
实例目录结构总览:
1)实现视图层。分别是login.html,login_success.html,login_failure.html login.html
<!DOCTYPE html>
<html lang="zh">
<head>
    <meta charset="UTF-8">
    <title>Title</title>
    <style>
        #loginDiv{
            margin: 0px auto;
            width: 300px;
            height: auto;
        }
        table,td{
            width: 280px;
            border-collapse:collapse;
            text-align: center;
        }
    </style>
</head>
<body>
<div id="loginDiv">
    <form action="users?action=login" method="post">
        <table>
            <tr>
                <td>用户名:</td>
                <td><input type="text" name="username" value=""/></td>
            </tr>
            <tr>
                <td>密码:</td>
                <td><input type="password" name="password" value=""/></td>
            </tr>
            <tr>
                <td colspan="2">
                    <input type="submit" value="登录">
                </td>
            </tr>
        </table>
    </form>
</div>
</body>
</html>
login_success.html
<!DOCTYPE html>
<html lang="zh">
<head>
    <meta charset="UTF-8">
    <title>Title</title>
</head>
<body>
<h1>登录成功</h1>
<hr>
</body>
</html>
login_failure.html
<!DOCTYPE html>
<html lang="zh">
<head>
    <meta charset="UTF-8">
    <title>Title</title>
</head>
<body>
<h1>登录失败</h1>
<hr>
</body>
</html>
2)实现实体层,对应users表的实体类。
package com.entity;

public class Users {
    private int uid; //用户编号
    private String username; //用户名
    private String password;  //密码


    public Users() {
    }

    public Users(int uid, String username, String password) {
        this.uid = uid;
        this.username = username;
        this.password = password;
    }

    @Override
    public String toString() {
        return "Users{" +
                "uid=" + uid +
                ", username='" + username + '\'' +
                ", password='" + password + '\'' +
                '}';
    }
}
3)复制druid.properties到src目录, 导入mysql和Druid驱动,导入JDBC课程中使用过的数据库工具类DBUtils。相关内容请参考《JDBC基础教程》的druid数据库连接池一节的内容。
4)实现业务逻辑接口层。分别有UsersDao,UsersDaoImpl类。 UsersDao
package com.dao;

public interface UsersDao {

    //用户登录接口
    public boolean login(String username,String password);
}
UsersDaoImpl
package com.dao.impl;

import com.dao.UsersDao;
import com.utils.DBUtils;
import java.sql.ResultSet;
import java.util.ArrayList;
import java.util.List;

public class UsersDaoImpl implements UsersDao {

    @Override
    public boolean login(String username, String password) {
        String sql = "select * from users where username = ? and password=?";
        List argList = new ArrayList();
        ResultSet rs = null;
        try{
            argList.add(username);
            argList.add(password);
            rs = DBUtils.executeQuery(sql,argList);
            //如果rs.next==true,说明找到了登录用户,则登录成功!
            if(rs.next()){
               return true;
            }
            return false;
        }catch(Exception ex){
            ex.printStackTrace();
            return false;
        }finally{
            DBUtils.closeAll();
        }
    }
}
5)实现服务层。对应UsersService和UsersServiceImpl
UsersService
package com.service;

public interface UsersService {

    //用户登录接口
    public boolean login(String username,String password);
}
UsersServiceImpl
package com.service.impl;
import com.dao.UsersDao;
import com.dao.impl.UsersDaoImpl;
import com.service.UsersService;

public class UsersServiceImpl implements UsersService {

    private UsersDao usersDao = new UsersDaoImpl();

    @Override
    public boolean login(String username, String password) {
        return usersDao.login(username,password);
    }
}
6)实现控制层。对应UsersServlet.
package com.servlet;

import com.service.UsersService;
import com.service.impl.UsersServiceImpl;

import javax.servlet.ServletException;
import javax.servlet.annotation.WebServlet;
import javax.servlet.http.HttpServlet;
import javax.servlet.http.HttpServletRequest;
import javax.servlet.http.HttpServletResponse;
import java.io.IOException;

@WebServlet(name = "UsersServlet",value="/users")
public class UsersServlet extends HttpServlet {

    private String action = "queryById";

    private UsersService usersService = new UsersServiceImpl();

    protected void doPost(HttpServletRequest request, HttpServletResponse response) throws ServletException, IOException {
         if(request.getParameter("action")!=null){
             this.action = request.getParameter("action");
         }

         switch(this.action){
             case "login":
                 login(request,response);
                 break;
         }
    }

    protected void doGet(HttpServletRequest request, HttpServletResponse response) throws ServletException, IOException {
         doPost(request,response);
    }

    //用户登录业务逻辑
    private void login(HttpServletRequest request, HttpServletResponse response)throws ServletException, IOException{
          String username = request.getParameter("username");
          String password = request.getParameter("password");

          if(usersService.login(username,password)){
              response.sendRedirect(request.getContextPath()+"/login_success.html");
          }else{
              response.sendRedirect(request.getContextPath()+"/login_failure.html");
          }
    }
}
7)在web.xml中,把login.html设置为欢迎页。
    <welcome-file-list>
        <welcome-file>login.html</welcome-file>
    </welcome-file-list>
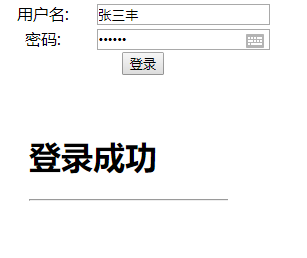
8)测试
启动tomcat,测试登录效果。
运行效果: