在现代 Web 开发中,API 是前后端分离架构的核心。FastAPI 凭借其高性能、简洁的语法和自动文档生成功能,成为 Python 开发者的首选框架。
1.FastAPI 介绍和安装
FastAPI 是一个基于 Python 3.8+ 的现代 Web 框架,专注于构建高性能 RESTful API。其核心特点包括:
- 基于 Starlette 和 Pydantic:提供异步支持和严格的数据验证。
- 自动生成 API 文档:内置 Swagger UI 和 ReDoc,开发者无需手动维护文档。
- 类型提示(Type Hints):利用 Python 的类型系统实现输入参数验证和代码提示。
FastAPI 的优势:
| 特性 | 说明 |
|---|---|
| 高性能 | 异步处理能力(ASGI)支持高并发,性能媲美 Node.js 和 Go。 |
| 开发效率高 | 通过类型提示和自动文档生成,减少代码冗余和调试时间。 |
| 生态完善 | 可无缝集成 SQLAlchemy、OAuth2、JWT 等常用库。 |
FastAPI的核心依赖:
在 fastapi 的依赖中,有三个核心依赖: 1. Pydantic:pydantic 处理所有数据验证、数据序列化以及基于 JSON Schema 的自动模型文档。 2. Starlette:Starlette 是一个轻量级的 ASGI 框架 / 工具包,非常适合用 Python 构建异步 Web服务。FastAPI 就是基于 Starlette 扩展而来的,FastAPI 提供的 Request 请求报文更是直接使用了 Starlette 的 Request 。 3. Uvicorn:Uvicorn 是一个轻量级的 ASGI 服务器,基于 uvloop 和 httptools 实现,运行速度极快。
ASGI 被称为异步服务器网关接口,和 WSGI 一样,二者都是为 Python 语言定义的 Web 服务器和 Web 应用之间的通用接口。 ASGI 向后兼容了 WSGI,可以认为是 SWGI 的扩展,并且提供异步特性和WebSocket 支持。
总的来说,FastAPI 框架集众框架之所长,不仅具有 Flask / Django 框架的 Web 核心功能,并且兼具异步特点,具有同步和异步两种运行模式。
FastAPI环境安装:
#步骤 1:安装依赖库
# FastAPI 依赖 Python 3.8 及更⾼版本
pip install fastapi
#步骤 1:安装uvicorn服务器
pip install "uvicorn[standard]"  # 安装 ASGI 服务器
第一个FastAPI入门案例:
first_web.py
from fastapi import FastAPI

app = FastAPI()

@app.get("/")
async def index():
    return {"msg": "hello world"}

@app.get("/items/{item_id}")
async def get_item(item_id: int, q: str=None):
    return {"item_id": item_id, "q": q}
使用以下命令启动web应用。
#reload 参数可以在代码更新后自动重启服务,在开发时方便我们随时验证 API。
uvicorn first_web:app --reload
出现以下信息说明web 服务器启动成功。
INFO:     Uvicorn running on http://127.0.0.1:8000 (Press CTRL+C to quit)
INFO:     Started reloader process [20452] using WatchFiles
INFO:     Started server process [17652]
INFO:     Waiting for application startup.
INFO:     Application startup complete.
FastAPI 为我们自动生成了两种形式的 API 文档: 1. 交互式 API 文档 2. 备用 API 文档
访问网址 http://127.0.0.1:8000/docs,打开交互式 API 文档(注意:需要使用翻墙软件):
2.读取请求中的各类数据
2.1路径参数
FastAPI 使用格式化字符串中的 {} 声明路径参数,即 URL 变量。比如上文用到的get_item 视图函数对应的 URL 规则中就使用了路径变量 item_id。
@app.get("/items/{item_id}")
async def get_item(item_id: int, q: str = None):
    return {"item_id": item_id
URL 变量 item_id 的值会作为参数 item_id 传递到视图函数 get_item() 。此外,参数 item_id 使用了标准的 Python 类型注解,标注类型为 int;FastAPI将利用类型检查自动完成请求解析,将 item_id 转换为整型。如果类型转换失败,将返回 422 错误响应:
字符串 hello 无法被转换为整型,因此类型校验失败,返回的错误消息也清晰地指出了这一点,还是非常友好的。 最后,我们需要了解一下路由的匹配顺序: 路由匹配是按顺序进行的,这意味着如果某个静态的 URL 刚好可以匹配到另一个动态的 URL 规则,为了能够正确触发静态 URL 规则对应的视图函数,应确保该 URL在动态 URL 规则之前声明。
比如:一个固定 URL 的 /items/all 获取所有的商品编号信息。
/items/{item_id} 获取指定 ID 的商品数据。
我们需要确保 /items/all 路径在 /items/{item_id} 路径之前已声明,否则/items/{item_id} 也将匹配 /items/all,总结一句话:静态路由要放在动态路由的前面。
from fastapi import FastAPI

app = FastAPI()

@app.get("/")
async def index():
    return {"msg": "hello world"}

#要确保静态路由在动态路由前面
@app.get("/items/all")
async def get_all_item():
    return {"item_ids": [1000,1001,1002,1003]}

@app.get("/items/{item_id}")
async def get_item(item_id: int, q: str=None):
    return {"item_id": item_id, "q": q}
2.2查询参数
当视图函数声明不属于 URL 路径参数的其他参数时,FastAPI 将自动解析为 Query查询参数。查询参数即 URL 地址中 ? 之后的一系列用 & 分隔的 key-value 键值对。
比如,下面用于处理集合资源访问的视图函数就定义了两个查询参数:
@app.get("/items/pager")
async def get_pager_items(pageNo: int=1, isLimit: bool=False):
    return {"pageNo": pageNo, "isLimit": isLimit}
查询参数作为 URL 的一部分,默认的类型也为字符串,因此需要借助类型注解转换为 int 类型,FastAPI 将依据注解的类型来验证传入的参数。在进行布尔型类转换时,对于 1 yes True 这样的值,也会自动转换为 true ;相反对于 0 no False 会自动转换为 false 。
访问以下链接: http://127.0.0.1:8000/items/pager?pageNo=100&isLimit=1
可以看到查询参数被正确解析到了视图函数的关键字参数中。
{
  "pageNo": 100,
  "isLimit": true
}
此外,因为我们在定义视图函数时,为查询参数 pageNo 和 isLimit 指定了默认值,因此查询参数将变为可选的,缺省时将使用默认值。
访问以下链接: http://127.0.0.1:8000/items/pager
返回的响应结果为:
{
  "pageNo": 1,
  "isLimit": false
}
2.3请求体数据
定义请求体需要使用 pydantic 模型,不能通过 GET 请求发送请求体。发送请求体时必须通过以下方法:
- POST
- PUT
- DELETE
- PATCH
下面,我们使用 pydantic 模块提供的 BaseModel 创建一个数据模型类。
from pydantic import BaseModel

class Item(BaseModel):
    item_id: int
    name: str = None
    description: str = None
    price: float = 0.0
和查询参数类似,模型类中定义的属性字段如果不是必需字段的话,可以设定默认值;否则该字段就是必须的。
下来新增添加商品和修改商品两个路由。
from fastapi import FastAPI
from pydantic import BaseModel


class Item(BaseModel):
    item_id: int
    name: str = None
    description: str = None
    price: float = 0.0


app = FastAPI()


@app.get("/")
async def index():
    return {"msg": "hello world"}


# 要确保静态路由在动态路由前面
@app.get("/items/all")
async def get_all_item():
    return {"item_ids": [1000, 1001, 1002, 1003]}


@app.get("/items/pager")
async def get_pager_items(pageNo: int = 1, isLimit: bool = False):
    return {"pageNo": pageNo, "isLimit": isLimit}


@app.get("/items/{item_id}")
async def get_item(item_id: int, q: str = None):
    return {"item_id": item_id, "q": q}


@app.post("/items/")
async def create_item(item: Item):
    return item


@app.put("/items/{item_id}")
async def modify_item(item_id: int, item: Item):
    return {'item_id': item_id, **item.dict()}
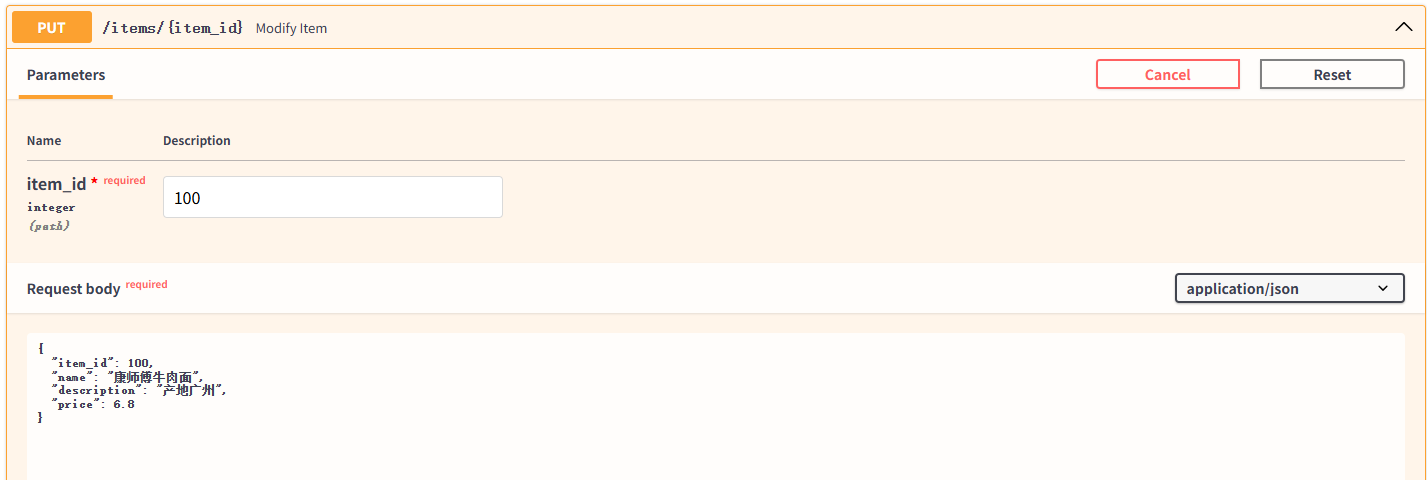
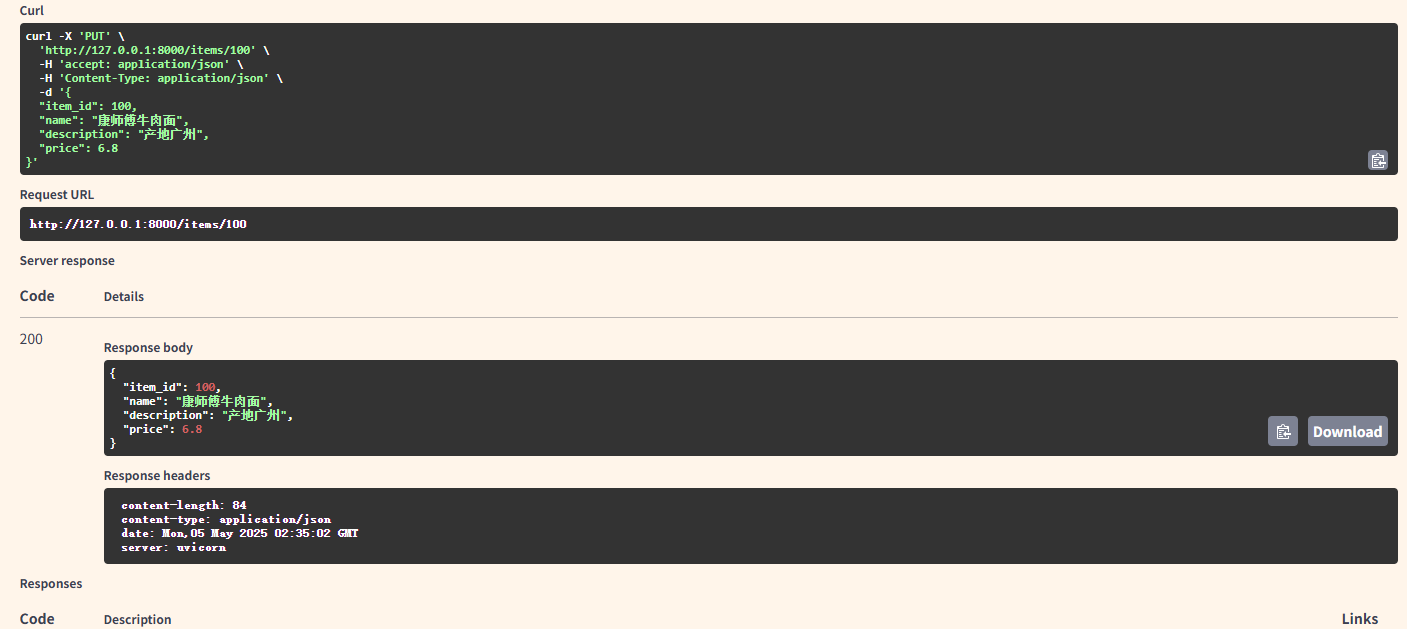
使用FastAPI的交互式文档测试添加商品接口,效果如下:
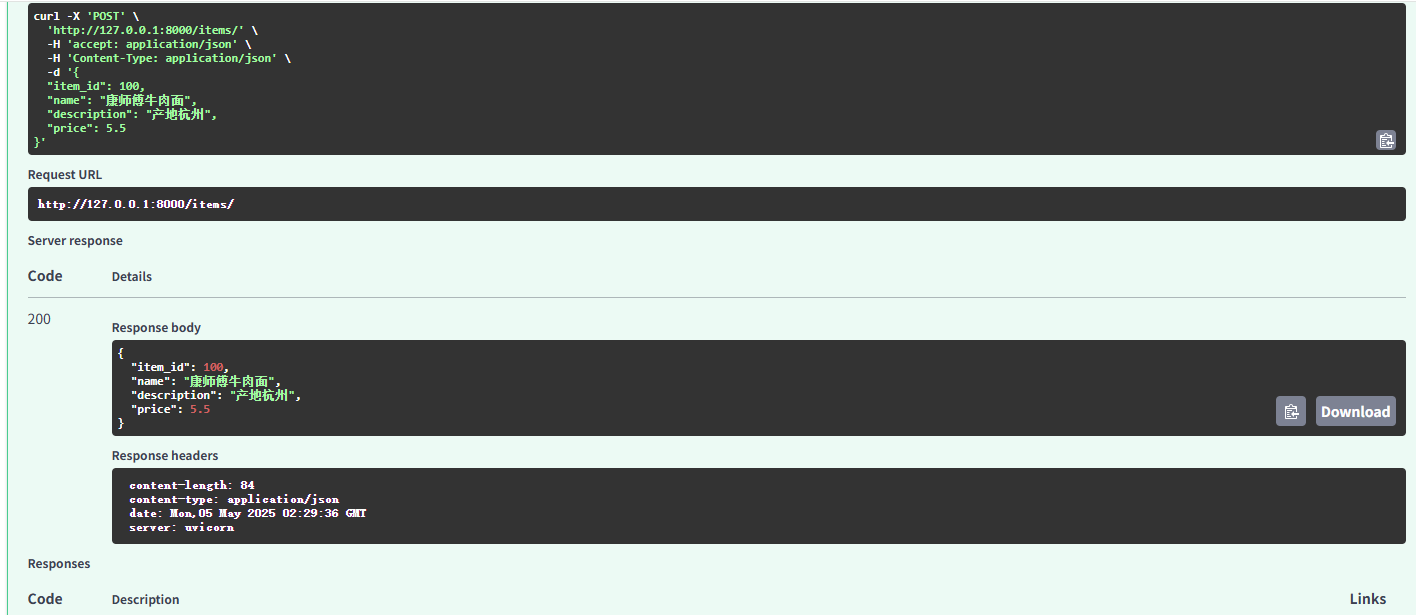
处理 PUT 请求的视图函数 modify_item 则不仅包含 JSON 格式的请求体,还定义了一个路径参数 item_id 。 使用FastAPI的交互式文档测试添加商品接口,效果如下:
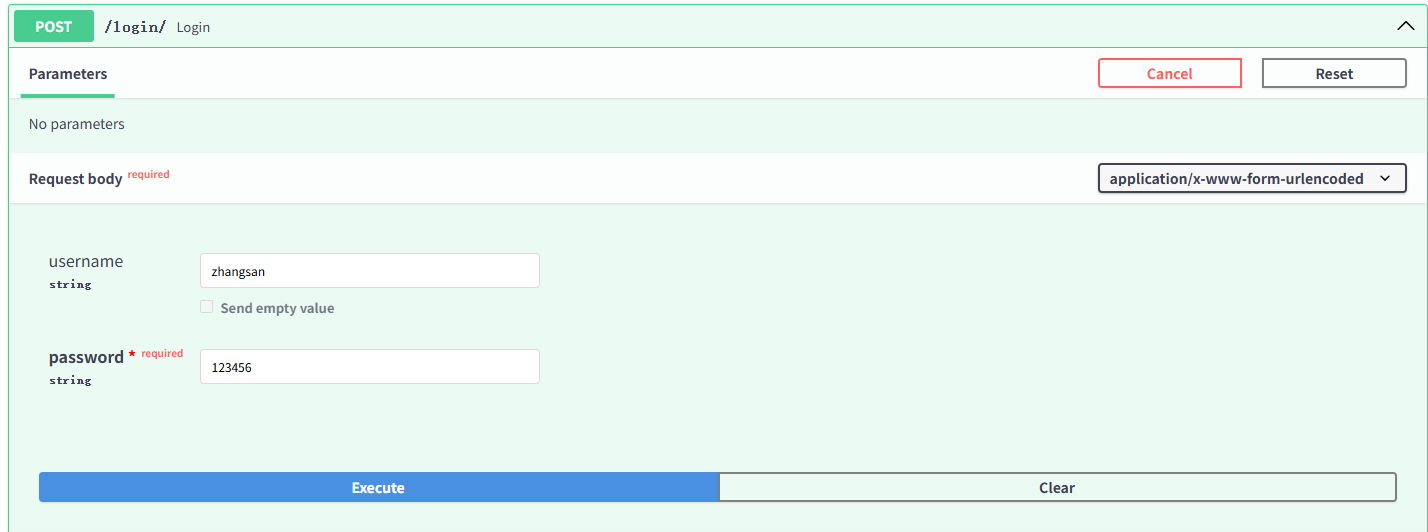
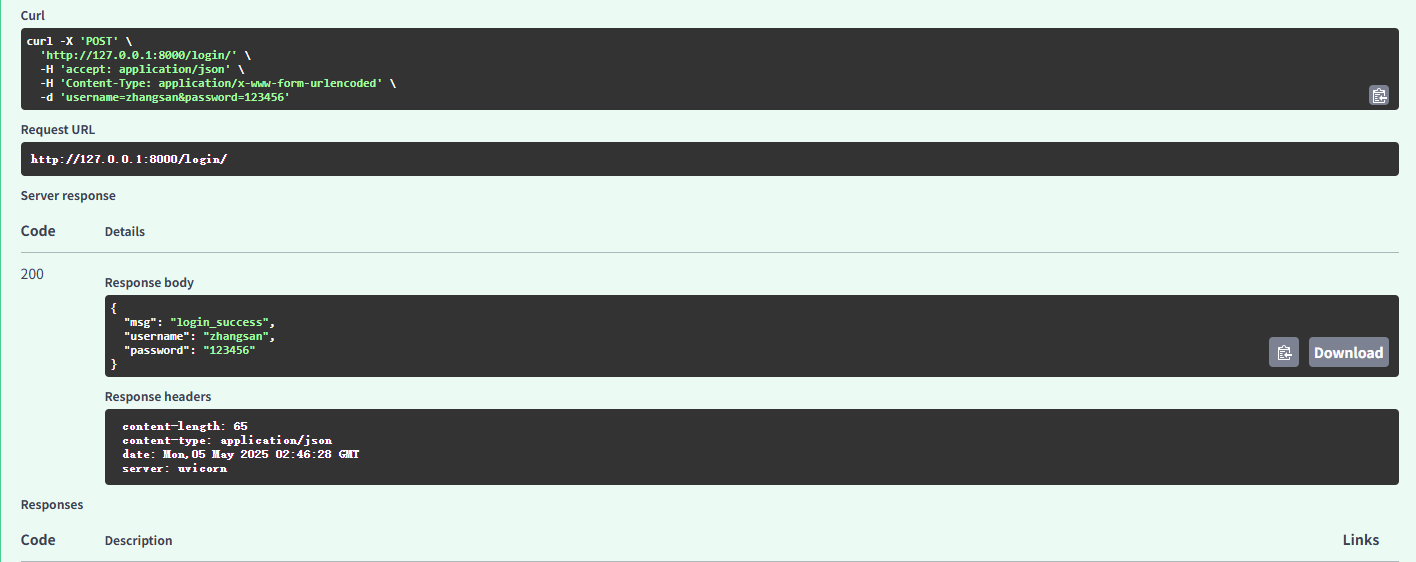
2.4表单数据
当视图函数需要接收表单字段而非 JSON 时,需要明确使用 Form 类,否则参数将被解析为查询参数或 JSON 主体。
from fastapi import FastAPI, Form

@app.post("/login/")
async def login(username: str = Form('admin'), password: str = Form()):
    return {"msg": "login_success", "username": username, "password": password}
HTML 表单在将数据提交到服务器时,会对数据进行特殊编码处理,常用的编码类型为媒体类型:
application/x-www-form-urlencoded
当包含文件上传字段时,将被编码为 multipart/form-data 类型。
下面,我们在交互式文档中测试上述用户登录的 POST 请求,返回响应效果如下:
2.5 一个简单的超市管理系统的案例
from fastapi import FastAPI
from pydantic import BaseModel


class Item(BaseModel):
    item_id: int
    name: str = None
    description: str = None
    price: float = 0.0


items_list=[]

app = FastAPI()


@app.get("/")
async def index():
    return {"msg": "欢迎使用重庆三峡超市管理系统"}


# 要确保静态路由在动态路由前面
@app.get("/items/all")
async def get_all_item():
    return {"code":200,"msg":"查询商品资料成功","data": items_list}


@app.get("/items/{item_id}")
async def get_item(item_id: int):
    for item in items_list:
        if item.item_id == item_id:
          return {"item": item}
    return {"item": None}


@app.post("/items/")
async def create_item(item: Item):
    items_list.append(item)

    return {"code":200,"msg":"新增商品成功","data":items_list}


@app.put("/items/{item_id}")
async def modify_item(item_id: int, item: Item):
    for temp in items_list:
        if temp.item_id == item_id:
          temp.item_id = item_id
          temp.name = item.name
          temp.description = item.description
          temp.price = item.price
          return {"code":200,"msg":"修改商品成功","item": temp}
    return {"code":200,"msg":"修改商品成功","item": None}


@app.delete("/items/{item_id}")
async def delete_item(item_id: int):

    for temp in items_list:
        if temp.item_id == item_id:
          items_list.remove(temp)
          return {"code":200,"msg":"删除商品成功"}
    return {"code":200,"msg":"删除商品成功"}
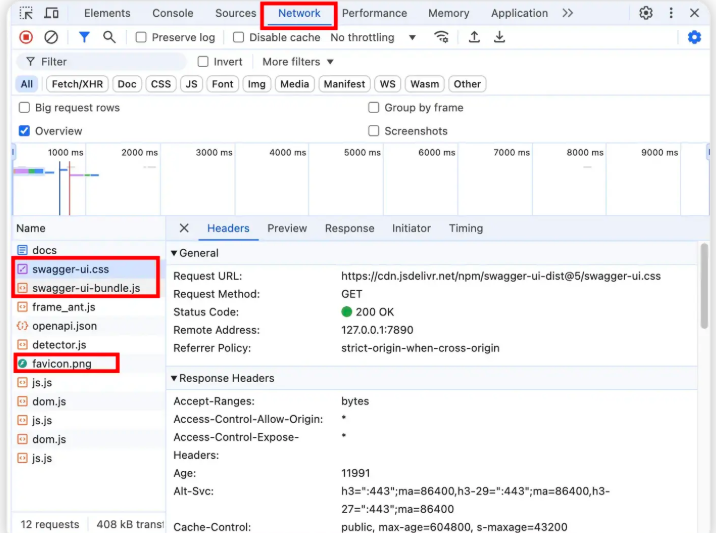
3. FastAPI访问不了接口文档的解决方法
FastAPI的docs接口文档页面加载时需要加载国外CDN网站的一些静态资源,由于网络限制或者工作环境无法访问外网的时候,你是打不开 FastAPI 项目的对接文档的。因为 FastAPI 的文档界面(如 /docs 和 /redoc)依赖于外部的JavaScript和 CSS库。
解决思路:通过配置FastAPI使用本地静态文件。
代码实现如下:
from fastapi import FastAPI
from fastapi.openapi.docs import get_swagger_ui_html
from starlette.staticfiles import StaticFiles

app = FastAPI(
    docs_url=None
)

# 挂载静态文件路径
app.mount("/static", StaticFiles(directory="static"), name="static")

@app.get("/docs", include_in_schema=False)
async def custom_swagger_ui_html():
    return get_swagger_ui_html(
        openapi_url=app.openapi_url,
        title="Custom Swagger UI",
        swagger_js_url="/static/swagger-ui-bundle.js",
        swagger_css_url="/static/swagger-ui.css"
    )

if __name__ == "__main__":
    import uvicorn
    uvicorn.run('main:app', host="127.0.0.1", port=8080, reload=True, workers=1)
我需要下载下图的三个资源文件(下载 swagger-ui.css、swagger-ui-bundle.js 和 favicon.png 这3个文件。)。下载地址如下:
https://pan.baidu.com/s/1JLv4s1paITZ6mHysGhwQMg?pwd=q5xr
我们只需要将下载好的静态资源文件放在项目的 /static 目录里。放在其他目录也行,你自己定就好。没有 /static 目录的也可以自己手动创建一个。