凹包特征检测
凹包特征检测
图像的凹包特征检测是一种用于提取复杂形状轮廓的技术,它能够更准确地反映物体的实际形状,尤其是当物体具有凹陷部分时。
1.凸包
凸包(Convex Hull)是一个计算机几何图形学中的概念, 简单来说, 给定二维平面点集, 凸包就是能够将最外层的点连接起来构成的凸多边形, 它能够包含点集中所有的点。在凸包中,任意两点之间的连线都不会超出多边形的边界。物体的凸包检测场应用在物体识别、手势识别及边界检测等领域。
例如,一个手的轮廓的凸包会是一个简单的凸多边形,但无法反映手指之间的凹陷部分。

凹包特征检测在以下领域有广泛应用: - 物体识别:能够更准确地描述物体的轮廓,尤其是当物体具有复杂的凹陷部分。 - 手势识别:例如在手势识别中,凹包可以更好地捕捉手指之间的凹陷区域。 - 边界检测:在图像分割和边界检测中,凹包能够提供更精细的边界信息。
2.OpenCV 图像的凹包特征检测
在 OpenCV 中,可以使用 cv2.convexHull 函数来计算一个点集的凸包。虽然这直接给出的是凸包,但你可以通过这种方式找到凹包的候选区域。
下面是一个使用Python和OpenCV对图片进行凸包检测的例子。这个示例将涵盖图像读取、灰度转换、Canny边缘检测、轮廓提取、凸包计算和绘制等步骤。
import cv2
import numpy as np
import matplotlib.pyplot as plt

# 读取图像
img = cv2.imread('./images/jpg/hand04.jpg')
if img is None:
    print("Error: 图像读取失败。")
    exit()

# 显示原始图像
plt.imshow(cv2.cvtColor(img, cv2.COLOR_BGR2RGB))
plt.title('Original Image')
plt.axis('off')
plt.show()

# 得到灰度图
img_gray = cv2.cvtColor(img, cv2.COLOR_BGR2GRAY)

# 应用Canny边缘检测
edges = cv2.Canny(img_gray, 100, 200)

# 提取轮廓
contours, hierarchy = cv2.findContours(edges, cv2.RETR_TREE, cv2.CHAIN_APPROX_SIMPLE)

# 绘制轮廓
img_contour = img.copy()
cv2.drawContours(img_contour, contours, -1, (0, 255, 0), 2)

# 显示轮廓图像
plt.imshow(cv2.cvtColor(img_contour, cv2.COLOR_BGR2RGB))
plt.title('Contours')
plt.axis('off')
plt.show()

# 凸包检测
hulls = []
for contour in contours:
    hull = cv2.convexHull(contour)
    hulls.append(hull)

# 绘制凸包
img_convex_hull = img.copy()
cv2.drawContours(img_convex_hull, hulls, -1, (0, 0, 255), 2)

# 显示凸包图像
plt.imshow(cv2.cvtColor(img_convex_hull, cv2.COLOR_BGR2RGB))
plt.title('Convex Hull')
plt.axis('off')
plt.show()

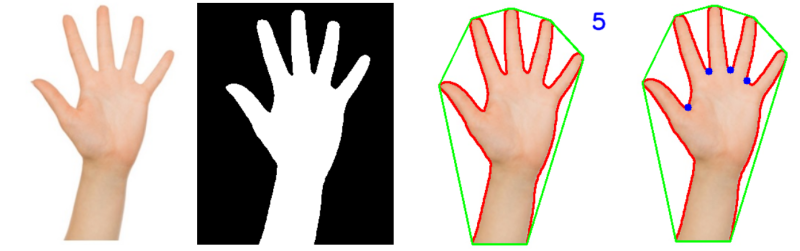
3.OpenCV 图像的凸包缺陷检测
凸包缺陷(Convexity Defects)是指一组点在其凸包和形状之间的偏差部分。换句话说,凸包缺陷是原始图形的轮廓与其凸包之间的差异区域。这些差异区域通常表现为图形中的凹陷部分。
下面是一个使用Python和OpenCV实现图片凸包缺陷检测的例子,读取一个手势图片并且实现手势识别。这个例子将包括图像读取、HSV色彩空间转换、轮廓检测、凸包计算与绘制、凸包缺陷检测等步骤。
import cv2
import os
import numpy as np

# 获取脚本的绝对路径
script_path = os.path.abspath(__file__)
# 获取脚本所在的目录
script_dir = os.path.dirname(script_path)
# 更改当前工作目录到脚本所在的目录
os.chdir(script_dir)


def show_img(img, WindowsName=None):
    """
    显示图片在窗口中,并等待用户关闭窗口。

    Args:
        img (numpy.ndarray): 要显示的图片,类型为numpy数组。
        WindowsName (str, optional): 窗口名称。默认为None,此时窗口名默认为'window'。

    Returns:
        None
    """

    cv2.imshow(WindowsName, img)
    cv2.waitKey(0)
    cv2.destroyAllWindows()


def detect_hand_contours_and_defects(img_path):
    """
    检测手部轮廓和缺陷。
    Args:
        img_path (str): 图片路径。
    Returns:
        None
    """
    img = cv2.imread(img_path)
    if img is None:
        print(f"Error: 图像 {img_path} 读取失败。")
        return
    # 显示原始图片
    show_img(img, WindowsName="src_img")

    # 转换为HSV色彩空间
    hsv_img = cv2.cvtColor(img, cv2.COLOR_BGR2HSV)

    # 提取肤色
    lower = np.array([0, 30, 100], dtype="uint8")
    upper = np.array([128, 255, 255], dtype="uint8")
    # 创建肤色掩膜
    skin_mask_hsv = cv2.inRange(hsv_img, lower, upper)
    # show_img(skin_mask_hsv, WindowsName="skin_mask")
    blurred_skin_mask = cv2.blur(skin_mask_hsv, (2, 2))
    # show_img(blurred_skin_mask, WindowsName="skin_mask")
    ret, thresh = cv2.threshold(blurred_skin_mask, 0, 255, cv2.THRESH_BINARY)
    show_img(thresh, WindowsName="skin_mask")

    # 查找轮廓
    contours, hierarchy = cv2.findContours(thresh, cv2.RETR_TREE, cv2.CHAIN_APPROX_SIMPLE)
    if contours:
        max_contour = max(contours, key=lambda x: cv2.contourArea(x))
        # 绘制最大轮廓
        cv2.drawContours(img, [max_contour], -1, (0, 0, 255), 2)
        # 在原图上展示轮廓
        # show_img(img, WindowsName="max_contours")

        # 对轮廓进行凸包检测
        hull = cv2.convexHull(max_contour)
        cv2.drawContours(img, [hull], -1, (0, 255, 0), 2)  # 绘制凸包
        show_img(img, WindowsName="hull")

        # 凸包缺陷检测
        hull_detect = cv2.convexHull(max_contour, returnPoints=False)  # 返回凸包缺陷
        defects = cv2.convexityDefects(max_contour, hull_detect)
        # 如果存在缺陷,则绘制
        if defects is not None:
            cnt = 0
            for i in range(defects.shape[0]):
                s, e, f, d = defects[i, 0]  # 获取缺陷信息, s, e, f分别表示起始点、终点、最远点, d表示距离
                start = tuple(max_contour[s][0])
                end = tuple(max_contour[e][0])
                far = tuple(max_contour[f][0])
                a = np.sqrt((end[0] - start[0]) ** 2 + (end[1] - start[1]) ** 2)  # 计算边长
                b = np.sqrt((far[0] - start[0]) ** 2 + (far[1] - start[1]) ** 2)  # 计算边长
                c = np.sqrt((end[0] - far[0]) ** 2 + (end[1] - far[1]) ** 2)  # 计算边长

                angle = np.arccos((b ** 2 + c ** 2 - a ** 2) / (2 * b * c))  # 计算角度

                if angle <= np.pi / 2:  # 角度小于90度,认为为手指
                    cnt += 1
                    # 绘制手指缺陷相关的图形
                    cv2.line(img, start, end, [0, 255, 0], 1)  # 绘制缺陷的起始和结束点之间的线
                    cv2.circle(img, far, 5, [255, 0, 0], -1)  # 绘制缺陷的远点(蓝色)

            # 仅在检测到手指缺陷时,才显示手指数量和绘制相关图形
            if cnt > 0:
                cnt += 1
                cv2.putText(img, str(cnt), (0, 50), cv2.FONT_HERSHEY_SIMPLEX, 1, (255, 0, 0), 2,
                            cv2.LINE_AA)  # 在原图上绘制手指数量
    show_img(img, WindowsName="defects")


def process_hand_image(img_path):
    """
    处理手部图像。
    Args:
        img_path (str): 图片路径。
    Returns:
        None
    """
    # 读取图片
    detect_hand_contours_and_defects(img_path)


if __name__ == '__main__':
    # 测试手部图像
    img_path = "./images/jpg/hand02.jpg"
    process_hand_image(img_path)