OpenCV+Dlib+Gradio的人脸识别系统
OpenCV+Dlib+Gradio的人脸识别系统
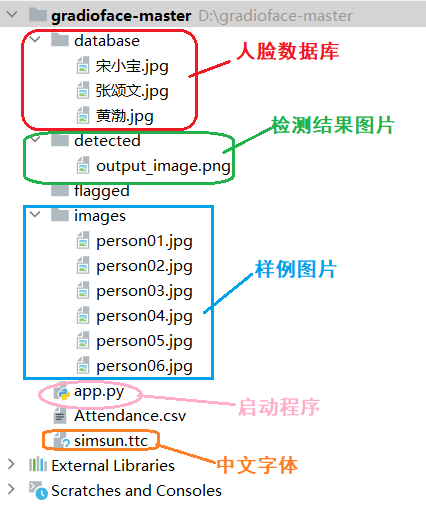
1.项目结构
项目结构截图如下:
2.安装依赖
pip install opencv-python -i https://pypi.tuna.tsinghua.edu.cn/simple
pip install numpy -i https://pypi.tuna.tsinghua.edu.cn/simple
pip install cmake -i https://pypi.tuna.tsinghua.edu.cn/simple
pip install dlib -i https://pypi.tuna.tsinghua.edu.cn/simple
pip install face_recognition -i https://pypi.tuna.tsinghua.edu.cn/simple
pip install gradio -i https://pypi.tuna.tsinghua.edu.cn/simple
3.程序实现
app.py
import cv2
import numpy as np
import face_recognition
import os
from datetime import datetime
import gradio as gr
from PIL import Image, ImageDraw, ImageFont
path = 'database' # 人像存储位置
images = []
className = []
myList = os.listdir(path) # 返回指定文件目录下的列表,这里返回的是人像图片
print(myList)
def cv2AddChineseText(img, text, position, textColor, textSize):
if (isinstance(img, np.ndarray)): # 判断是否OpenCV图片类型
img = Image.fromarray(cv2.cvtColor(img, cv2.COLOR_BGR2RGB))
# 创建一个可以在给定图像上绘图的对象
draw = ImageDraw.Draw(img)
# 字体的格式
fontStyle = ImageFont.truetype(
"simsun.ttc", textSize, encoding="utf-8") # simsun.ttc语言包放在程序同级目录下
# 绘制文本
draw.text(position, text, textColor, font=fontStyle)
# 转换回OpenCV格式
return cv2.cvtColor(np.asarray(img), cv2.COLOR_RGB2BGR)
for cl in myList: # 获取每张人像的名称
#curImg = cv2.imread(f'{path}/{cl}')
# 字符流转换字节流,这样可以读取中文文件名
with open(f'{path}/{cl}', 'rb') as f:
image_data = f.read()
curImg = cv2.imdecode(np.frombuffer(image_data, np.uint8), cv2.IMREAD_COLOR)
images.append(curImg)
className.append(os.path.splitext(cl)[0])
print(className)
def findEncodings(images): # 获取所有存储的人像编码
encodeList = []
for img in images:
img = cv2.cvtColor(img, cv2.COLOR_BGR2RGB)
encode = face_recognition.face_encodings(img)[0]
encodeList.append(encode)
return encodeList
def markAttendance(name): # 打卡,生成记录
with open('Attendance.csv', 'r+',encoding='utf-8') as f:
myDatalist = f.readlines() # 读取文件中所有的行
nameList = []
for line in myDatalist:
entry = line.split(',')
nameList.append(entry[0])
if name not in nameList:
now = datetime.now()
dtString = now.strftime('%H:%M:%S') # 将日期时间格式化成字符串
f.writelines(f'\n{name},{dtString}') # 将包含多个字符串的可迭代对象写入文件中,这里是记录人名
encodeListKnown = findEncodings(images)
print('encoding complete')
# 人脸检测函数
def face_rec(img):
imgs = cv2.cvtColor(img, cv2.COLOR_BGR2RGB)
faceCurFrame = face_recognition.face_locations(imgs) # 获取人脸位置信息
encodesCurFrame = face_recognition.face_encodings(imgs, faceCurFrame) # 获取人脸编码
for encodeFace, faceLoc in zip(encodesCurFrame, faceCurFrame): # zip函数,连接成字典
matches = face_recognition.compare_faces(encodeListKnown, encodeFace) # 人脸匹配度
faceDis = face_recognition.face_distance(encodeListKnown, encodeFace) # 欧式距离
# print(faceDis)
matchIndex = np.argmin(faceDis) # 返回数组中小元素的索引
if matches[matchIndex]:
name = className[matchIndex].upper()
print(name)
y1, x2, y2, x1 = faceLoc # 人脸位置
y1, x2, y2, x1 = y1 * 4, x2 * 4, y2 * 4, x1 * 4
cv2.rectangle(imgs, (x1, y1), (x2, y2), (0, 255, 0), 1)
cv2.rectangle(imgs, (x1, y2 - 35), (x2, y2), (0, 255, 0), cv2.FILLED)
#cv2.putText(imgs, name, (x1 + 6, y2 - 6), cv2.QT_FONT_NORMAL, 1, (255, 255, 255), 2)
imgs = cv2AddChineseText(imgs, name, (100, 100), (250, 242, 131), 30)
markAttendance(name) # 记录人名
filename = "detected/output_image.png"
cv2.imwrite(filename, imgs)
dest_img = ''
#cv2.imshow(str('Face_Detector'), img)
return filename
demo = gr.Interface(
fn = face_rec,
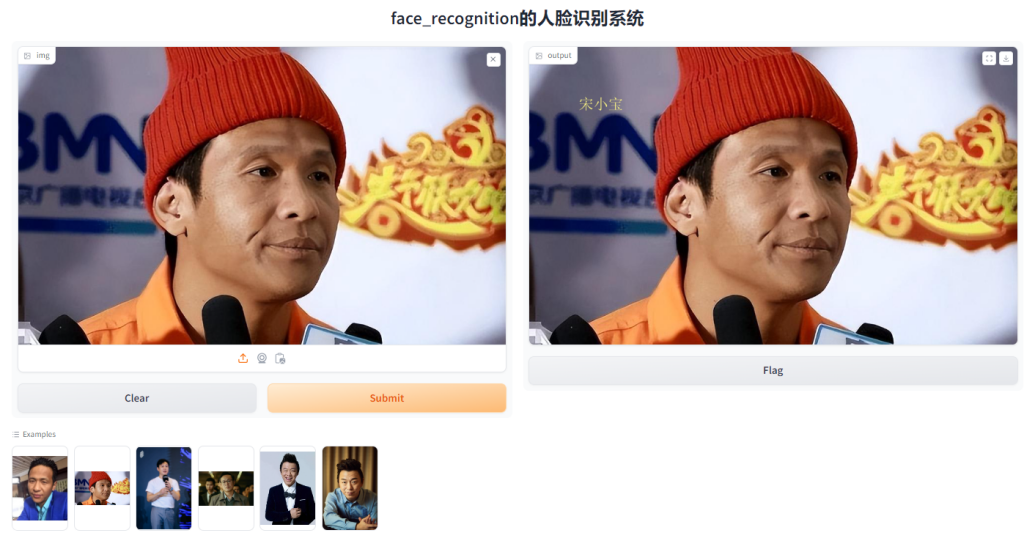
title='face_recognition的人脸识别系统',
inputs = gr.Image(),
outputs = "image",
examples=["images/person01.jpg", "images/person02.jpg", "images/person03.jpg","images/person04.jpg","images/person05.jpg","images/person06.jpg"],
)
if __name__ == "__main__":
demo.launch()
运行效果: