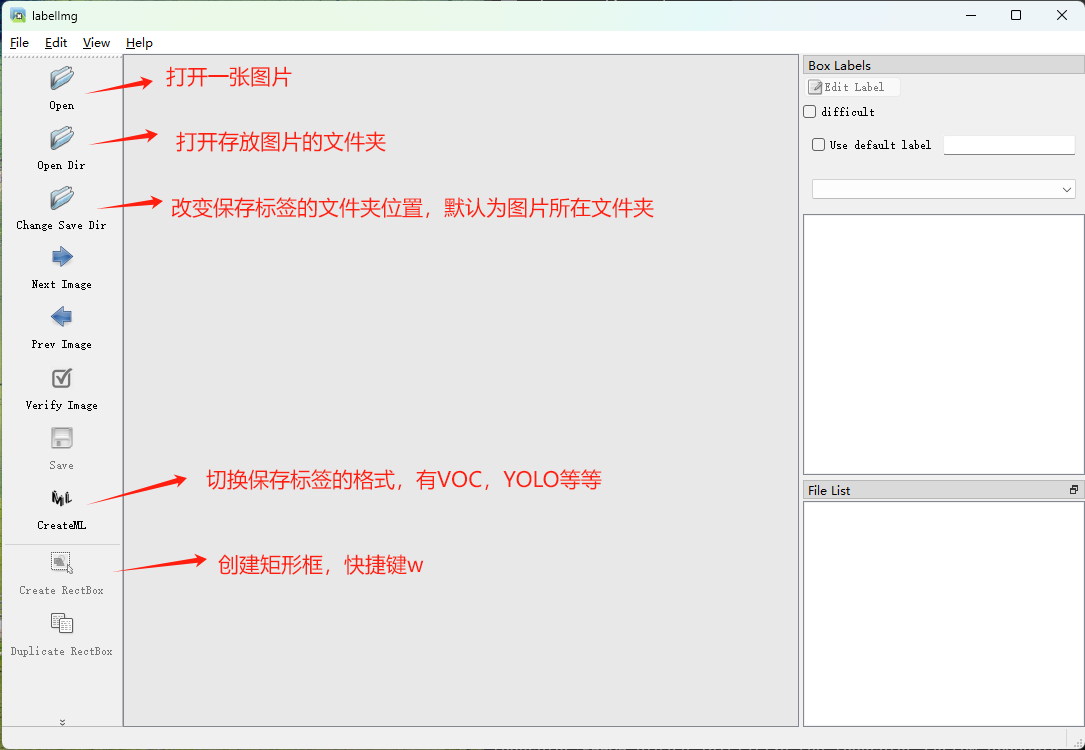
标注工具Labelimg安装与使用
标注工具Labelimg安装与使用
1.LabelImg 简介
LabelImg是一个开源的图形图像注释工具,用于创建边界/矩形框(适用于要标注物体的位置和大小)和多边形注释(适用于标注非规则形状的物体)。它是用Python写的,并使用Qt作为其图形界面。LabelImg能够在Windows、Linux和macOS等多个平台上运行,同时支持各种类型的图像文件格式,如JPG、PNG和BMP等(注:图片格式不是这几种的,可以使用格式工厂转一下即可)。
在LabelImg中,可以选择PASCAL VOC、YOLO和CreateML三种格式进行类别标注,生成的文件类型分别为:
PASCAL VOC  //xxx.XML文件(常用)
YOLO  //xxx.txt文件(常用)
CreateML  //xxx.json文件
2.Labelimg工具的安装
# 创建环境
# 注意:labelimg环境要求python版本必须<=3.9

conda create -n labelimg_env python=3.9.0

# 激活环境
conda activate labelimg_env

# 安装工具
pip install labelimg
3.Labelimg工具的使用
在刚刚创建的环境中直接输入 labelimg。
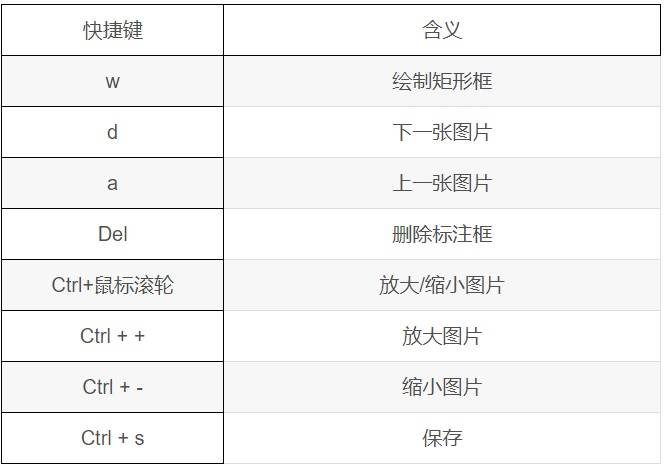
在Labelimg中比较常用的快捷键如下:
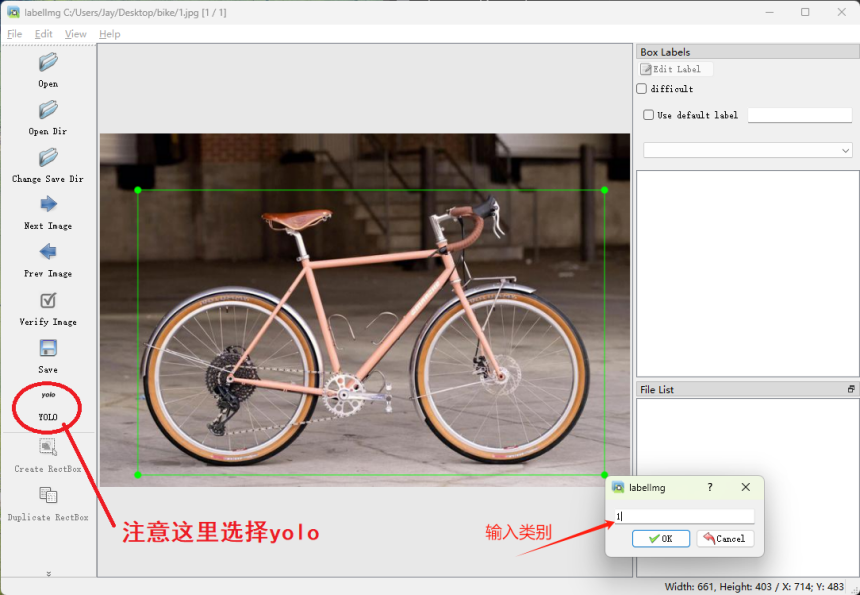
选择YOLO模式创建标签。
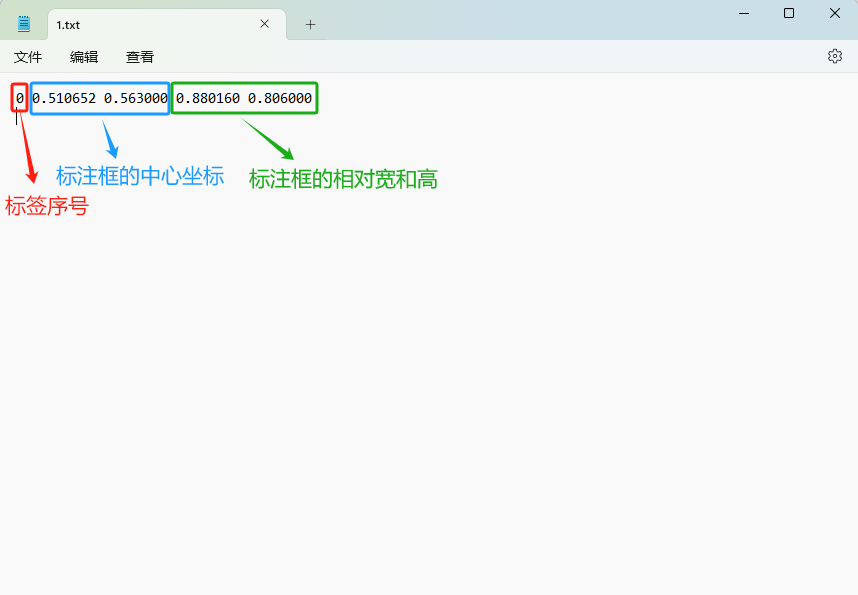
保存成功后,会在你选择保存标签的文件夹中默认生成两个txt文件:
- 存放标签信息的文件(XXX.txt);
- 存放标签类别的文件(classes.txt)
注意:存放标签信息的文件的文件名必须与图片名相同,内容由N行5列数据组成。
每一行代表标注的一个目标,通常包括五个数据,从左到右依次为:类别id、x_center、y_center、width、height。
其中: - 类别id代表标注目标的类别; - x_center和y_center代表标注框的相对中心坐标; - width和height代表标注框的相对宽和高。
注意,这里的中心点坐标、宽和高都是相对数据!!!
PascalVOC模式和PascalVOC模式的标签创建方式与YOLO类似,这里不再赘述。
4.YOLO格式文件与VOC格式文件相互转换
1).txt2xml
def Txt2XML(input_txt_dir, output_xml_dir, image_dir, class_txt):
    # 获取txt文件的目录列表
    txt_files = os.listdir(input_txt_dir)
    # 获取图像的目录列表
    image_files = os.listdir(image_dir)
    image_infos = []
    for txt_file in txt_files:
        file_name, file_ext = os.path.splitext(txt_file)
        for image_file in image_files:
            images = []
            image_name, image_ext = os.path.splitext(image_file)
            if image_ext == '.jpg':
                # 判断图像名是否与txt文件名相同
                if image_name == file_name:
                    images.append(image_file)
                    # 读取txt文件中的标注信息
                    with open(os.path.join(input_txt_dir, txt_file), 'r') as f:
                        bboxes = []
                        for line in f.readlines():
                            bbox_id, x_center, y_center, width, height = line.strip().split()
                            x_center = float(x_center)    # 相对坐标
                            y_center = float(y_center)    # 相对坐标
                            width = float(width)          # 相对坐标
                            height = float(height)        # 相对坐标

                            bbox = (bbox_id, x_center, y_center, width, height)
                            bboxes.append(bbox)
                        images.append(bboxes)
                    image_infos.append(images)
    # 获取标注框的类别列表
    class_names = []
    with open(class_txt, 'r') as classes:
        for class_name in classes.readlines():
            class_names.append(class_name.strip())

    # 遍历每个图像文件,获取图像的高度和宽度,并将标注信息写入XML文件
    for image_info in image_infos:
        image_file = image_info[0]
        image_name, image_ext = os.path.splitext(image_file)
        image_path = os.path.join(image_dir, image_file)
        img = cv2.imread(image_path)
        image_height, image_width, num_channels = img.shape[:3]   # 获取图片的高度、宽度和通道数

        # 创建XML文件并写入标注信息
        with open(os.path.join(output_xml_dir, image_name+'.xml'), 'a') as f:
            f.write('<annotation>\n')
            # 图像位置信息
            f.write('\t<filename>{}</filename>\n'.format(image_file))
            f.write('\t<path>{}</path>\n'.format(image_path))
            # 图像尺寸信息
            f.write('\t<size>\n')
            f.write('\t\t<width>{}</width>\n\t\t<height>{}</height>\n\t\t<depth>{}</depth>\n'.format(image_width, image_height, num_channels))
            f.write('\t</size>\n')
            # 图像类别、坐标信息
            bboxes = image_info[1]
            for bbox in bboxes:
                bbox_id, x_center, y_center, width, height = bbox
                xmin = (x_center * image_width) - (width * image_width)/2      # 计算标注框左上角x坐标值
                ymin = (y_center * image_height) - (height * image_height)/2   # 计算标注框左上角y坐标值
                xmax = (x_center * image_width) + (width * image_width)/2      # 计算标注框右下角x坐标值
                ymax = (y_center * image_height) + (height * image_height)/2   # 计算标注框右下角y坐标值

                f.write('\t<object>\n')
                f.write('\t\t<name>{}</name>\n'.format(class_names[int(bbox_id)].strip()))
                f.write('\t\t<pose>Unspecified</pose>\n')
                f.write('\t\t<truncated>0</truncated>\n')
                f.write('\t\t<difficult>0</difficult>\n')
                f.write('\t\t<bndbox>\n')
                f.write('\t\t\t<xmin>{}</xmin>\n\t\t\t<ymin>{}</ymin>\n\t\t\t<xmax>{}</xmax>\n\t\t\t<ymax>{}</ymax>\n'.format(int(xmin), int(ymin), int(xmax), int(ymax)))
                f.write('\t\t</bndbox>\n')

                f.write('\t</object>\n')
            f.write('</annotation>')
2).xml2txt
import xml.etree.ElementTree as ET
import os
xml_files_list=[]
def traverse_directory(root_dir):
for root, dirs, files in os.walk(root_dir):
# root : 当前目录路径
# dirs : 当前目录下的子目录列表
# files : 当前目录下的文件列表
for file in files:
file_path = os.path.join(root, file)
#print("文件路径:", file_path)
xml_files_list.append(file_path)
def xml_to_yolo(xml_path, output_dir, classes):
# 创建输出目录
os.makedirs(output_dir, exist_ok=True)
# 解析XML文件
tree = ET.parse(xml_path)
root = tree.getroot()
# 获取图像尺寸
size = root.find('size')
img_width = int(size.find('width').text)
img_height = int(size.find('height').text)
# 准备YOLO格式内容
yolo_lines = []
# 遍历所有object元素
for obj in root.iter('object'):
# 获取类别名称
class_name = obj.find('name').text
if class_name not in classes:
continue # 如果类别不在列表中则跳过
# 获取类别ID
class_id = classes.index(class_name)
# 获取边界框坐标
bbox = obj.find('bndbox')
xmin = int(bbox.find('xmin').text)
ymin = int(bbox.find('ymin').text)
xmax = int(bbox.find('xmax').text)
ymax = int(bbox.find('ymax').text)
# 转换为YOLO格式(归一化中心坐标和宽高)
x_center = (xmin + xmax) / 2 / img_width
y_center = (ymin + ymax) / 2 / img_height
width = (xmax - xmin) / img_width
height = (ymax - ymin) / img_height
yolo_lines.append(f"{class_id} {x_center:.6f} {y_center:.6f} {width:.6f} {height:.6f}")
# 写入输出文件
base_name = os.path.basename(xml_path).replace('.xml', '.txt')
output_path = os.path.join(output_dir, base_name)
with open(output_path, 'w') as f:
f.write('\n'.join(yolo_lines))
# 使用方法示例
classes = ["overflow", "garbage","garbage_bin"] # 必须与XML中的类别名称顺序一致
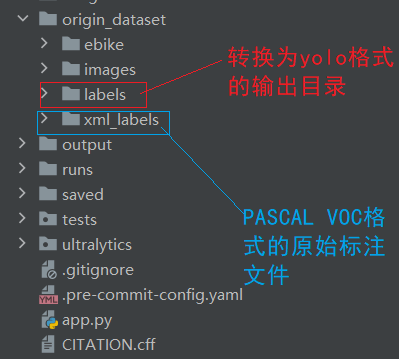
output_dir = "./origin_dataset/labels" # 输出目录
#xml_to_yolo(xml_file, output_dir, classes)
if __name__ == '__main__':
traverse_directory("./origin_dataset/xml_labels")
#print(xml_files_list)
for xml_file in xml_files_list:
xml_to_yolo(xml_file, output_dir, classes)