基于Yolov8的车牌识别系统
基于Yolov8的车牌识别系统
基于yolov8车牌识别算法,支持12种中文车牌类型的识别检测。
1.项目介绍
本项目是基于yolov8实现的车牌识别算法,支持12种中文车牌类型。
- 单行蓝牌
- 单行黄牌
- 新能源车牌
- 白色警用车牌
- 教练车牌
- 武警车牌
- 双层黄牌
- 双层白牌
- 使馆车牌
- 港澳粤Z牌
- 双层绿牌
- 民航车牌
2.下载项目源码
项目地址:
https://github.com/we0091234/yolov8-plate
使用git clone下载项目源码,后打开项目目录结构如下图所示:
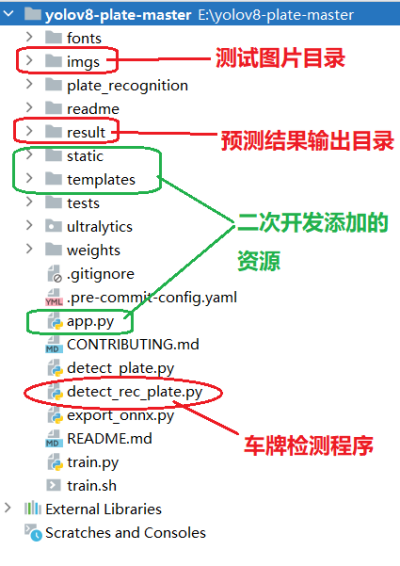
其中绿色部分,是咱们对该项目进行二次开发添加了Web Api接口所添加的flask框架的资源文件。
3.项目部署运行
直接运行detect_plate.py 或者运行如下命令行:
python detect_rec_plate.py --detect_model weights/yolov8s.pt --rec_model weights/plate_rec_color.pth --image_path imgs --output result
4.二次开发
我们使用flask框架,添加一个文件上传和车牌识别的web Api接口,尽量遵循RESTFul API风格。
首先添加flask框架依赖。
(pytorch_env) E:\yolov8-plate-master>pip install flask
分别创建static和templates目录,添加flask的文件上传资源目录和模板文件资源。目录结构如下图所示:
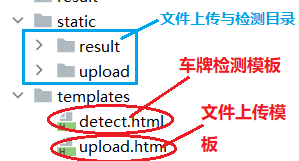
upload.html 模板代码如下:
<!DOCTYPE html>
<html lang="en">
<head>
    <meta charset="UTF-8">
    <meta http-equiv="X-UA-Compatible" content="IE=edge">
    <meta name="viewport" content="width=device-width, initial-scale=1.0">
    <title>文件上传</title>
    <style>
        #container {
            width: 860px;
            height: 200px;
            margin: 0px auto;
            border: 1px solid #ccc;
            border-radius: 20px;
            text-align: center;
        }

        #container form {
            margin-top: 20px;
        }

        #container form table{
            margin: 0 auto;
            width: 380px;
        }

        #container form table tr{
            height: 48px;
        }
    </style>
</head>
<body>
<div id="container">
    <h2 style="color:#4682B4;">文件上传</h2>
    <hr>
    <form action="/upload" method="post" enctype="multipart/form-data">

        <table>
            <tr>
                <td style="width: 120px">文件上传</td>
                <td><input type="file" name="pic"></td>
            </tr>
            <tr>
                <td colspan="2"><input type="submit" value="提交"></td>
            </tr>
        </table>
    </form>
    <br>
    <div>
        <a href="/">返回首页</a>
    </div>
</div>
</body>
</html>
detect.html 车牌检测模板文件源码如下:
<!DOCTYPE html>
<html lang="en">
<head>
<meta charset="UTF-8">
<meta http-equiv="X-UA-Compatible" content="IE=edge">
<meta name="viewport" content="width=device-width, initial-scale=1.0">
<title>车牌检测</title>
<style>
#container {
width: 860px;
height: auto;
margin: 0px auto;
border: 1px solid #ccc;
border-radius: 20px;
text-align: center;
}
#container form {
margin-top: 20px;
}
#container form table{
margin: 0 auto;
width: 380px;
}
#container form table tr{
height: 48px;
}
.srcImg,.dectImg{
margin: 0px auto;
position: relative;
width: 600px;
height: auto;
display: flex;
text-align: center;
justify-content: center;
}
.srcImg img{
position: relative;
width: 480px;
height: auto;
object-fit: fill;
}
.dectImg img{
position: relative;
width: 480px;
height: auto;
object-fit: fill;
}
</style>
</head>
<body>
<div id="container">
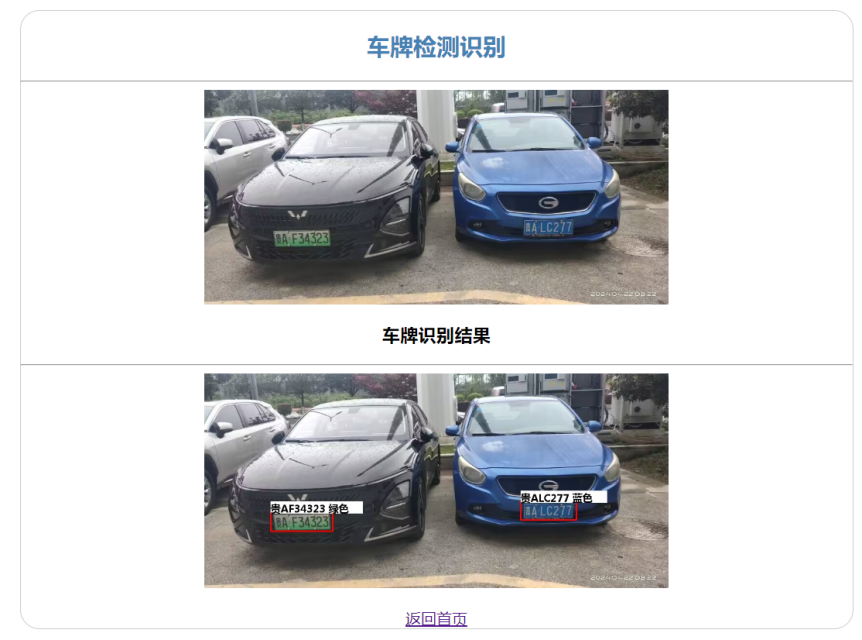
<h2 style="color:#4682B4;">车牌检测识别</h2>
<hr>
<div class="srcImg">
<img src="{{url_for('static', filename='upload/'+uploadFileName)}}"/>
</div>
<h3>车牌识别结果</h3>
<hr>
<div class="dectImg">
<img src="{{url_for('static', filename='result/'+uploadFileName)}}"/>
</div>
<br>
<div>
<a href="/">返回首页</a>
</div>
</div>
</body>
</html>
app.py
from flask import Flask
from flask import render_template, request
from flask_cors import CORS
from flask import Flask, session
from werkzeug.utils import secure_filename
import os
import subprocess
from flask_cors import CORS
import uuid
app = Flask(__name__)
CORS(app)
# 秘钥
app.config['SECRET_KEY'] = 'www.simoniu.com'
UPLOAD_PATH = os.path.join(os.path.dirname(__file__), 'static/upload')
DETECT_PATH = os.path.join(os.path.dirname(__file__), 'static/result')
def generate_uuid():
return str(uuid.uuid4())
# 一个index接口
@app.route('/')
def index():
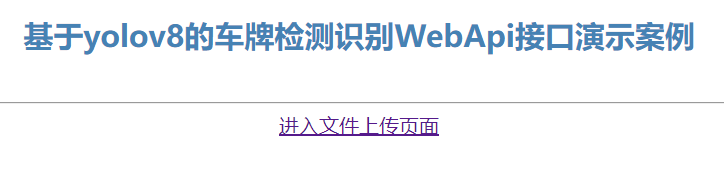
return '<h1 style="text-align:center;color: #4682B4;">基于yolov8的车牌检测识别WebApi接口演示案例 </h1><br>' \
'<hr>' \
'<div style="font-size:16pt; margin:0px auto; width=600px;text-align:center"><a href="/upload">进入文件上传页面</a></div>'
@app.route('/upload/', methods=['GET', 'POST'])
def upload():
if request.method == 'GET':
return render_template('upload.html')
else:
img_file = request.files.get('pic')
file_name = img_file.filename
# 文件名的安全转换
filename = secure_filename(file_name)
#先生成一个UUID
uuid_path = generate_uuid()
print('uuid_path=>',uuid_path)
#创建新目录
#使用os.makedirs递归地创建目录
os.makedirs(UPLOAD_PATH+"/"+uuid_path)
os.makedirs(DETECT_PATH+"/"+uuid_path)
# 保存文件
img_file.save(os.path.join(UPLOAD_PATH+"/"+uuid_path, filename))
session['current_upload_success_file'] = file_name
session['current_uuid_path'] = uuid_path
return '<h3 style="text-align:center">上传文件成功!</h3>' \
'<hr>' \
'<div style="font-size:16pt; margin:0px auto; width=600px;text-align:center"><a href="/detect">进入车牌检测识别页面</a></div>'
@app.route('/detect', methods=['GET', 'POST'])
def detect():
current_filename = session.get('current_upload_success_file', 'Session key does not exist.')
current_uuid_path = session.get('current_uuid_path', 'Session key does not exist.')
print('上传成功的文件名:', current_filename)
# detect_upload_plate();
predict_command = [
'python',
'detect_rec_plate.py',
'--detect_model',
'weights/yolov8s.pt',
'--rec_model',
'weights/plate_rec_color.pth',
'--image_path',
'static/upload/'+current_uuid_path,
'--output',
'static/result/'+current_uuid_path
]
# 这里执行车牌目标检查和车牌识别...
try:
subprocess.run(predict_command,timeout=1200) # 超时时间是20分钟
return render_template('detect.html',uploadFileName=session.get('current_uuid_path')+"/"+session.get('current_upload_success_file'))
except subprocess.CalledProcessError as e:
return e.stderr
#return render_template('detect.html')
if __name__ == '__main__':
# app.run() #启动一个web服务器
app.run(host="127.0.0.1", port=8080, debug=True)
测试 Web 接口。直接运行 app.py 即可。启动后运行效果如下:
 * Serving Flask app 'app'
 * Debug mode: on
WARNING: This is a development server. Do not use it in a production deployment. Use a production WSGI server instead.
 * Running on http://127.0.0.1:8080
Press CTRL+C to quit
 * Restarting with stat
 * Debugger is active!
 * Debugger PIN: 739-211-911
上传一张汽车图片后,车牌识别界面效果如下: