OpenCV实现人脸识别
OpenCV实现人脸识别
1.OpenCV
OpenCV是一款广泛使用的计算机视觉库,包含了很多人脸识别的方法。本文介绍使用face_recognition库轻松实现人脸识别,它是OpenCV中一个基于深度学习的人脸识别模块。使用face_recognition,你可以输入一张图像或一段视频流,然后对其中的人脸进行识别和标注。其核心功能是将图像中的人脸进行编码,然后与已有的人脸编码进行比对,从而进行人脸识别。此外,face_recognition还提供了一些其他的功能,比如人脸特征点检测、人脸姿态估计等。通过这些功能,你可以更加全面地理解一张人脸图像的信息。
2.代码实现步骤
1).安装环境
pip install opencv-python -i https://pypi.tuna.tsinghua.edu.cn/simple
pip install numpy -i https://pypi.tuna.tsinghua.edu.cn/simple
pip install cmake -i https://pypi.tuna.tsinghua.edu.cn/simple
pip install dlib -i https://pypi.tuna.tsinghua.edu.cn/simple
pip install face_recognition -i https://pypi.tuna.tsinghua.edu.cn/simple
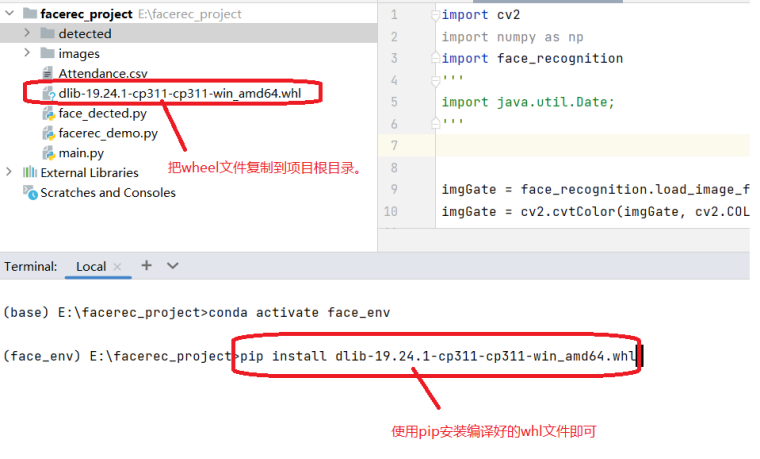
在pip install dlib时,由于版本原因经常会失败,试了很多办法不管用,Debug真的折磨人(´;ω;`),解决方案如下:
通过手动下载dlib文件,手动安装才成功的。注意dlib的版本要和python版本对应!
附上链接:python3.11.1对应的dlib版本:dlib-19.24.1-cp311-cp311-win_amd64.whl文件。使用pip命令安装。
pip install dlib-19.24.1-cp311-cp311-win_amd64.whl
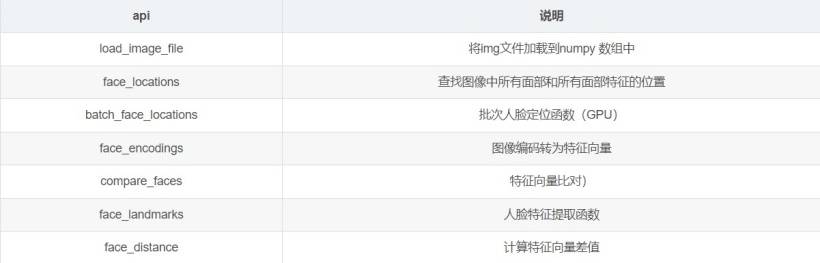
2).face_recognition库函数介绍
3).人像图片对比
import cv2
import numpy as np
import face_recognition

imgGate = face_recognition.load_image_file('./imgs/bill-gates.jpg')  # 加载图片
imgGate = cv2.cvtColor(imgGate, cv2.COLOR_BGR2RGB)  # 将BGR彩色图像转化为RGB彩色图像
imgTest = face_recognition.load_image_file('./imgs/Elon-Musk.jpg')
#imgTest = face_recognition.load_image_file('./imgs/bill-gates2.jpg')
imgTest = cv2.cvtColor(imgTest, cv2.COLOR_BGR2RGB)

faceLoc = face_recognition.face_locations(imgGate)[0]  # 定位人脸位置
encodeElon = face_recognition.face_encodings(imgGate)[0]  # 提取人脸的面部特征
cv2.rectangle(imgGate, (faceLoc[3], faceLoc[0]), (faceLoc[1], faceLoc[2]), (255, 0, 255), 2)  # 框出人脸

# print(faceLoc)

faceLocTest = face_recognition.face_locations(imgTest)[0]
encodeTest = face_recognition.face_encodings(imgTest)[0]
cv2.rectangle(imgTest, (faceLocTest[3], faceLocTest[0]), (faceLocTest[1], faceLocTest[2]), (255, 0, 255), 2)

result = face_recognition.compare_faces([encodeElon], encodeTest)  # 比较人脸编码的相似度
faceDis = face_recognition.face_distance([encodeElon], encodeTest)  # 计算两个人脸的欧氏距离(欧氏距离用于计算样本之间的相似度或距离)
print(result, faceDis)
cv2.putText(imgTest, f'{result}{round(faceDis[0], 2)}', (50, 50), cv2.FONT_HERSHEY_COMPLEX, 1, (0, 0, 255), 2)  # 显示比对结果

cv2.imshow('Bill Gates', imgGate)
cv2.imshow('Elon Musk', imgTest)
key = cv2.waitKey(0)
if key == 27:  # 按ESC键退出
    cv2.destroyAllWindows()
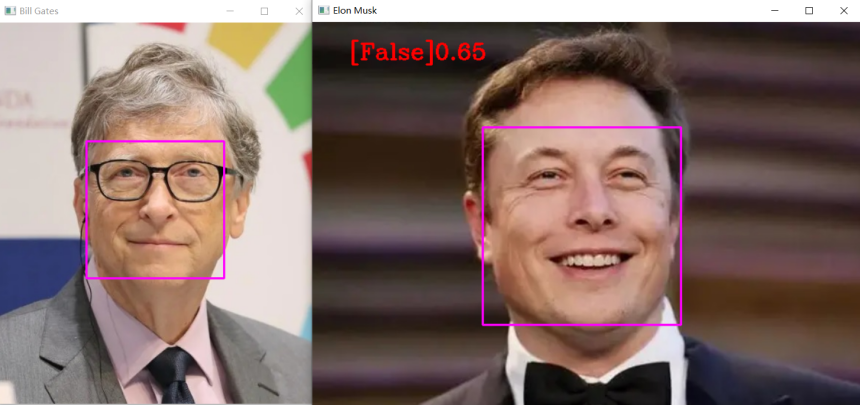
False:表示不是同一个人。0.77为欧氏距离,值越大相似度越小,值越小相似度越大。
4).调用摄像头实现人脸打卡考勤
import cv2
import numpy as np
import face_recognition
import os
from datetime import datetime
path = 'detect' # 人像存储位置
images = []
className = []
myList = os.listdir(path) # 返回指定文件目录下的列表,这里返回的是人像图片
print(myList)
for cl in myList: # 获取每张人像的名称
curImg = cv2.imread(f'{path}/{cl}')
images.append(curImg)
className.append(os.path.splitext(cl)[0])
print(className)
def findEncodings(images): # 获取所有存储的人像编码
encodeList = []
for img in images:
img = cv2.cvtColor(img, cv2.COLOR_BGR2RGB)
encode = face_recognition.face_encodings(img)[0]
encodeList.append(encode)
return encodeList
def markAttendance(name): # 打卡,生成记录
with open('Attendance.csv', 'r+') as f:
myDatalist = f.readlines() # 读取文件中所有的行
nameList = []
for line in myDatalist:
entry = line.split(',')
nameList.append(entry[0])
if name not in nameList:
now = datetime.now()
dtString = now.strftime('%H:%M:%S') # 将日期时间格式化成字符串
f.writelines(f'\n{name},{dtString}') # 将包含多个字符串的可迭代对象写入文件中,这里是记录人名
encodeListKnown = findEncodings(images)
print('encoding complete')
cap = cv2.VideoCapture(0)
while True:
success, img = cap.read()
imgs = cv2.resize(img, (0, 0), None, 0.25, 0.25) # 调整图片大小
imgs = cv2.cvtColor(imgs, cv2.COLOR_BGR2RGB)
faceCurFrame = face_recognition.face_locations(imgs) # 获取人脸位置信息
encodesCurFrame = face_recognition.face_encodings(imgs, faceCurFrame) # 获取人脸编码
for encodeFace, faceLoc in zip(encodesCurFrame, faceCurFrame): # zip函数,连接成字典
matches = face_recognition.compare_faces(encodeListKnown, encodeFace) # 人脸匹配度
faceDis = face_recognition.face_distance(encodeListKnown, encodeFace) # 欧式距离
# print(faceDis)
matchIndex = np.argmin(faceDis) # 返回数组中小元素的索引
if matches[matchIndex]:
name = className[matchIndex].upper()
print(name)
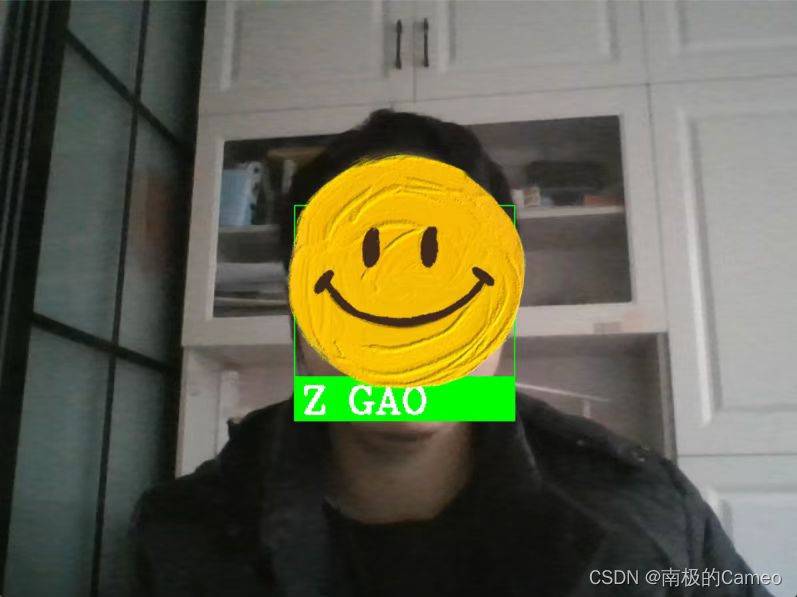
y1, x2, y2, x1 = faceLoc # 人脸位置
y1, x2, y2, x1 = y1 * 4, x2 * 4, y2 * 4, x1 * 4
cv2.rectangle(img, (x1, y1), (x2, y2), (0, 255, 0), 1)
cv2.rectangle(img, (x1, y2 - 35), (x2, y2), (0, 255, 0), cv2.FILLED)
cv2.putText(img, name, (x1 + 6, y2 - 6), cv2.FONT_HERSHEY_COMPLEX, 1, (255, 255, 255), 2)
markAttendance(name) # 记录人名
cv2.imshow(str('Face_Detector'), img)
if cv2.waitKey(1) & 0xff == 27:
break
其中,打卡用户的人脸照片和打卡记录保存的文件保存在项目的指定目录中,如下图所示:
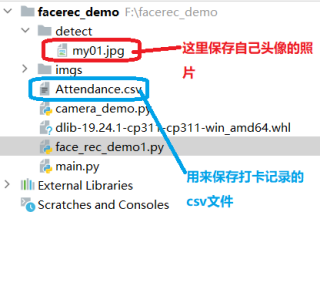
Attendance.csv文件会保存如下打卡记录:
Z GAO,22:49:49