1.YOLOv8:80个类别无限可能
YOLOv8沿袭了使用COCO数据集进行预训练的传统,包含80个类别,涵盖了从日常物品到野生动物的常见范围。每一个类别都有一个唯一的ID,用于训练过程中的识别和分类。下面就是未经额外训练的YOLOv8能够识别的所有对象类别及其类ID列表:
{0: 'person',
 1: 'bicycle',
 2: 'car',
 3: 'motorcycle',
 4: 'airplane',
 5: 'bus',
 6: 'train',
 7: 'truck',
 8: 'boat',
 9: 'traffic light',
 10: 'fire hydrant',
 11: 'stop sign',
 12: 'parking meter',
 13: 'bench',
 14: 'bird',
 15: 'cat',
 16: 'dog',
 17: 'horse',
 18: 'sheep',
 19: 'cow',
 20: 'elephant',
 21: 'bear',
 22: 'zebra',
 23: 'giraffe',
 24: 'backpack',
 25: 'umbrella',
 26: 'handbag',
 27: 'tie',
 28: 'suitcase',
 29: 'frisbee',
 30: 'skis',
 31: 'snowboard',
 32: 'sports ball',
 33: 'kite',
 34: 'baseball bat',
 35: 'baseball glove',
 36: 'skateboard',
 37: 'surfboard',
 38: 'tennis racket',
 39: 'bottle',
 40: 'wine glass',
 41: 'cup',
 42: 'fork',
 43: 'knife',
 44: 'spoon',
 45: 'bowl',
 46: 'banana',
 47: 'apple',
 48: 'sandwich',
 49: 'orange',
 50: 'broccoli',
 51: 'carrot',
 52: 'hot dog',
 53: 'pizza',
 54: 'donut',
 55: 'cake',
 56: 'chair',
 57: 'couch',
 58: 'potted plant',
 59: 'bed',
 60: 'dining table',
 61: 'toilet',
 62: 'tv',
 63: 'laptop',
 64: 'mouse',
 65: 'remote',
 66: 'keyboard',
 67: 'cell phone',
 68: 'microwave',
 69: 'oven',
 70: 'toaster',
 71: 'sink',
 72: 'refrigerator',
 73: 'book',
 74: 'clock',
 75: 'vase',
 76: 'scissors',
 77: 'teddy bear',
 78: 'hair drier',
 79: 'toothbrush'}
这一常见的类别覆盖,确保了YOLOv8能够适应大多数不同的检测场景,从城市交通监控到野生动物保护,再到家庭日常物品的识别,都能够提供卓越的识别能力。
对应翻译为中文字典如下:
{
    0: '人',
    1: '自行车',
    2: '汽车',
    3: '摩托车',
    4: '飞机',
    5: '公交车',
    6: '火车',
    7: '卡车',
    8: '船',
    9: '交通信号灯',
    10: '消防栓',
    11: '停车标志',
    12: '停车计时器',
    13: '长椅',
    14: '鸟',
    15: '猫',
    16: '狗',
    17: '马',
    18: '羊',
    19: '牛',
    20: '大象',
    21: '熊',
    22: '斑马',
    23: '长颈鹿',
    24: '背包',
    25: '雨伞',
    26: '手提包',
    27: '领带',
    28: '行李箱',
    29: '飞盘',
    30: '滑雪板',
    31: '滑板',
    32: '运动球',
    33: '风筝',
    34: '棒球棒',
    35: '棒球手套',
    36: '滑板',
    37: '冲浪板',
    38: '网球拍',
    39: '瓶子',
    40: '酒杯',
    41: '杯子',
    42: '叉子',
    43: '刀',
    44: '勺子',
    45: '碗',
    46: '香蕉',
    47: '苹果',
    48: '三明治',
    49: '橙子',
    50: '西兰花',
    51: '胡萝卜',
    52: '热狗',
    53: '披萨',
    54: '甜甜圈',
    55: '蛋糕',
    56: '椅子',
    57: '沙发',
    58: '盆栽植物',
    59: '床',
    60: '餐桌',
    61: '马桶',
    62: '电视',
    63: '笔记本电脑',
    64: '鼠标',
    65: '遥控器',
    66: '键盘',
    67: '手机',
    68: '微波炉',
    69: '烤箱',
    70: '烤面包机',
    71: '水槽',
    72: '冰箱',
    73: '书',
    74: '钟表',
    75: '花瓶',
    76: '剪刀',
    77: '泰迪熊',
    78: '吹风机',
    79: '牙刷'
}
2.代码获取YOLOv8对象类别
from ultralytics import YOLO
# 以及yolov8s.pt、yolov8m.pt、yolov8l.pt、yolov8x.pt
model = YOLO('yolov8n.pt')
print(model.names)
3.YOLOV8统计图片中某种物体出现的次数
import torch
import ultralytics
from ultralytics import YOLO
model = YOLO('./model/predict/yolov8n.pt')
person_couter=0
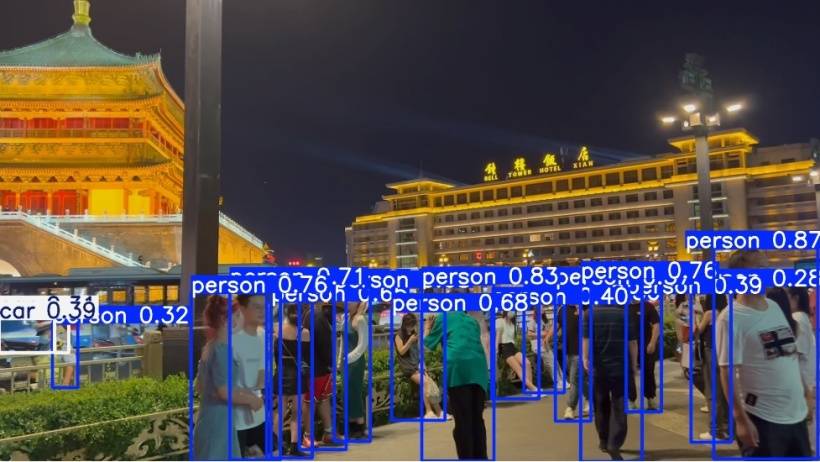
predictions = model.predict('./images/xian_power001.jpg',save=True)
# 解析预测结果
# 提取检测结果
for result in predictions:
boxes = result.boxes.xyxy # 边界框坐标
scores = result.boxes.conf # 置信度分数
classes = result.boxes.cls # 类别索引
# 如果有类别名称,可以通过类别索引获取
class_names = [model.names[int(cls)] for cls in classes]
# 打印检测结果
for box, score, class_name in zip(boxes, scores, class_names):
if class_name == 'person': #找到了一个人
person_couter+=1
print(f"Class: {class_name}, Score: {score:.2f}, Box: {box}")
# 可视化检测结果
result.plot()
print(f'该图片中一共有:{person_couter}个人!')
运行效果:
image 1/1 E:\ultralytics-main\images\xian_power001.jpg: 384x640 15 persons, 2 cars, 60.1ms
Speed: 3.0ms preprocess, 60.1ms inference, 2.0ms postprocess per image at shape (1, 3, 384, 640)
Results saved to runs\detect\predict
Class: person, Score: 0.87, Box: tensor([1664.5657,  583.3973, 1906.1005, 1074.0574], device='cuda:0')
Class: person, Score: 0.83, Box: tensor([ 984.7618,  667.4482, 1152.0951, 1079.0076], device='cuda:0')
Class: person, Score: 0.76, Box: tensor([1354.3561,  654.3528, 1497.0007, 1080.0000], device='cuda:0')
Class: person, Score: 0.76, Box: tensor([ 447.0591,  687.5493,  623.5461, 1080.0000], device='cuda:0')
Class: person, Score: 0.71, Box: tensor([ 537.6637,  668.9442,  655.7850, 1076.0796], device='cuda:0')
Class: person, Score: 0.68, Box: tensor([ 780.5947,  675.1927,  864.5834, 1033.0759], device='cuda:0')
Class: person, Score: 0.68, Box: tensor([ 914.7535,  729.7934, 1038.1494,  984.0890], device='cuda:0')
Class: person, Score: 0.65, Box: tensor([ 633.1584,  707.1714,  729.3265, 1072.3101], device='cuda:0')
Class: person, Score: 0.58, Box: tensor([ 699.5367,  672.1633,  808.0820, 1052.4730], device='cuda:0')
Class: person, Score: 0.57, Box: tensor([1295.2001,  668.9659, 1378.2485,  986.1671], device='cuda:0')
Class: person, Score: 0.40, Box: tensor([1147.0979,  714.7033, 1257.6401,  934.0609], device='cuda:0')
Class: person, Score: 0.39, Box: tensor([1460.0952,  689.7789, 1542.4763,  964.8219], device='cuda:0')
Class: person, Score: 0.32, Box: tensor([124.6159, 758.7654, 183.1747, 908.6636], device='cuda:0')
Class: person, Score: 0.30, Box: tensor([1222.9368,  704.8621, 1316.7229,  920.6885], device='cuda:0')
Class: person, Score: 0.28, Box: tensor([1611.9005,  672.5137, 1704.3842, 1035.8785], device='cuda:0')
该图片中一共有:15个人!
另一种实现方式:
from ultralytics import YOLO

if __name__ == '__main__':

    # Load a model  加载模型
    model = YOLO("./model/predict/yolov8n.pt")  # pretrained YOLOv8n model
    # 读取图片
    # 用模型model预测读取的图片source
    results = model('./images/bus002.jpg')  # 返回一个列表
    # 因为只预测了一张图片results中只有一个元素,预测结果存在boxes的cls属性中
    res = results[0].boxes.cls
    # 以为0代表person,取aa中0的个数即为人数
    person_num = res[res == 0].numel()
    print(f"人数有{person_num}个")

    # save属性保存带识别框的图
    results[0].save(filename="./output/result.jpg")
4.results结果解析和处理
根据官方文档的描述,result主要包含如下几个对象:
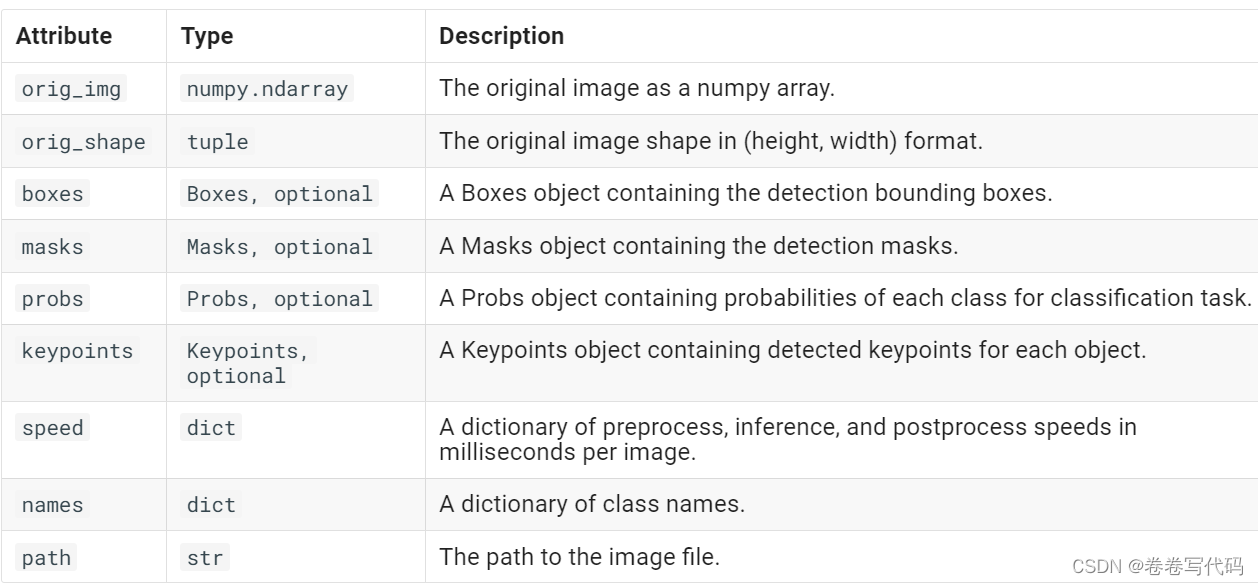
简单解释一下: - orig_img: numpy数组格式的原图,可以在此原图上进行进一步绘制 - orig_shape:原图的shape - boxes:十分重要的一个对象,包含所有检测框的信息 - masks:包含检测掩码的mask对象 - probs:一个包含分类任务中每个类别的概率的Probs对象 - keypoints:包含每个对象检测到的关键点 - speed:字典类型,表示以毫秒为单位的预处理、推理和后处理速度 - names:字典类型,表示所有类的名称 - path:图片的路径
其中,boxes比较重要,里面又包含了几个对象:
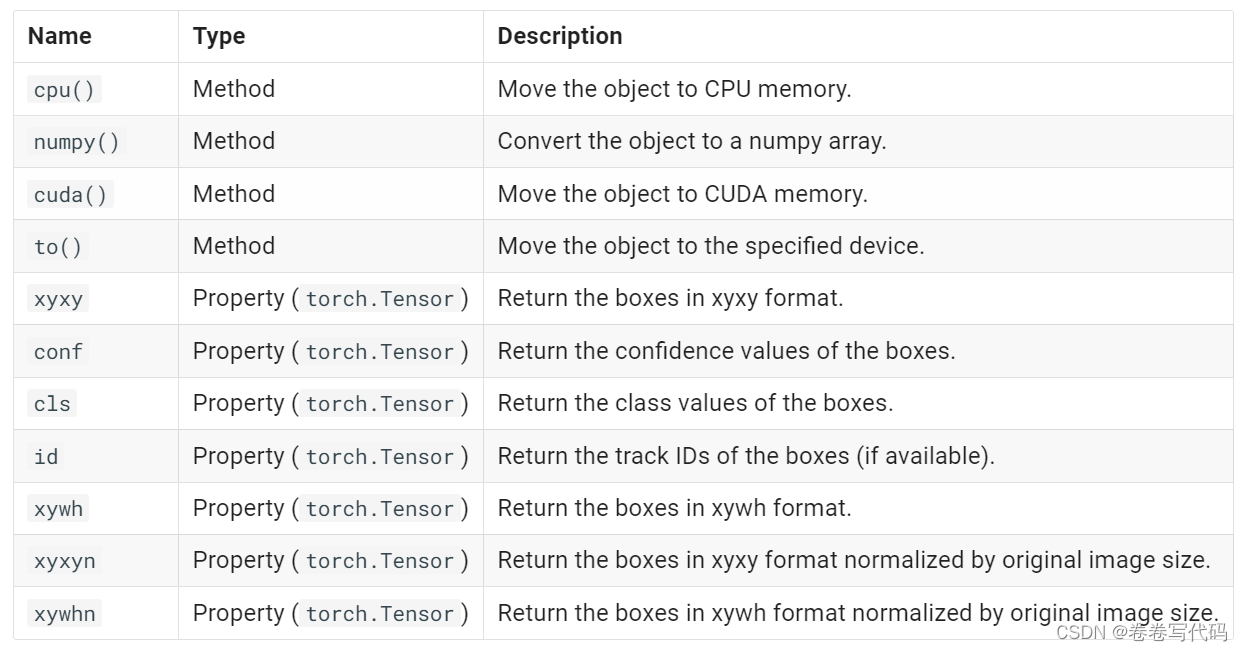
- xyxy/xywh/xyxyn/xywhn:这几个都是用于表示每个检测框的位置的
- conf:检测框对应的置信度
- cls:每个检测框对应的类别
- id:这个对象只有track时候才会有,赋予每个检测框唯一的标号
实例:
from ultralytics import YOLO

# 加载模型
model = YOLO("yolov8n.pt")  # 使用YOLOv8n模型

# 对图片列表进行批量推理
results = model(['./images/bus.jpg'])  # 返回结果对象的列表
# results = model.predict("./bus.jpg", imgsz=320, conf=0.5)
# results = model.predict("./bus.jpg", save=True, imgsz=320, conf=0.5)
# results = model.predict("./bus.jpg", save=True, imgsz=320, conf=0.5, line_width=50)

# 处理结果列表
for result in results:
    boxes = result.boxes  # Boxes对象,用于存储边界框输出
    masks = result.masks  # Masks对象,用于存储分割掩模输出
    keypoints = result.keypoints  # Keypoints对象,用于存储姿态关键点输出
    probs = result.probs  # Probs对象,用于存储分类概率输出
    # 打印每个边界框的坐标
    for box in boxes:
        # 获取边界框的坐标 (x1, y1, x2, y2)
        x1, y1, x2, y2 = box.xyxy[0].tolist()  # 将张量转换为列表
        confidence = box.conf.item()  # 获取置信度
        class_id = box.cls.item()  # 获取类别ID
        class_name = model.names[class_id]  # 获取类别名称

        # 打印边界框信息
        print(f"类别: {class_name} (ID: {class_id}), 置信度: {confidence:.2f}")
        print(f"边界框坐标: [x1: {x1:.2f}, y1: {y1:.2f}, x2: {x2:.2f}, y2: {y2:.2f}]")
        print("-" * 50)
    result.show()  # 显示结果到屏幕上
    result.save(filename='result.jpg')  # 保存结果
运行效果:

0: 640x480 4 persons, 1 bus, 1 stop sign, 31.9ms
Speed: 5.0ms preprocess, 31.9ms inference, 131.7ms postprocess per image at shape (1, 3, 640, 480)
类别: bus (ID: 5.0), 置信度: 0.87
边界框坐标: [x1: 17.29, y1: 230.59, x2: 801.52, y2: 768.41]
--------------------------------------------------
类别: person (ID: 0.0), 置信度: 0.87
边界框坐标: [x1: 48.74, y1: 399.26, x2: 244.50, y2: 902.50]
--------------------------------------------------
类别: person (ID: 0.0), 置信度: 0.85
边界框坐标: [x1: 670.27, y1: 380.28, x2: 809.86, y2: 875.69]
--------------------------------------------------
类别: person (ID: 0.0), 置信度: 0.82
边界框坐标: [x1: 221.39, y1: 405.79, x2: 344.72, y2: 857.39]
--------------------------------------------------
类别: stop sign (ID: 11.0), 置信度: 0.35
边界框坐标: [x1: 0.06, y1: 254.64, x2: 32.29, y2: 325.04]
--------------------------------------------------
类别: person (ID: 0.0), 置信度: 0.30
边界框坐标: [x1: 0.00, y1: 551.01, x2: 67.10, y2: 873.94]
--------------------------------------------------
mask,keypoints和probes分别用于segement,pose和classify模型的预测。
masks
定义:如果使用的是实例分割模型,masks属性会包含分割掩码的信息。 数据结构:通常是一个张量(tensor),形状为(N, H, W),其中N是检测到的目标数量,H和W是图像的高度和宽度。每个掩码表示一个目标在图像中的分割区域。 属性: - masks.data:原始掩码张量。 - masks.xy:分割轮廓的像素坐标,格式为List[segment] * N。 - masks.xyn:归一化后的分割轮廓坐标,格式为List[segment] * N。
keypoints
定义:如果使用的是关键点检测模型,keypoints属性会包含检测到的关键点信息。 数据结构:通常是一个张量,形状为(N, K, 2),其中N是检测到的目标数量,K是每个目标的关键点数量,2表示每个关键点的坐标(x, y)。 用途:用于表示目标的关键点位置,例如人体姿态估计中的关节位置。
probs
定义:包含每个类别的置信度分数。 数据结构:一个张量,形状为(num_class,),表示每个类别的置信度。 用途:用于表示模型对每个类别的预测置信度,帮助评估模型对不同类别的预测可靠性。
实例:
from ultralytics import YOLO

# 加载模型
#model = YOLO("./model/predict/yolov8n.pt")  # 使用YOLOv8n模型
#model = YOLO("./model/classify/yolov8n-cls.pt")
#model = YOLO("./model/seg/yolov8n-seg.pt")
model = YOLO("./model/pose/yolov8n-pose.pt")
# 对图片列表进行批量推理
results = model(['./images/bus.jpg'])  # 返回结果对象的列表
# results = model.predict("./bus.jpg", imgsz=320, conf=0.5)
# results = model.predict("./bus.jpg", save=True, imgsz=320, conf=0.5)
# results = model.predict("./bus.jpg", save=True, imgsz=320, conf=0.5, line_width=50)
print(len(results))
# 处理结果列表
for result in results:
    boxes = result.boxes  # Boxes对象,用于存储边界框输出
    masks = result.masks  # Masks对象,用于存储分割掩模输出
    keypoints = result.keypoints  # Keypoints对象,用于存储姿态关键点输出
    probs = result.probs  # Probs对象,用于存储分类概率输出

    print("---------------------")
    print(masks)
    print(keypoints)
    print(probs)
    result.show()  # 显示结果到屏幕上
    result.save(filename='result.jpg')  # 保存结果
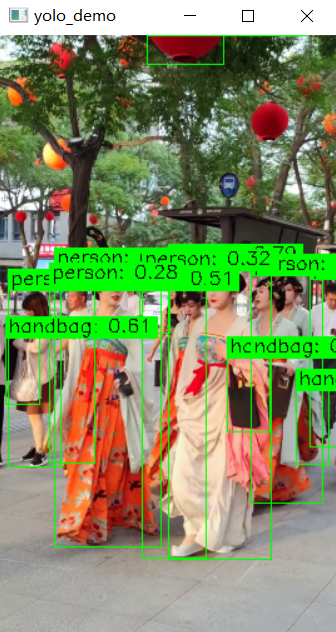
5.YOLO视频目标检测
import cv2

from ultralytics import YOLO

# 加载YOLOv8模型
model = YOLO("./model/predict/yolov8n.pt")

# 打开视频文件
video_path = "./video/xian_street01.mp4"
cap = cv2.VideoCapture(video_path)

# 遍历视频帧
while cap.isOpened():
    # 从视频中读取一帧
    success, frame = cap.read()

    if success:
        # 获取每一帧的图片的宽度和高度
        height, width = frame.shape[:2]

        # 图像进行缩放
        resized_frame = cv2.resize(frame, (int(width / 4), int(height / 4)), interpolation=cv2.INTER_AREA)

        # 在帧上运行YOLOv8推理
        results = model(resized_frame)

        # 在帧上可视化推理结果
        annotated_frame = results[0].plot()

        # 显示标注后的帧
        cv2.imshow("yolo_demo", annotated_frame)

        # 如果按下'q'键则退出循环
        if cv2.waitKey(25) & 0xFF == ord("q"):
            break
    else:
        # 如果视频播放完毕,则退出循环
        break

# 释放视频捕获对象并关闭显示窗口
cap.release()
cv2.destroyAllWindows()
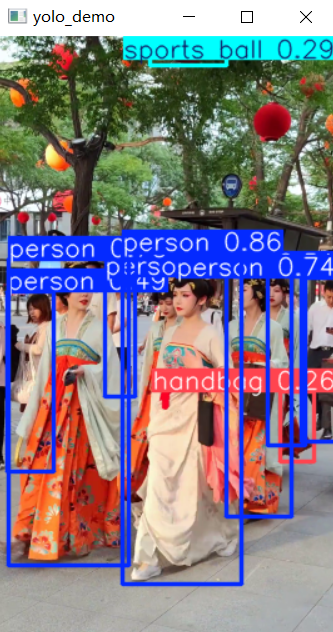
我们发现控制台会不停地输出检测信息,并且绘制的检测目标框的线条太粗。代码优化如下:
import cv2
from ultralytics import YOLO

# 加载YOLOv8模型
model = YOLO("./model/predict/yolov8n.pt")

# 打开视频文件
video_path = "./video/xian_street01.mp4"
cap = cv2.VideoCapture(video_path)

# 遍历视频帧
while cap.isOpened():
    # 从视频中读取一帧
    success, frame = cap.read()

    if success:
        # 获取每一帧的图片的宽度和高度
        height, width = frame.shape[:2]

        # 图像进行缩放
        resized_frame = cv2.resize(frame, (int(width / 4), int(height / 4)), interpolation=cv2.INTER_AREA)

        # 在帧上运行YOLOv8推理
        #results = model(resized_frame)
        #verbose=False 控制台是否输出检测信息,True显示,False不显示
        results = model.predict(resized_frame, verbose=False)
        # 获取检测结果
        boxes = results[0].boxes
        names = results[0].names

        # 手动绘制检测框和标签
        annotated_frame = resized_frame.copy()
        for box in boxes:
            # 获取检测框的坐标
            x1, y1, x2, y2 = box.xyxy[0].tolist()
            x1, y1, x2, y2 = int(x1), int(y1), int(x2), int(y2)

            # 获取类别ID和置信度
            cls_id = int(box.cls[0])
            conf = box.conf[0].item()

            # 绘制检测框(线条粗细设置为1,更细)
            cv2.rectangle(annotated_frame, (x1, y1), (x2, y2), (0, 255, 0), thickness=1)

            # 绘制标签
            label = f"{names[cls_id]}: {conf:.2f}"
            (label_width, label_height), _ = cv2.getTextSize(label, cv2.FONT_HERSHEY_SIMPLEX, 0.5, 1)
            cv2.rectangle(annotated_frame, (x1, y1 - label_height - 5), (x1 + label_width + 5, y1), (0, 255, 0), -1)
            cv2.putText(annotated_frame, label, (x1 + 2, y1 - 5), cv2.FONT_HERSHEY_SIMPLEX, 0.5, (0, 0, 0), 1)

        # 显示标注后的帧
        cv2.imshow("yolo_demo", annotated_frame)

        # 如果按下'q'键则退出循环
        if cv2.waitKey(25) & 0xFF == ord("q"):
            break
    else:
        # 如果视频播放完毕,则退出循环
        break

# 释放视频捕获对象并关闭显示窗口
cap.release()
cv2.destroyAllWindows()
小结:
YOLOv8 是一个目标检测模型,可以识别多种不同的物体。它的种类识别能力取决于训练时使用的数据集。通常,一个YOLOv8模型可以识别上百种不同的物体。具体的物体种类数目取决于模型训练时使用的数据集,比如常见的COCO数据集包含了80种常见物体类别。因此,如果YOLOv8是在COCO数据集上训练的,它可以识别80种左右的物体。