人工智能环境完整搭建过程。包含五个部分:1.python解释器;2.miniconda安装与创建新环境;3.pycharm2022安装与导入conda环境;4.jupyter安装与配置;5.C语言环境搭建
1.安装python解释器
人工智能python环境推荐使用conda创建,这样可以做到项目环境的隔离。但是考虑到平时有可能会调试一些非python或者人工智能的项目,所以我们也必须安装python的解释器。
python的解释器又分为2.x和3.x两个版本,这两个版本区别差异很大,也相互不兼容。所以两个版本都必须安装。
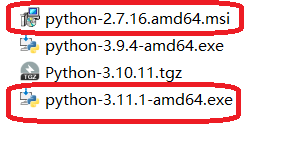
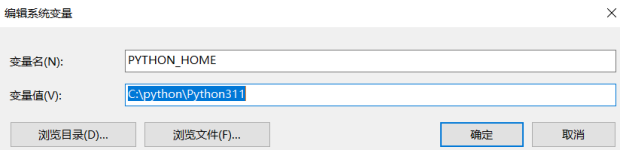
安装过程无需赘述,可以把两个版本分别安装到c:\python\python271和c:\python\python311目录下。
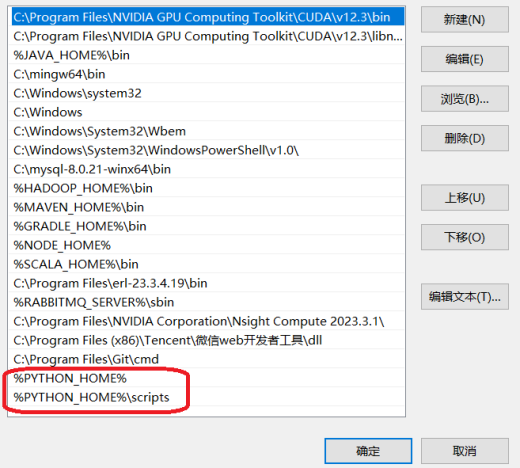
然后配置环境变量。
输入cmd命令,打开Dos窗口,测试以下命令:
C:\Users\admin>python -V
Python 3.11.1

C:\Users\admin>python
Python 3.11.1 (tags/v3.11.1:a7a450f, Dec  6 2022, 19:58:39) [MSC v.1934 64 bit (AMD64)] on win32
Type "help", "copyright", "credits" or "license" for more information.
>>> print('hello,world')
hello,world
>>> exit();
如果能正常运行,说明python解释器安装正确。
正确配置Pip的源:
PIP默认访问的官网总是在国外的网络环境,在国内每每访问国外环境,在网速上总是有一些不尽如人意,今天想到国内也有对应的网络源,如:阿里,腾讯,大学清华源。
pip命令配置指定国内mirrors,通过如下命令快速配置阿里云pip镜像。
pip config set global.index-url https://mirrors.aliyun.com/pypi/simple/
pip config set install.trusted-host mirrors.aliyun.com
pip config命令配置阿里云镜像其本质是修改了 %USER_HOME%/AppData/Roaming/pip/pip.ini文件。
设置后,pip.ini文件如下:
[global]
index-url = https://mirrors.aliyun.com/pypi/simple/

[install]
trusted-host = mirrors.aliyun.com
pip install 命令下载的 whl 文件缓存通常位于用户目录下的特定文件夹中。对于Windows系统,whl文件的缓存通常存放在以下路径:C:\Users\用户名\AppData\Local\pip\Cache。例如,如果你使用的是Windows操作系统,并且你的用户名是"Administrator",那么whl文件的缓存位置就是:C:\Users\Administrator\AppData\Local\pip\Cache
2.安装minicoda与创建新环境
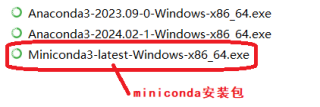
Miniconda是一个轻量级的发行版,默认情况下只包含Python和Conda本身,以及它们的依赖项。Miniconda的安装文件较小,适合对存储空间要求较高的用户。它提供了一个基本的环境,用户可以根据自己的需要,通过Conda或Pip安装其他所需的包。
下载miniconda安装包,按照默认方式安装至d:\miniconda3
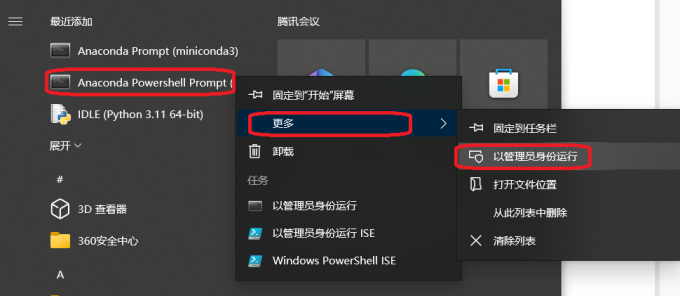
在Windows的开始菜单,以管理员身份打开conda powershell prompt。
输入以下命令:
# 查看conda版本
(base) PS C:\Windows\system32> conda -V
conda 24.3.0

# 查看conda基本信息
(base) PS C:\Windows\system32> conda info

# 查看conda已有的环境
(base) PS C:\Windows\system32> conda env list
# conda environments:
#
base                  *  D:\miniconda3
首先设置清华大学源。
#配置清华源
conda config --add channels https://mirrors.tuna.tsinghua.edu.cn/anaconda/pkgs/main
conda config --add channels https://mirrors.tuna.tsinghua.edu.cn/anaconda/pkgs/free
conda config --set show_channel_urls yes


#如果你想要确认配置是否成功,可以运行以下命令查看.condarc文件内容:
(pytorch_env) PS C:\Users\xxx> cat ~/.condarc
channels:
  - https://mirrors.tuna.tsinghua.edu.cn/anaconda/pkgs/free
  - https://mirrors.tuna.tsinghua.edu.cn/anaconda/pkgs/main
  - defaults
show_channel_urls: true
创建新环境。
(base) PS C:\Windows\system32> conda create -n pandas_env python==3.11.0

(base) PS C:\Windows\system32> conda env list
# conda environments:
#
base                  *  D:\miniconda3
pandas_env               D:\miniconda3\envs\pandas_env
激活新环境。
(base) PS C:\Windows\system32> conda activate pandas_env
(pandas_env) PS C:\Windows\system32>
查看已经安装的包。
(pandas_env) PS C:\Windows\system32> conda list
# packages in environment at D:\miniconda3\envs\pandas_env:
#
# Name                    Version                   Build  Channel
bzip2                     1.0.8                h2bbff1b_5    https://mirrors.tuna.tsinghua.edu.cn/anaconda/pkgs/main
ca-certificates           2024.3.11            haa95532_0    https://mirrors.tuna.tsinghua.edu.cn/anaconda/pkgs/main
libffi                    3.4.4                hd77b12b_0    https://mirrors.tuna.tsinghua.edu.cn/anaconda/pkgs/main
openssl                   1.1.1w               h2bbff1b_0    https://mirrors.tuna.tsinghua.edu.cn/anaconda/pkgs/main
pip                       23.3.1          py311haa95532_0    https://mirrors.tuna.tsinghua.edu.cn/anaconda/pkgs/main
python                    3.11.0               h966fe2a_3    https://mirrors.tuna.tsinghua.edu.cn/anaconda/pkgs/main
setuptools                68.2.2          py311haa95532_0    https://mirrors.tuna.tsinghua.edu.cn/anaconda/pkgs/main
sqlite                    3.41.2               h2bbff1b_0    https://mirrors.tuna.tsinghua.edu.cn/anaconda/pkgs/main
tk                        8.6.12               h2bbff1b_0    https://mirrors.tuna.tsinghua.edu.cn/anaconda/pkgs/main
tzdata                    2024a                h04d1e81_0    https://mirrors.tuna.tsinghua.edu.cn/anaconda/pkgs/main
vc                        14.2                 h21ff451_1    https://mirrors.tuna.tsinghua.edu.cn/anaconda/pkgs/main
vs2015_runtime            14.27.29016          h5e58377_2    https://mirrors.tuna.tsinghua.edu.cn/anaconda/pkgs/main
wheel                     0.41.2          py311haa95532_0    https://mirrors.tuna.tsinghua.edu.cn/anaconda/pkgs/main
xz                        5.4.6                h8cc25b3_0    https://mirrors.tuna.tsinghua.edu.cn/anaconda/pkgs/main
zlib                      1.2.13               h8cc25b3_0    https://mirrors.tuna.tsinghua.edu.cn/anaconda/pkgs/main
3.安装pycharm2022.3与导入conda环境
下载pycharm2022.3安装包,按照默认方式安装至D:\JetBrains\PyCharm 2022.3.1
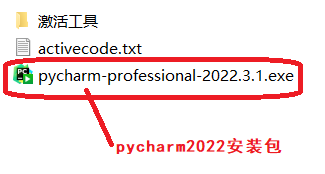
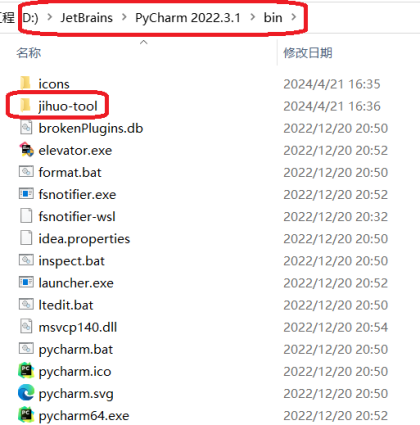
把'激活工具'目录里的jihuo-tool,复制到D:\JetBrains\PyCharm 2022.3.1\bin目录下。如下图所示:
执行D:\JetBrains\PyCharm 2022.3.1\bin\jihuo-tool\scripts\install-all-users.vbs脚本。
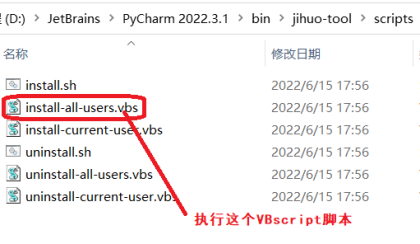
注意:执行此脚本之前,最好关闭电脑的所有杀毒软件。
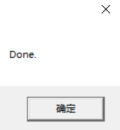
如果出现Done窗口,说明破解成功!
去以下网站 http://jets.idejihuo.com/,复制PyCharm最新的激活码。
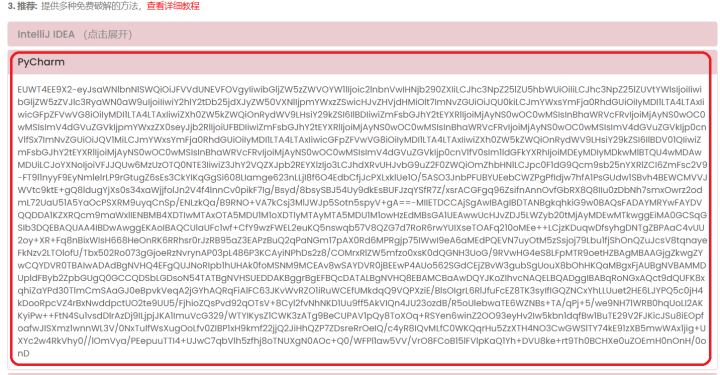
打开pycharm输入激活码。
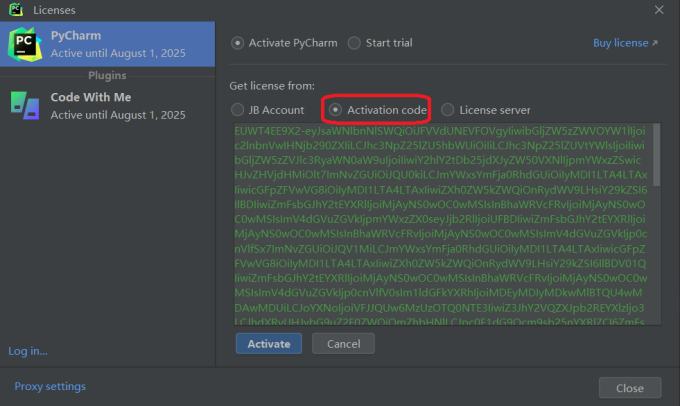
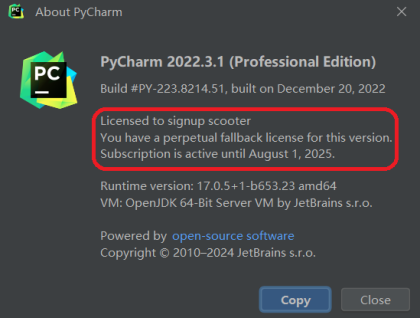
查看pycharm的Help->About,如果显示Licence信息说明激活成功。
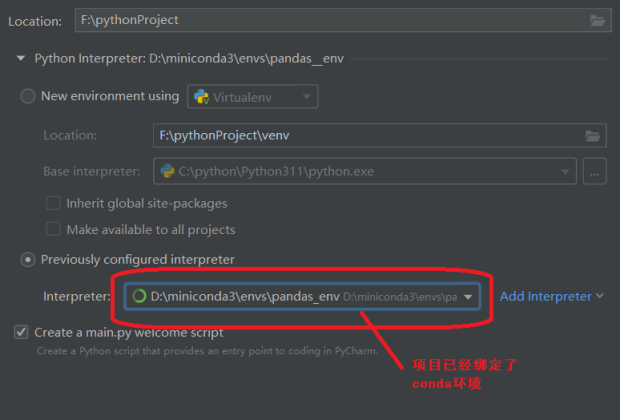
打开pycharm,创建python项目,选择已有的conda环境。
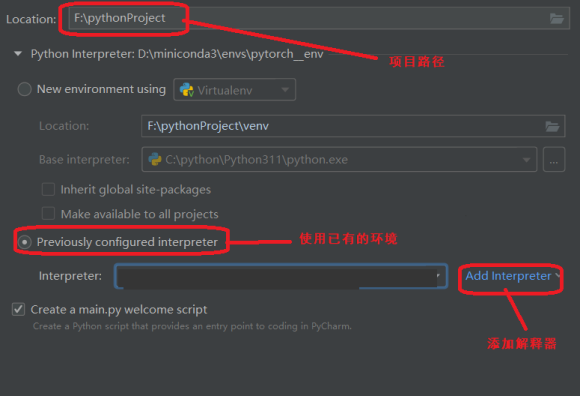
导入已有的conda环境。
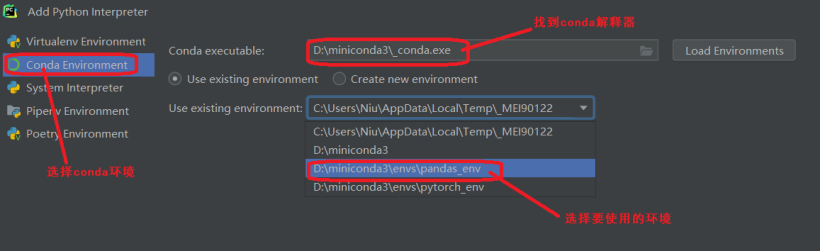
注意:对于新版本的pycharm可能无法识别conda根目录下的_conda.exe文件,也可以在conda安装文件夹下,寻找Scripts文件夹,可以选择Scripts文件夹中的conda.exe。
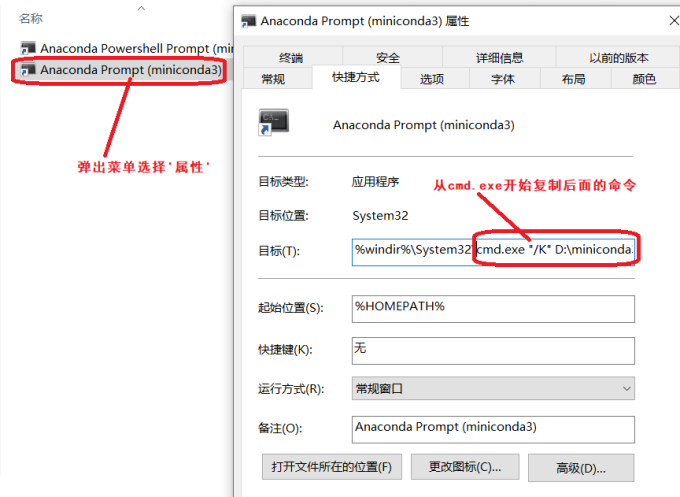
设置pycharm的terminal终端使用conda命令。首先查找conda prompt的路径。
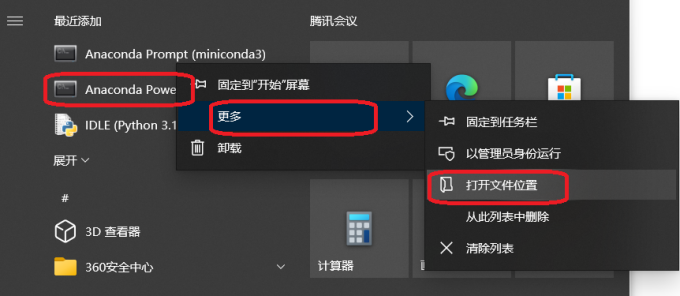
复制conda prompt的打开时所使用的命令脚本。
在pycharm的setting->tools->terminal,修改shell path
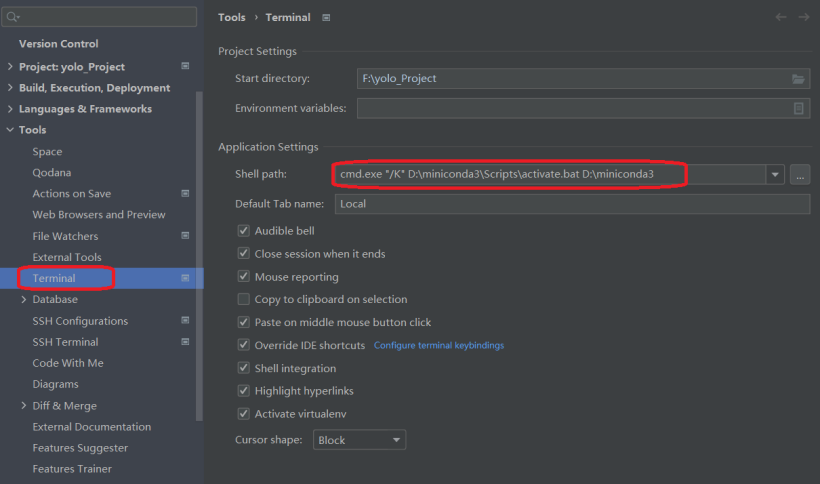
在pycharm中测试打开终端窗口,测试conda命令。

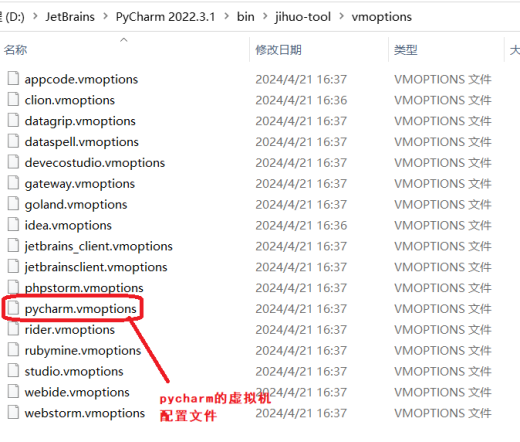
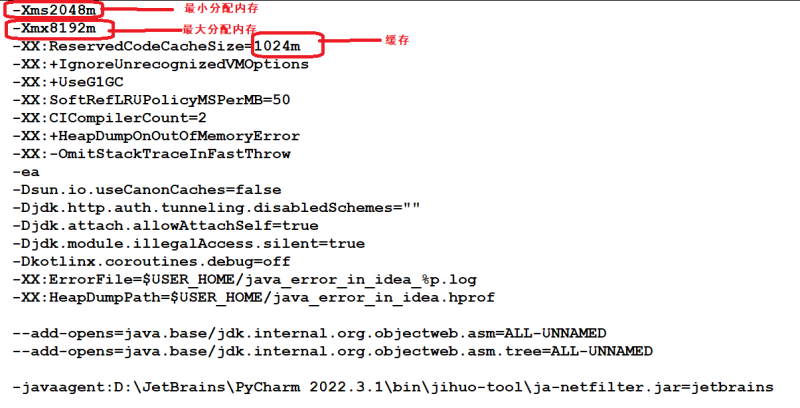
pycharm的内存优化,在D:\JetBrains\PyCharm 2022.3.1\bin\jihuo-tool\vmoptions目录下找到pycharm的虚拟机配置文件。
根据自身电脑内存情况,酌情优化内存配置。
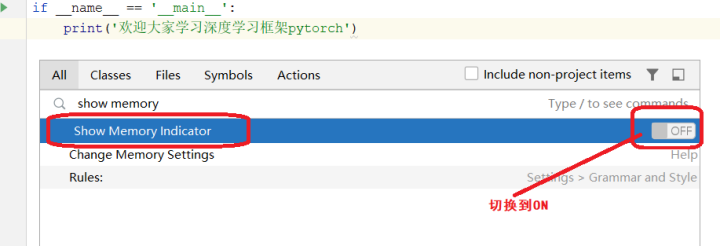
在pycharm中打开内存指示器。打开一个python工程,连续按下shift,输入Show Memory Indicator,点击右侧的 ON-OFF按钮,实现 开启/关闭。
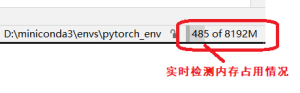
通过内存指示器可以实时检测内存的占用情况。
4.安装jupyter
输入下面命令安装jupyter:
conda install jupyter
安装完成后,输入jupyter notebook就可以启动jupyter了。
(base) PS C:\Windows\system32> jupyter notebook
[I 2024-04-22 23:39:54.057 ServerApp] jupyter_lsp | extension was successfully linked.
[I 2024-04-22 23:39:54.064 ServerApp] jupyter_server_terminals | extension was successfully linked.
[I 2024-04-22 23:39:54.070 ServerApp] jupyterlab | extension was successfully linked.
[I 2024-04-22 23:39:54.077 ServerApp] notebook | extension was successfully linked.
[I 2024-04-22 23:39:54.580 ServerApp] notebook_shim | extension was successfully linked.
[I 2024-04-22 23:39:54.628 ServerApp] notebook_shim | extension was successfully loaded.
[I 2024-04-22 23:39:54.630 ServerApp] jupyter_lsp | extension was successfully loaded.
[I 2024-04-22 23:39:54.631 ServerApp] jupyter_server_terminals | extension was successfully loaded.
[I 2024-04-22 23:39:54.638 LabApp] JupyterLab extension loaded from C:\Users\Niu\AppData\Roaming\Python\Python312\site-packages\jupyterlab
[I 2024-04-22 23:39:54.639 LabApp] JupyterLab application directory is C:\Users\Niu\AppData\Roaming\Python\share\jupyter\lab
[I 2024-04-22 23:39:54.639 LabApp] Extension Manager is 'pypi'.
[I 2024-04-22 23:39:54.829 ServerApp] jupyterlab | extension was successfully loaded.
[I 2024-04-22 23:39:54.836 ServerApp] notebook | extension was successfully loaded.
[I 2024-04-22 23:39:54.836 ServerApp] Serving notebooks from local directory: C:\Windows\system32
[I 2024-04-22 23:39:54.837 ServerApp] Jupyter Server 2.14.0 is running at:
[I 2024-04-22 23:39:54.838 ServerApp] http://localhost:8888/tree?token=a2f502cdd3e70bceff9522a72ae03eb4db27d0e29f9fd082
[I 2024-04-22 23:39:54.838 ServerApp]     http://127.0.0.1:8888/tree?token=a2f502cdd3e70bceff9522a72ae03eb4db27d0e29f9fd082
[I 2024-04-22 23:39:54.838 ServerApp] Use Control-C to stop this server and shut down all kernels (twice to skip confirmation).
[C 2024-04-22 23:39:54.932 ServerApp]

    To access the server, open this file in a browser:
        file:///C:/Users/Niu/AppData/Roaming/jupyter/runtime/jpserver-10504-open.html
    Or copy and paste one of these URLs:
        http://localhost:8888/tree?token=a2f502cdd3e70bceff9522a72ae03eb4db27d0e29f9fd082
        http://127.0.0.1:8888/tree?token=a2f502cdd3e70bceff9522a72ae03eb4db27d0e29f9fd082
[I 2024-04-22 23:39:56.321 ServerApp] Skipped non-installed server(s): bash-language-server, dockerfile-language-server-nodejs, javascript-typescript-langserver, jedi-language-server, julia-language-server, pyright, python-language-server, python-lsp-server, r-languageserver, sql-language-server, texlab, typescript-language-server, unified-language-server, vscode-css-languageserver-bin, vscode-html-languageserver-bin, vscode-json-languageserver-bin, yaml-language-server
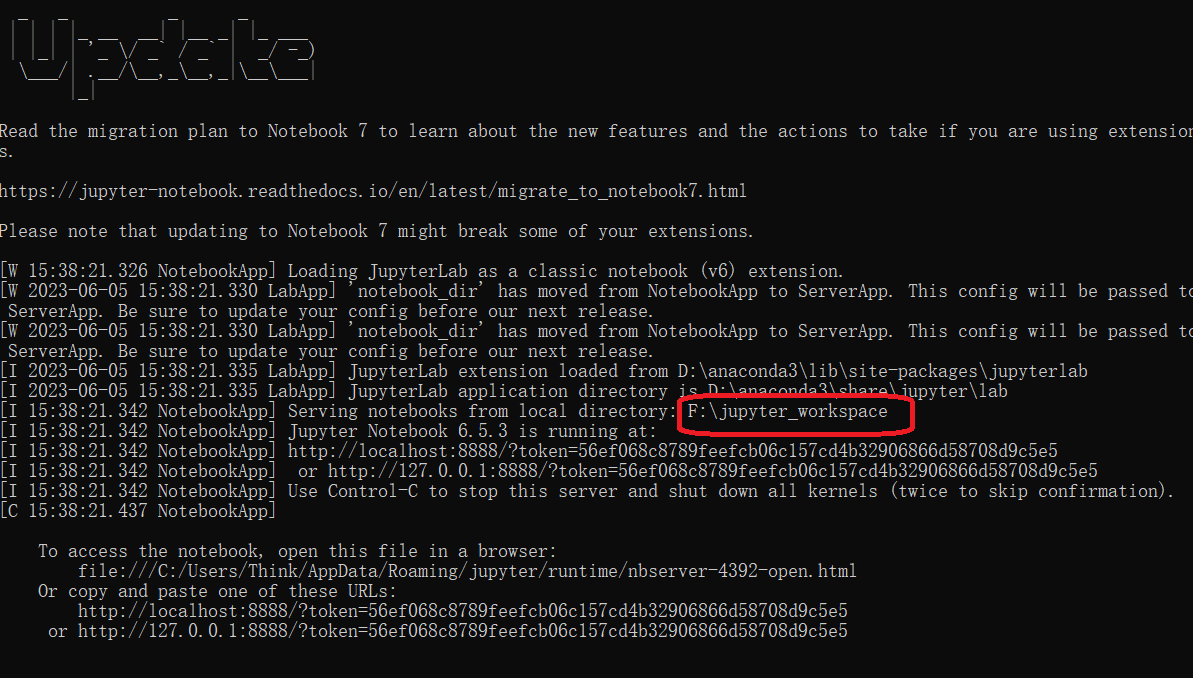
但是我们发现jupyter的默认工作空间在C:\Windows\system32 ,我们修改JupyterNotebook默认存储路径。
输入命令 jupyter notebook --generate-config
jupyter notebook --generate-config
通过这个命令,我们可以查询到jupyter配置文档路径。如下图所示:

编辑jupyter_notebook_config.py
搜索 c.NotebookApp.notebook_dir 关键字,如果没有就在文件结尾添加。设置Jupyter Notebook默认文件保存路径。
# 根据个人情况自己设置jupyter notebook默认的工作空间目录。
c.NotebookApp.notebook_dir = 'F:/jupyter_workspace'
此时windows的开始菜单,就出现了启动jupyter的快捷图标。点击这个图标启动,我们发现默认空间是用户目录,并不是我们在jupyter_notebook_config.py配置文件里设置的'F:/jupyter_workspace'。
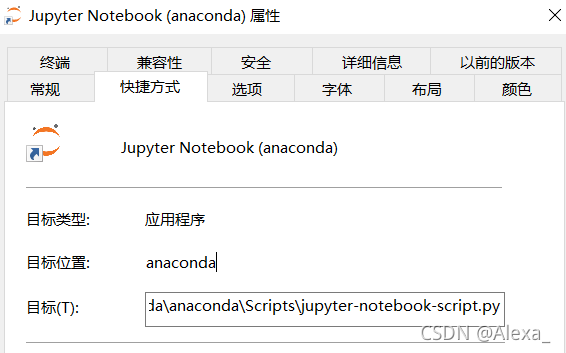
我们修改Jupyte Notebook的快捷方式。
找到Jupyte Notebook”快捷键,鼠标右击 – 更多 – 打开文件位置,找到对应的“Jupyte Notebook”快捷键,鼠标右击 – 属性 --快捷方式–目标,去掉后面的 “%USERPROFILE%/”。
重新启动Jupyte Notebook即可。
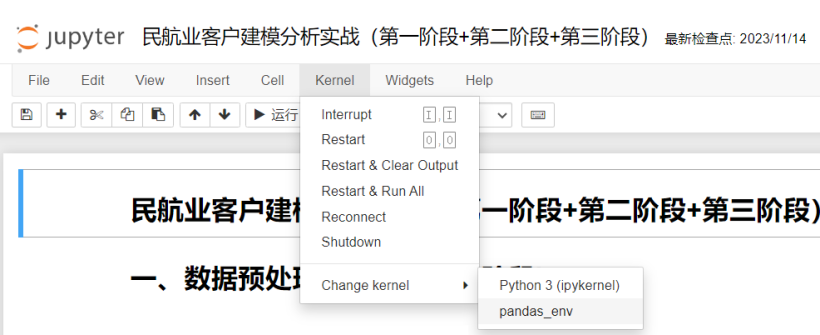
jupyter notebook如何切换环境呢?
首先查看conda现有的环境。
(base) PS C:\Users\Admin> conda env list
# conda environments:
#
pandas_env               C:\Users\Admin\.conda\envs\pandas_env
pytorch_env              C:\Users\Admin\.conda\envs\pytorch_env
tensorflow_env           C:\Users\Admin\.conda\envs\tensorflow_env
base                  *  D:\anaconda3
激活要切换的环境。
(base) PS C:\Users\Admin> conda activate pandas_env
(pandas_env) PS C:\Users\Admin>
安装ipykernel包。
(pandas_env) PS C:\Users\Admin>pip install ipykernel -i https://pypi.tuna.tsinghua.edu.cn/simple
将环境加载进jupyter中。
#pandas_env为环境名
(pandas_env) PS C:\Users\Admin>python -m ipykernel install --name pandas_env
打开jupyter notebook 更换环境。
5.C语言环境搭建
1.下载安装VS code.
官网下载地址:VS code 下载地址
2.安装插件
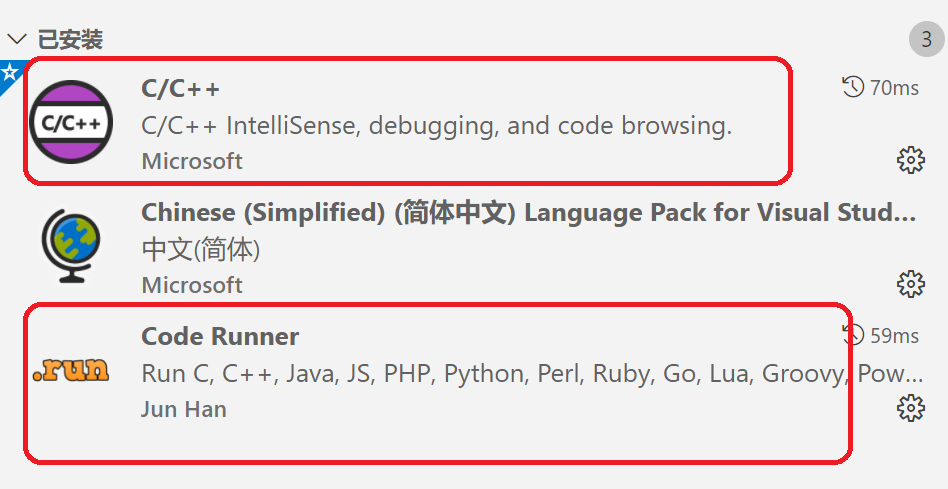 - C/C++:又名 cpptools,提供Debug和Format功能。
- Code Runner:右键即可编译运行单文件,很方便;但无法Debug。
- C/C++:又名 cpptools,提供Debug和Format功能。
- Code Runner:右键即可编译运行单文件,很方便;但无法Debug。
3.安装MinGW
下载gcc编译器:MinGW-w64 - for 32 and 64 bit Windows 。
下载地址:https://pan.baidu.com/s/16_4Ff18HFkvuCIZTjRI1YQ 提取码:9527 解压缩后,将bin目录配置到path环境变量。
C:\mingw64\bin
在cmd窗口输入以下命令测试:
gcc -v
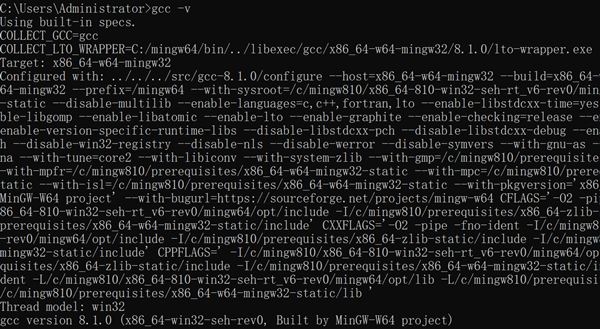
出现以上结果,说明MinGW安装成功。
4.配置json文件
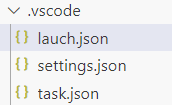
创建一个你打算存放代码的文件夹,称作工作区文件夹;路径不能含有中文和引号,最好不要有空格,我用的是F:\c_project。C和C++需要分别建立不同的文件夹。不要选上一节存放编译器的文件夹,源代码和编译器要分开放。打开VSC,选打开文件夹;最好不要选“添加工作区文件夹”,这个就是虚拟工作区,我没用过,不保证没问题。点新建文件夹,名称为.vscode;如果用的是Win10 1903+也可以在资源管理器里新建。然后创建 lauch.json,task.json,settings.json(不是setting.json) 放到.vscode文件夹下,如下图:
lauch.json
{

    "version": "0.2.0",
    "configurations": [
        {
            "name": "(gdb) 启动",
            "type": "cppdbg",
            "request": "launch",
            "program": "${fileDirname}/${fileBasenameNoExtension}.exe",
            "args": [],
            "stopAtEntry": false,
            "cwd": "${workspaceFolder}",
            "environment": [],
            "externalConsole": true,
            "MIMode": "gdb",
            "miDebuggerPath": "C:\\mingw64\\bin\\gdb.exe",
            "preLaunchTask": "gcc",
            "setupCommands": [
                {
                    "description": "为 gdb 启用整齐打印",
                    "text": "-enable-pretty-printing",
                    "ignoreFailures": true
                }
            ]
        }
    ]
}
settings.json
{
    "files.defaultLanguage": "c",
    "editor.formatOnType": true,
    "editor.suggest.snippetsPreventQuickSuggestions": false,
    "editor.acceptSuggestionOnEnter": "off",
    "code-runner.runInTerminal": true,
    "code-runner.executorMap": {
        "c": "gcc '$fileName' -o '$fileNameWithoutExt.exe' -Wall -O2 -m64 -lm -static-libgcc -fexec-charset=GBK -D__USE_MINGW_ANSI_STDIO && &'./$fileNameWithoutExt.exe'",
        "cpp": "g++ '$fileName' -o '$fileNameWithoutExt.exe' -Wall -O2 -m64 -static-libgcc -fexec-charset=GBK && &'./$fileNameWithoutExt.exe'"
    },
    "code-runner.saveFileBeforeRun": true,
    "code-runner.preserveFocus": true,
    "code-runner.clearPreviousOutput": false,
    "code-runner.ignoreSelection": true,
    "code-runner.fileDirectoryAsCwd": true,
    "C_Cpp.clang_format_sortIncludes": true,
}
task.json
{
    "version": "2.0.0",
    "tasks": [{
        "label": "gcc",
        "type": "shell",
        "windows": {
            "command": "gcc",
            "args": [
                "-g",
                "\"${file}\"",
                "-o",
                "\"${fileDirname}\\${fileBasenameNoExtension}.exe\""
            ]
        },
        "group": {
            "kind": "build",
            "isDefault": true
        },
        "presentation": {
            "reveal": "silent",
            "focus": false,
            "echo": false,
            "panel": "dedicated"
        },
        "problemMatcher": {
            "owner": "cpp",
            "fileLocation": [
                "relative",
                "${workspaceFolder}"
            ],
            "pattern": {
                "regexp": "^(.*):(\\d+):(\\d+):\\s+(warning|error):\\s+(.*)$",
                "file": 1,
                "line": 2,
                "column": 3,
                "severity": 4,
                "message": 5
            }
        }
    }]
}
5.编写C程序测试运行
#include <stdio.h>
int main(){
   printf("%s","HelloWorld!");
   system("pause");
   return 0;
}
按F5执行调试。运行正常!