自定义AccessLimit 注解实现接口防刷
自定义AccessLimit 注解实现接口防刷
在一些高并发的业务场景里,我们通常需要防止请求在一定时间内被进行多次访问,这时我们就需要对该接口进行限流。
当然限流操作还有一些场景:
- 秒杀活动,有人使用软件恶意刷单抢货,需要限流防止机器参与活动
- 某api被各式各样系统广泛调用,严重消耗网络、内存等资源,需要合理限流
- 淘宝获取ip所在城市接口、微信公众号识别微信用户等开发接口,免费提供给用户时需要限流,更具有实时性和准确性的接口需要付费。
总的就是说防止同一用户对单个接口进行重复调用,这里我们就需要使用到@AccessLimit进行流量控制。这个注解需要我们自己手动去定义,并搭配springboot的拦截器使用。
项目实现结构图如下:
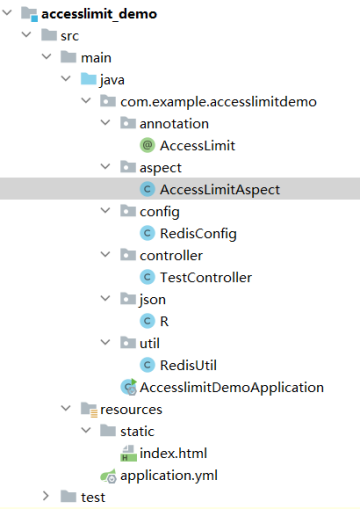
项目相关的pom.xml和application.yml具体配置,请参考springboot相关教程。
1).首先添加Reids配置类。
package com.example.accesslimitdemo.config;

import com.fasterxml.jackson.annotation.JsonAutoDetect;
import com.fasterxml.jackson.annotation.PropertyAccessor;
import com.fasterxml.jackson.databind.ObjectMapper;
import org.springframework.cache.CacheManager;
import org.springframework.cache.annotation.CachingConfigurerSupport;
import org.springframework.cache.interceptor.KeyGenerator;
import org.springframework.context.annotation.Bean;
import org.springframework.context.annotation.Configuration;
import org.springframework.context.annotation.DependsOn;
import org.springframework.context.annotation.Primary;
import org.springframework.data.redis.cache.RedisCacheConfiguration;
import org.springframework.data.redis.cache.RedisCacheManager;
import org.springframework.data.redis.connection.lettuce.LettuceConnectionFactory;
import org.springframework.data.redis.core.RedisTemplate;
import org.springframework.data.redis.serializer.Jackson2JsonRedisSerializer;
import org.springframework.data.redis.serializer.RedisSerializationContext;
import org.springframework.data.redis.serializer.StringRedisSerializer;

import java.lang.reflect.Method;

@Configuration
public class RedisConfig extends CachingConfigurerSupport {
    /**
     * * 自定义缓存key的生成策略。默认的生成策略是看不懂的(乱码内容) 通过Spring 的依赖注入特性进行自定义的 配置注入并且此类是一个配置类可以更多程度的自定义配置
     * *
     * * @return
     */
    @Bean
    @Override
    public KeyGenerator keyGenerator() {
        return new KeyGenerator() {
            @Override
            public Object generate(Object target, Method method, Object... params) {
                StringBuilder sb = new StringBuilder();
                sb.append(target.getClass().getName());
                sb.append(method.getName());
                for (Object obj : params) {
                    sb.append(obj.toString());
                }
                return sb.toString();
            }
        };
    }

    /**
     * *
     * * 缓存配置管理器
     */
    @Bean("redisCacheManager")
    @Primary
    @DependsOn("customRedisTemplate")
    public CacheManager cacheManager(RedisTemplate<String, Object> redisTemplate) {
        return RedisCacheManager.RedisCacheManagerBuilder
                .fromConnectionFactory(redisTemplate.getConnectionFactory())
                // 设置缓存默认永不过期
                .cacheDefaults(
                        RedisCacheConfiguration.defaultCacheConfig()
                                // 不缓存null(需要与unless = "#result == null"共同使用)
                                .disableCachingNullValues()
                                .serializeKeysWith(
                                        RedisSerializationContext.SerializationPair.fromSerializer(redisTemplate.getStringSerializer()))
                                .serializeValuesWith(
                                        RedisSerializationContext.SerializationPair.fromSerializer(redisTemplate.getValueSerializer())))
                // 配置同步修改或删除 put/evict
                .transactionAware()
                .build();
    }

    @Bean("customRedisTemplate")
    //当自动装配时当出现多个Bean候选者时,被注解为@Primary的Bean将作为首选者,否则将抛出异常
    @Primary
    public RedisTemplate<String, Object> redisTemplate(LettuceConnectionFactory factory) {
        RedisTemplate<String, Object> template = new RedisTemplate<>();
        template.setConnectionFactory(factory);
        Jackson2JsonRedisSerializer jackson2JsonRedisSerializer = new Jackson2JsonRedisSerializer(Object.class);
        ObjectMapper om = new ObjectMapper();
        om.setVisibility(PropertyAccessor.ALL, JsonAutoDetect.Visibility.ANY);
        om.enableDefaultTyping(ObjectMapper.DefaultTyping.NON_FINAL);
        jackson2JsonRedisSerializer.setObjectMapper(om);
        StringRedisSerializer stringRedisSerializer = new StringRedisSerializer();
        // 在使用注解@Bean返回RedisTemplate的时候,同时配置hashKey与hashValue的序列化方式。
        // key采用String的序列化方式
        template.setKeySerializer(stringRedisSerializer);
        // value序列化方式采用jackson
        template.setValueSerializer(jackson2JsonRedisSerializer);
        // hash的key也采用String的序列化方式
        template.setHashKeySerializer(stringRedisSerializer);
        // hash的value序列化方式采用jackson
        template.setHashValueSerializer(jackson2JsonRedisSerializer);
        template.afterPropertiesSet();
        return template;
    }
}
2).用户的请求记录需要存储到redis中,我先设计RedisUtil工具类。
package com.example.accesslimitdemo.util;

import com.baomidou.mybatisplus.core.toolkit.CollectionUtils;
import org.springframework.data.redis.core.RedisTemplate;
import org.springframework.data.redis.core.ValueOperations;
import org.springframework.stereotype.Component;
import javax.annotation.Resource;
import java.util.Set;
import java.util.concurrent.TimeUnit;

@Component
public class RedisUtil {

    @Resource(name = "customRedisTemplate")
    private RedisTemplate<String, Object> redisTemplate;   //redisTemplate

    /**
     * 往redis中缓存数据
     *
     * @param key
     * @param object
     * @return
     */
    public boolean set(String key, Object object) {
        ValueOperations<String, Object> vo = redisTemplate.opsForValue();
        vo.set(key, object);
        return true;
    }

    public boolean set(String key,Object object,long duration){
        ValueOperations<String, Object> vo = redisTemplate.opsForValue();
        //表示5分钟后自动过期
        vo.set(key, object,5, TimeUnit.SECONDS);
        return true;
    }

    /**
     * 根据key从redis服务器中获取value值
     *
     * @param key
     * @return
     */
    public Object get(String key) {
        ValueOperations<String, Object> vo = redisTemplate.opsForValue();
        return vo.get(key);
    }

    public boolean hasKey(String key) {
        return Boolean.TRUE.equals(redisTemplate.hasKey(key));
    }

    /**
     * 根据key从Redis中删除value值
     */
    public void remove(String key) {
        redisTemplate.delete(key);
    }

    /*
    * 根据前缀模糊删除key的集合
    * */

    public void removeByPrex(String prex) {
        Set<String> keys = redisTemplate.keys(prex+"*");
        if (CollectionUtils.isNotEmpty(keys)) {
            redisTemplate.delete(keys);
        }
    }
}
3).设计相应数据格式封装类R
package com.example.accesslimitdemo.json;


import lombok.Data;

import java.io.Serializable;

@Data
//R ===>Response 响应
public class R implements Serializable {

    private static final Integer SUCCESS = 200; //表示请求成功的状态码的常量
    private static final Integer FAIL = 400; //表示一般失败的状态码的常量
    private static final Integer ERROR = 500; //表示服务器内部错误的状态码常量

    private static final Integer UNAUTH = 403; // 没有权限

    private Integer code; //表示状态码属性
    private String msg; //表示响应的消息

    private Object data; //表示响应返回的数据
    private String token; //表示令牌,将来做身份认证用的,肯定能用到。

    //成功
    public static R success() {
        R r = new R();
        r.setCode(SUCCESS);
        r.setMsg("success");
        return r;
    }

    //方法重载...
    public static R success(String msg) {
        R r = new R();
        r.setCode(SUCCESS);
        r.setMsg(msg);
        return r;
    }

    public static R success(String msg, Object data) {
        R r = new R();
        r.setCode(SUCCESS);
        r.setMsg(msg);
        r.setData(data);
        return r;
    }

    //失败
    public static R fail() {
        R r = new R();
        r.setCode(FAIL);
        r.setMsg("failure");
        return r;
    }

    //方法重载...
    public static R fail(String msg) {
        R r = new R();
        r.setCode(FAIL);
        r.setMsg(msg);
        return r;
    }

    //错误
    //error

    public static R error() {
        R r = new R();
        r.setCode(ERROR);
        r.setMsg("error");
        return r;
    }

    //方法重载
    public static R error(String msg) {
        R r = new R();
        r.setCode(ERROR);
        r.setMsg(msg);
        return r;
    }

    public static R unauth() {
        R r = new R();
        r.setCode(UNAUTH);
        r.setMsg("unauthorized");
        return r;
    }

    public static R unauth(String msg) {
        R r = new R();
        r.setCode(UNAUTH);
        r.setMsg(msg);
        return r;
    }

}
4).实现自定义注解类
package com.example.accesslimitdemo.annotation;

import java.lang.annotation.*;

@Target({ElementType.METHOD, ElementType.TYPE})
@Retention(RetentionPolicy.RUNTIME)
@Documented
public @interface AccessLimit {

    int seconds();
    int maxCount();
}
5).AOP切面类(具体逻辑实现doAround方法)
package com.example.accesslimitdemo.aspect;
import com.example.accesslimitdemo.json.R;
import com.example.accesslimitdemo.util.RedisUtil;
import lombok.extern.slf4j.Slf4j;
import org.aspectj.lang.JoinPoint;
import org.aspectj.lang.ProceedingJoinPoint;
import org.aspectj.lang.annotation.*;
import org.springframework.stereotype.Component;
import org.springframework.web.context.request.RequestContextHolder;
import org.springframework.web.context.request.ServletRequestAttributes;
import javax.annotation.Resource;
import javax.servlet.http.HttpServletRequest;
import javax.servlet.http.HttpSession;
@Aspect
@Component
@SuppressWarnings({"unused"})
@Slf4j
public class AccessLimitAspect {
@Resource
private RedisUtil redisUtil;
@Pointcut("@annotation(com.example.accesslimitdemo.annotation.AccessLimit)")
public void annotationPointcut() {
}
@Before("annotationPointcut()")
public void beforePointcut(JoinPoint joinPoint) {
// 此处进入到方法前 可以实现一些业务逻辑
}
@Around("annotationPointcut()")
public Object doAround(ProceedingJoinPoint joinPoint) {
ServletRequestAttributes attributes =
(ServletRequestAttributes) RequestContextHolder.getRequestAttributes();
//获取request
HttpServletRequest request = attributes.getRequest();
HttpSession session = request.getSession();
//User user = BdpSecurityManager.getLoginedUser();
//组装redis key 从redis中获取对应的值
String uid = request.getParameter("uid");
String key = "accessLimit_"+uid;
//如果redis中不存在对应的值,则执行原有的代码逻辑(插入文章操作)
if (!redisUtil.hasKey(key)) {
//redis设置key,value ,1秒有效
redisUtil.set(key, "",1);
try {
return joinPoint.proceed();
} catch (Throwable throwable) {
redisUtil.remove(key);
// RestResponse 为自定义的而返回对象
return R.error( "系统错误,请联系管理员!");
}
} else {
//如果redis中存在对应的值,则证明重复提交,返回对应的信息
//log.info("{}:重复提交", key+"_"+item);
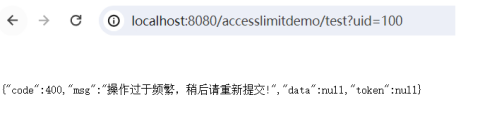
return R.fail( "操作过于频繁,稍后请重新提交!");
}
}
/**
* 在切入点return内容之后切入内容(可以用来对处理返回值做一些加工处理)
* @param joinPoint
*/
@AfterReturning("annotationPointcut()")
public void doAfterReturning(JoinPoint joinPoint) {
}
}
6).编写测试接口
package com.example.accesslimitdemo.controller;

import com.example.accesslimitdemo.annotation.AccessLimit;
import com.example.accesslimitdemo.json.R;
import org.springframework.web.bind.annotation.GetMapping;
import org.springframework.web.bind.annotation.RequestParam;
import org.springframework.web.bind.annotation.RestController;

@RestController

public class TestController {

    @AccessLimit(seconds = 1,maxCount = 1)  // 同一用户1秒内只允许一次请求
    @GetMapping("/test")
    public R accessLimitRequest() {
        try {
            System.out.println("处理时间戳为:" + System.currentTimeMillis() + "的请求!");
            return R.success("请求成功!");
        } catch (Exception ex) {
            ex.printStackTrace();
            return R.error("程序出现异常!");
        }
    }
}
测试在一秒钟之内多重重复请求TestController接口,会出现相应的限流警告信息。