Flume高级组件有Source Interceptors、Channel Selectors和Sink Processors。
1.高级组件
- Source Interceptors:Source可以指定一个或者多个拦截器按先后顺序依次对采集到的数据进行处理。
- Channel Selectors:Source发往多个Channel的策略设置,如果source后面接了多个channel,到底是给所有的channel都发,还是根据规则发送到不同channel,这些是由Channel Selectors来控制的。
- Sink Processors:Sink 发送数据的策略设置,一个channel后面可以接多个sink,channel中的数据是被哪个sink获取,这个是由Sink Processors控制的。
2.Event
Event是Flume传输数据的基本单位,也是事务的基本单位,在文本文件中,通常一行记录就是一个Event。 Event中包含header和body;
- body是采集到的那一行记录的原始内容。
- header类型为Map
3.Source Interceptors
Flume系统中已经内置提供了很多Source Interceptors,常见的Source Interceptors类型:Timestamp Interceptor、Host Interceptor、Search and Replace Interceptor 、Static Interceptor、Regex Extractor Interceptor 等等。
- Timestamp Interceptor:向event中的header里面添加timestamp 时间戳信息。
- Host Interceptor:向event中的header里面添加host属性,host的值为当前机器的主机名或者ip。
- Search and Replace Interceptor:根据指定的规则查询Event中body里面的数据,然后进行替换,这个拦截器会修改event中body的值,也就是会修改原始采集到的数据内容。
- Static Interceptor:向event中的header里面添加固定的key和value。
- Regex Extractor Interceptor:根据指定的规则从Event中的body里面抽取数据,生成key和value,再把key和value添加到header中。
Timestamp Interceptor、Host Interceptor、Static Interceptor、Regex Extractor Interceptor是向event中的header里面添加key-value类型的数据,方便后面的channel和sink组件使用,对采集到的原始数据内容没有任何影响。
Search and Replace Interceptor是会根据规则修改event中body里面的原始数据内容,对header没有任何影响,使用这个拦截器需要特别小心,因为他会修改原始数据内容。 这里面这几个拦截器,其中Search and Replace Interceptor和Regex Extractor Interceptor 我们在工作中使用的频率较高一些。
4.Source Interceptors案例
对采集到的数据按天按类型分目录存储,原始日志信息如下:
在 /data/log/下创建,moreType.log日志文件。注意:最后一定要保留一个空行。
{"id":"14943445328940974601","uid":"840717325115457536","lat":"53.530598","lnt":"-2.5620373","hots":0,"title":"0","status":"1","topicId":"0","end_time":"1494344570","watch_num":0,"share_num":"1","replay_url":null,"replay_num":0,"start_time":"1494344544","timestamp":1494344571,"type":"video_info"}
{"uid":"861848974414839801","nickname":"mick","usign":"","sex":1,"birthday":"","face":"","big_face":"","email":"abc@qq.com","mobile":"","reg_type":"102","last_login_time":"1494344580","reg_time":"1494344580","last_update_time":"1494344580","status":"5","is_verified":"0","verified_info":"","is_seller":"0","level":1,"exp":0,"anchor_level":0,"anchor_exp":0,"os":"android","timestamp":1494344580,"type":"user_info"}
{"send_id":"834688818270961664","good_id":"223","video_id":"14943443045138661356","gold":"10","timestamp":1494344574,"type":"gift_record"}
最终在hdfs中需要生成的目录大致是这样的:
hdfs://192.168.182.100:9000/moreType/20200101/videoInfo
hdfs://192.168.182.100:9000/moreType/20200101/userInfo
hdfs://192.168.182.100:9000/moreType/20200101/giftRecord
所以整体的流程如下:
Exec Source -> Search and Replace Interceptor->Regex Extractor Interceptor->File Channel->HDFS Sink
面我们来配置Agent,在$FLUME_HOME/conf下创建file-to-hdfs-moreType.conf
# agent的名称是a1
# 指定source组件、channel组件和Sink组件的名称
a1.sources = r1
a1.channels = c1
a1.sinks = k1

# 配置source组件
a1.sources.r1.type = exec
a1.sources.r1.command = tail -F /data/log/moreType.log

# 配置拦截器 [多个拦截器按照顺序依次执行]
a1.sources.r1.interceptors = i1 i2 i3 i4
a1.sources.r1.interceptors.i1.type = search_replace
a1.sources.r1.interceptors.i1.searchPattern = "type":"video_info"
a1.sources.r1.interceptors.i1.replaceString = "type":"videoInfo"

a1.sources.r1.interceptors.i2.type = search_replace
a1.sources.r1.interceptors.i2.searchPattern = "type":"user_info"
a1.sources.r1.interceptors.i2.replaceString = "type":"userInfo"

a1.sources.r1.interceptors.i3.type = search_replace
a1.sources.r1.interceptors.i3.searchPattern = "type":"gift_record"
a1.sources.r1.interceptors.i3.replaceString = "type":"giftRecord"


a1.sources.r1.interceptors.i4.type = regex_extractor
a1.sources.r1.interceptors.i4.regex = "type":"(\\w+)"
a1.sources.r1.interceptors.i4.serializers = s1
a1.sources.r1.interceptors.i4.serializers.s1.name = logType


# 配置channel组件
a1.channels.c1.type = file
a1.channels.c1.checkpointDir = /usr/local/flume/data/moreType/checkpoint
a1.channels.c1.dataDirs = /usr/local/flume/data/moreType/data


# 配置sink组件
a1.sinks.k1.type = hdfs
a1.sinks.k1.hdfs.path = hdfs://192.168.56.101:9000/moreType/%Y%m%d/%{logType}
a1.sinks.k1.hdfs.fileType = DataStream
a1.sinks.k1.hdfs.writeFormat = Text
a1.sinks.k1.hdfs.rollInterval = 3600
a1.sinks.k1.hdfs.rollSize = 134217728
a1.sinks.k1.hdfs.rollCount = 0
a1.sinks.k1.hdfs.useLocalTimeStamp = true

#增加文件前缀和后缀
a1.sinks.k1.hdfs.filePrefix = data
a1.sinks.k1.hdfs.fileSuffix = .log

# 把组件连接起来
a1.sources.r1.channels = c1
a1.sinks.k1.channel = c1
启动Agent.
[root@master flume]# bin/flume-ng agent --name a1 --conf conf --conf-file conf/file-to-hdfs-moreType.conf -Dflume.root.logger=INFO,console
看一下HDFS中的文件内容,发现type字段的值确实被拦截器修改了。
[root@master ~]# hdfs dfs -cat /moreType/20230924/videoInfo/data.1695529628995.log.tmp
2023-09-24 12:33:43,051 INFO sasl.SaslDataTransferClient: SASL encryption trust check: localHostTrusted = false, remoteHostTrusted = false
{"id":"14943445328940974601","uid":"840717325115457536","lat":"53.530598","lnt":"-2.5620373","hots":0,"title":"0","status":"1","topicId":"0","end_time":"1494344570","watch_num":0,"share_num":"1","replay_url":null,"replay_num":0,"start_time":"1494344544","timestamp":1494344571,"type":"videoInfo"}
5.Channel Selectors
Channel Selectors类型包括:Replicating Channel Selector 和Multiplexing Channel Selector 其中Replicating Channel Selector是默认的channel 选择器,它会将Source采集过来的Event发往所有Channel。
查看官方文档中针对这个默认channel选择器的解释。
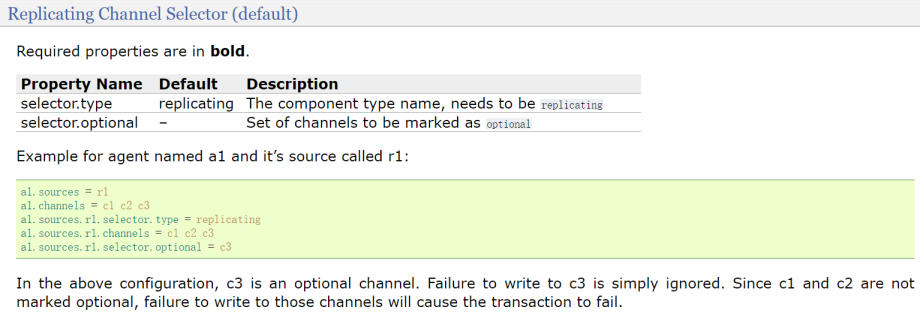
在这个例子的配置中,c3是可选channel。对c3的写入失败将被忽略。由于c1和c2未标记为可选,因此未能写入这些channel将导致事务失败,针对这个配置,通俗一点来说就是,source的数据会发往c1、c2、c3这三个channle中,可以保证c1、c2一定能接收到所有数据,但是c3就无法保证了。这个selector.optional参数是一个可选项,可以不用配置就行。
如果是多个channel的话,直接在channels参数后面指定多个channel的名称就可以了。
还有一个 channel选择器是Multiplexing Channel Selector,它表示会根据Event中header里面的值将Event发往不同的Channel。
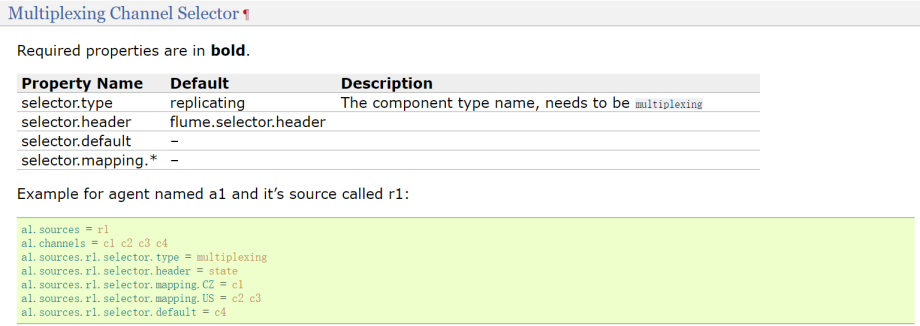
在这个例子的配置中,指定了4个channel,c1、c2、c3、c4 source采集到的数据具体会发送到哪个channel中,会根据event中header里面的state属性的值,这个是通过selector.header控制的。
- 如果state属性的值是CZ,则发送给c1
- 如果state属性的值是US,则发送给c2 c3
- 如果state属性的值是其它值,则发送给c4 这些规则是通过selector.mapping和selector.default控制的,这样就可以实现根据一定规则把数据分发给不同的channel了。
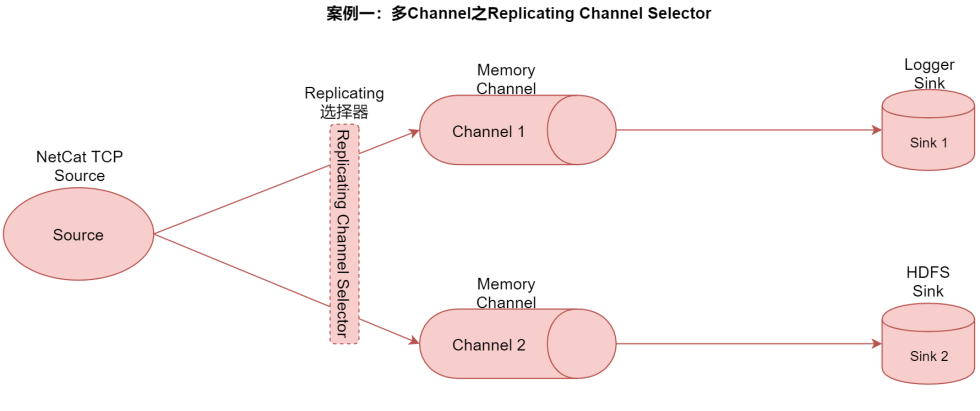
案例一:多Channel之Replicating Channel Selector
实现步骤如下:
1).在flume的conf目录中创建tcp-to-replicatingchannel.conf
[root@bigdata04 conf]# vim tcp-to-replicatingchannel.conf
# agent的名称是a1
# 指定source组件、channel组件和Sink组件的名称
a1.sources = r1
a1.channels = c1 c2
a1.sinks = k1 k2

# 配置source组件
a1.sources.r1.type = netcat
a1.sources.r1.bind = 0.0.0.0
a1.sources.r1.port = 44444

# 配置channle选择器[默认就是replicating,所以可以省略]
a1.sources.r1.selector.type = replicating

# 配置channel组件
a1.channels.c1.type = memory
a1.channels.c1.capacity = 1000
a1.channels.c1.transactionCapacity = 100

a1.channels.c2.type = memory
a1.channels.c2.capacity = 1000
a1.channels.c2.transactionCapacity = 100


# 配置sink组件
a1.sinks.k1.type = logger

a1.sinks.k2.type = hdfs
a1.sinks.k2.hdfs.path = hdfs://192.168.56.101:9000/replicating
a1.sinks.k2.hdfs.fileType = DataStream
a1.sinks.k2.hdfs.writeFormat = Text
a1.sinks.k2.hdfs.rollInterval = 3600
a1.sinks.k2.hdfs.rollSize = 134217728
a1.sinks.k2.hdfs.rollCount = 0
a1.sinks.k2.hdfs.useLocalTimeStamp = true
a1.sinks.k2.hdfs.filePrefix = data
a1.sinks.k2.hdfs.fileSuffix = .log


# 把组件连接起来
a1.sources.r1.channels = c1 c2
a1.sinks.k1.channel = c1
a1.sinks.k2.channel = c2
启动Agent.
[root@bigdata04 apache-flume-1.9.0-bin]# bin/flume-ng agent --name a1 --conf conf --conf-file conf/tcp-to-replicatingchannel.conf -Dflume.root.logger=INFO,console
生成测试数据,通过telnet连接到socket。
[root@bigdata04 ~]# telnet localhost 44444
Trying ::1...
Connected to localhost.
Escape character is '^]'.
hello,flume
OK
可以看到Flume在控制台输出的日志信息。
2023-09-30 00:18:25,235 (SinkRunner-PollingRunner-DefaultSinkProcessor) [INFO - org.apache.flume.sink.LoggerSink.process(LoggerSink.java:95)] Event: { headers:{} body: 68 65 6C 6C 6F 2C 66 6C 75 6D 65 0D hello,flume. }
查看在hdfs中生成的文件中的内容。
[root@master ~]# hdfs dfs -cat hdfs://192.168.56.101:9000/replicating/data.1696004146850.log.tmp
2023-09-30 00:19:12,396 INFO sasl.SaslDataTransferClient: SASL encryption trust check: localHostTrusted = false, remoteHostTrusted = false
hello,flume
案例二:多Channel之Multiplexing Channel Selector
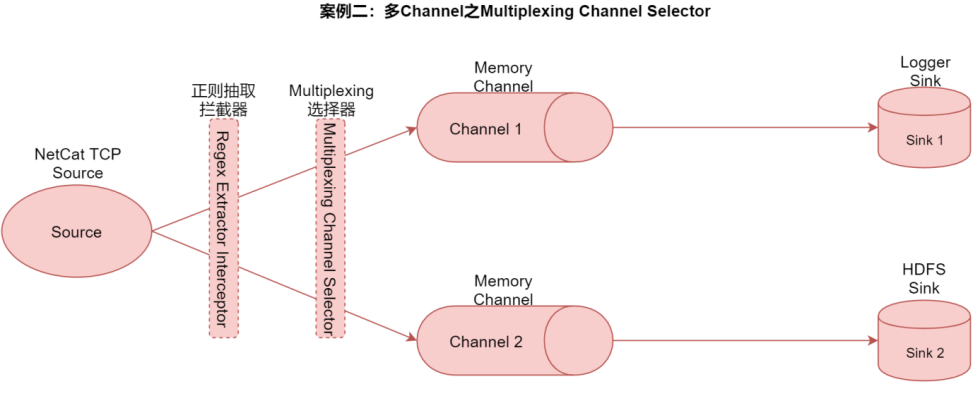
在这个案例中我们使用Multiplexing选择器,将source采集到的数据按照一定规则发送给两个channle,最终再把不同channel中的数据存储到不同介质中。
在这里面我们需要用到正则抽取拦截器在Event的header中生成key-value,作为Multiplexing选择器的规则。
假设我们的原始数据格式为:
{"name":"jack","age":19,"city":"bj"}
{"name":"tom","age":26,"city":"sh"}
下面来配置Agent,复制tcp-to-replicatingchannel.conf的内容,在flume的conf目录中创建tcp-to-multiplexingchannel.conf
[root@master conf]# vim tcp-to-multiplexingchannel.conf

# agent的名称是a1

# 指定source组件、channel组件和Sink组件的名称
a1.sources = r1
a1.channels = c1 c2
a1.sinks = k1 k2

# 配置source组件
a1.sources.r1.type = netcat
a1.sources.r1.bind = 0.0.0.0
a1.sources.r1.port = 44444

# 配置source拦截器
a1.sources.r1.interceptors = i1
a1.sources.r1.interceptors.i1.type = regex_extractor
a1.sources.r1.interceptors.i1.regex = "city":"(\\w+)"
a1.sources.r1.interceptors.i1.serializers = s1
a1.sources.r1.interceptors.i1.serializers.s1.name = city

# 配置channle选择器
a1.sources.r1.selector.type = multiplexing
a1.sources.r1.selector.header = city
a1.sources.r1.selector.mapping.bj = c1
a1.sources.r1.selector.default = c2

# 配置channel组件
a1.channels.c1.type = memory
a1.channels.c1.capacity = 1000
a1.channels.c1.transactionCapacity = 100

a1.channels.c2.type = memory
a1.channels.c2.capacity = 1000
a1.channels.c2.transactionCapacity = 100


# 配置sink组件
a1.sinks.k1.type = logger

a1.sinks.k2.type = hdfs
a1.sinks.k2.hdfs.path = hdfs://192.168.56.101:9000/multiplexing
a1.sinks.k2.hdfs.fileType = DataStream
a1.sinks.k2.hdfs.writeFormat = Text
a1.sinks.k2.hdfs.rollInterval = 3600
a1.sinks.k2.hdfs.rollSize = 134217728
a1.sinks.k2.hdfs.rollCount = 0
a1.sinks.k2.hdfs.useLocalTimeStamp = true
a1.sinks.k2.hdfs.filePrefix = data
a1.sinks.k2.hdfs.fileSuffix = .log


# 把组件连接起来
a1.sources.r1.channels = c1 c2
a1.sinks.k1.channel = c1
a1.sinks.k2.channel = c2
启动Agent。
[root@master flume]# bin/flume-ng agent --name a1 --conf conf --conf-file conf/tcp-to-multiplexingchannel.conf -Dflume.root.logger=INFO,console
通过telnet连接到socket.
[root@master ~]# telnet localhost 44444
Trying ::1...
Connected to localhost.
Escape character is '^]'.
{"name":"jack","age":19,"city":"bj"}
OK
{"name":"tom","age":26,"city":"sh"}
OK
看结果,在Flume启动命令行中会输出如下日志信息。
2020-05-03 10:19:58,181 (SinkRunner-PollingRunner-DefaultSinkProcessor) [INFO - org.apache.flume.sink.LoggerSink.process(LoggerSink.java:95)] Event: { headers:{city=bj} body: 7B 22 6E 61 6D 65 22 3A 22 6A 61 63 6B 22 2C 22 {"name":"jack"," }
2020-05-03 10:20:43,058 (SinkRunner-PollingRunner-DefaultSinkProcessor) [INFO - org.apache.flume.sink.hdfs.BucketWriter.open(BucketWriter.java:246)] Creating hdfs://192.168.56.101:9000/multiplexing/data.1588472338039.tmp
查看sink2输出到hdfs中的数据。
[root@master ~]# hdfs dfs -cat hdfs://192.168.56.101:9000/multiplexing/data.1696297859966.log.tmp
2023-10-03 09:54:48,534 INFO sasl.SaslDataTransferClient: SASL encryption trust check: localHostTrusted = false, remoteHostTrusted = false
{"name":"tom","age":26,"city":"sh"}
6.Sink Processors
Sink Processors类型包括这三种:Default Sink Processor、Load balancing Sink Processor和Failover Sink Processor
DefaultSink Processor是默认的,不用配置sinkgroup,就是咱们现在使用的这种最普通的形式,一个channel后面接一个sink的形式。Load balancing Sink Processor是负载均衡处理器,一个channle后面可以接多个sink,这多个sink属于一个sink group,根据指定的算法进行轮询或者随机发送,减轻单个sink的压力 Failover Sink Processor是故障转移处理器,一个channle后面可以接多个sink,这多个sink属于一个sink group,按照sink的优先级,默认先让优先级高的sink来处理数据,如果这个sink出现了故障,则用优先级低一点的sink处理数据,可以保证数据不丢失。
我们主要研究下负载均衡,Load balancing Sink Processor。
本案例必须在hadoop集群下试验,采用一主二从集群模式配置。具体配置参照《Hadoop-3.1.3集群配置》小节内容。
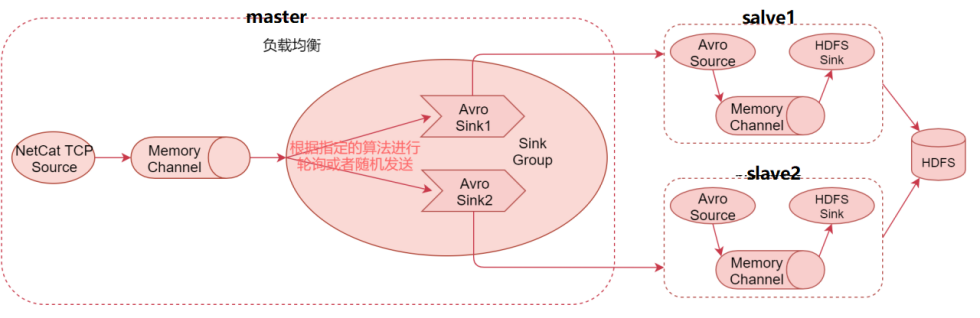
看这个图,在这里面一个channel后面接了两个sink,这两个sink属于一个sink group。
看中间的参数信息, sinks:指定这个sink groups中有哪些sink,指定sink的名称,多个的话中间使用空格隔开即可【注意,这里写的是processor.sinks,但是在下面的example中使用的是sinks,实际上就是sinks,所以文档也是有一些瑕疵的,不过Flume的文档已经算是写的非常好的了】 processor.type:针对负载均衡的sink处理器,这里需要指定load_balance processor.selector:此参数的值内置支持两个,round_robin和random,round_robin表示轮询,按照sink的顺序,轮流处理数据,random表示随机。 processor.backoff:默认为false,设置为true后,故障的节点会列入黑名单,过一定时间才会再次发送数据,如果还失败,则等待时间是指数级增长;一直到达到最大的时间。 如果不开启,故障的节点每次还会被重试发送,如果真有故障节点的话就会影响效率。 processor.selector.maxTimeOut:最大的黑名单时间,默认是30秒。
在master主机的$FLUME_HOME/conf下新建,load-balancing.conf
[root@master conf]# vim load-balancing.conf
# agent的名称是a1
# 指定source组件、channel组件和Sink组件的名称
a1.sources = r1
a1.channels = c1
a1.sinks = k1 k2

# 配置source组件
a1.sources.r1.type = netcat
a1.sources.r1.bind = 0.0.0.0
a1.sources.r1.port = 44444


# 配置channel组件
a1.channels.c1.type = memory
a1.channels.c1.capacity = 1000
a1.channels.c1.transactionCapacity = 100


# 配置sink组件,[为了方便演示效果,把batch-size设置为1]
a1.sinks.k1.type=avro
a1.sinks.k1.hostname=192.168.128.129
a1.sinks.k1.port=41414
a1.sinks.k1.batch-size = 1

a1.sinks.k2.type=avro
a1.sinks.k2.hostname=192.168.128.130
a1.sinks.k2.port=41414
a1.sinks.k2.batch-size = 1


# 配置sink策略
a1.sinkgroups = g1
a1.sinkgroups.g1.sinks = k1 k2
a1.sinkgroups.g1.processor.type = load_balance
a1.sinkgroups.g1.processor.backoff = true
a1.sinkgroups.g1.processor.selector = round_robin


# 把组件连接起来
a1.sources.r1.channels = c1
a1.sinks.k1.channel = c1
a1.sinks.k2.channel = c1
接着配置slave1和slave2上的Agent。 slave1节点为load-balancing-slave1.conf,slave2节点为load-balancing-slave2.conf
[root@slave1 conf]# vim load-balancing-slave1.conf

# agent的名称是a1

# 指定source组件、channel组件和Sink组件的名称
a1.sources = r1
a1.channels = c1
a1.sinks = k1

# 配置source组件
a1.sources.r1.type = avro
a1.sources.r1.bind = 0.0.0.0
a1.sources.r1.port = 41414

# 配置channel组件
a1.channels.c1.type = memory
a1.channels.c1.capacity = 1000
a1.channels.c1.transactionCapacity = 100


# 配置sink组件[为了区分两个sink组件生成的文件,修改filePrefix的值]
a1.sinks.k1.type = hdfs
a1.sinks.k1.hdfs.path = hdfs://192.168.128.128:9000/load_balance
a1.sinks.k1.hdfs.fileType = DataStream
a1.sinks.k1.hdfs.writeFormat = Text
a1.sinks.k1.hdfs.rollInterval = 3600
a1.sinks.k1.hdfs.rollSize = 134217728
a1.sinks.k1.hdfs.rollCount = 0
a1.sinks.k1.hdfs.useLocalTimeStamp = true
#由于都是输出到同一个hdfs服务器,为了区分我们把不同的sink起不同的前缀名字。
#注意slave2的配置名字改为为slave2即可。
a1.sinks.k1.hdfs.filePrefix = slave1
#a1.sinks.k1.hdfs.filePrefix = slave2
a1.sinks.k1.hdfs.fileSuffix = .log


# 把组件连接起来
a1.sources.r1.channels = c1
a1.sinks.k1.channel = c1
需要先启动slave1和slave2上的Agent,最后启动master上的Agent.
#启动slave1的Agent
[root@slave1 flume]# bin/flume-ng agent --name a1 --conf conf --conf-file conf/load-balancing-slave1.conf -Dflume.root.logger=INFO,console
#启动slave2的Agent
[root@slave2 flume]# bin/flume-ng agent --name a1 --conf conf --conf-file conf/load-balancing-slave2.conf -Dflume.root.logger=INFO,console
#启动master的Agent
[root@master flume]# bin/flume-ng agent --name a1 --conf conf --conf-file conf/load-balancing.conf -Dflume.root.logger=INFO,console
通过telnet产生数据。
[root@master ~]# telnet master 44444
Trying 192.168.128.128...
Connected to master.
Escape character is '^]'.
hello,linux
OK
hello,hadoop
OK
^ZConnection closed by foreign host.
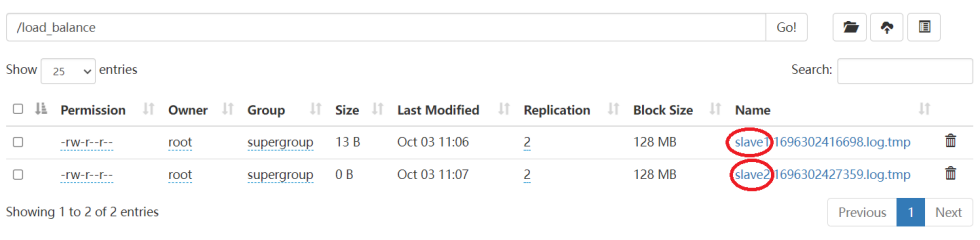
[root@master ~]# hdfs dfs -cat hdfs://192.168.128.128:9000/load_balance/slave1.1696302416698.log.tmp
2023-10-03 11:08:15,613 INFO sasl.SaslDataTransferClient: SASL encryption trust check: localHostTrusted = false, remoteHostTrusted = false
hello,linux
[root@master ~]# hdfs dfs -cat hdfs://192.168.128.128:9000/load_balance/slave2.1696302427359.log.tmp
2023-10-03 11:08:32,687 INFO sasl.SaslDataTransferClient: SASL encryption trust check: localHostTrusted = false, remoteHostTrusted = false
hello,hadoop
hdfs 服务器上观察,Load balancing Sink Processor负载均衡效果。