在日常的项目开发中,往往会涉及到一些需要做到定时执行的代码,例如自动将超过24小时的未付款的单改为取消状态,自动将超过14天客户未签收的订单改为已签收状态等等,那么为了在Spring Boot中实现此类需求我们需要使用定时任务。@Scheduled和quartz类都可以实现定时任务。
1.Scheduled
在Springboot启动类增加注解自动开启job。
@SpringBootApplication
@MapperScan(basePackages = {"com.hqyj.springboot.mapper"})
@EnableCaching  //开启缓存支持
@EnableCanalClient
@EnableAsync
//表示启用Scheduled定时任务机制
@EnableScheduling
public class FirstdemoApplication {
    public static void main(String[] args) {
        SpringApplication.run(FirstdemoApplication.class, args);
    }
}
编写定时器任务。
@Component
public class ScheduledTask  {
    //控制台每隔6秒钟会输出一次"hello,world!"
    @Scheduled(cron ="*/6 * * * * ?")
    public void sayHello() {
        System.out.println("hello,world!");
    }

}
@Scheduled除过cron还有三种方式:fixedRate,fixedDelay,initialDelay。
- cron:表达式可以定制化执行任务,但是执行的方式是与fixedDelay相近的,也是会按照上一次方法结束时间开始算起。
- fixedRate:控制方法执行的间隔时间,是以上一次方法执行完开始算起,如上一次方法执行阻塞住了,那么直到上一次执行完,并间隔给定的时间后,执行下一次。
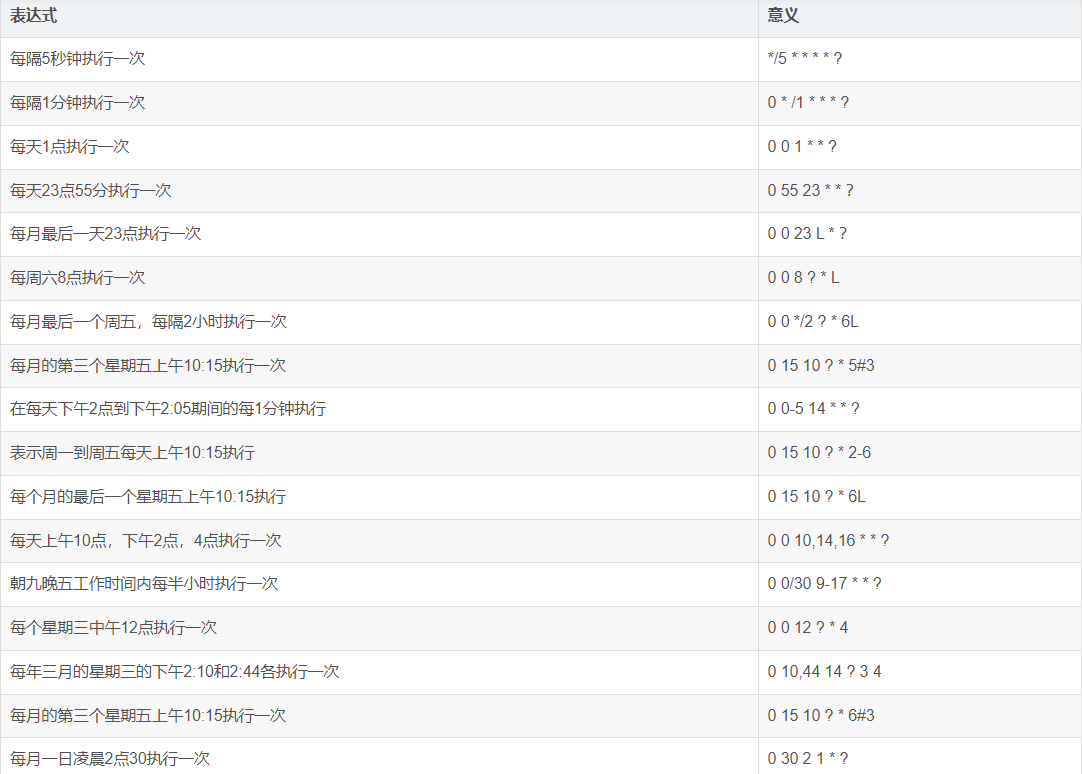
Corn表达式是一个字符串,字符串以5或6个空格隔开,分隔出6或7个时间域,每个时间域代表一个时间含义,它有两种语法。
语法一:Seconds Minutes Hours DayOfMonth Month DayOfWeek Year
语法二:Seconds Minutes Hours DayOfMonth Month DayOfWeek
SpringTask仅支持语法二,即它只能有6个时间域
cron表达式常用案例:
2.Scheduled接口实现
使用@Scheduled 注解很方便,但缺点是当我们调整了执行周期的时候,需要重启应用才能生效,这多少有些不方便。为了达到实时生效的效果,那么可以使用接口来完成定时任务,统一将定时器信息保存在数据库中。
实现步骤如下:
1).创建Scheduled实体类
@Entity
@Table(name="scheduled")
@Data
@NoArgsConstructor
@AllArgsConstructor
@Builder

public class Scheduled extends BaseEntity{
    @Id
    @GeneratedValue(strategy = GenerationType.IDENTITY)
    @TableId(type = IdType.AUTO)
    private Integer cronId;  //定时器任务的ID
    private String cronName; //定时器任务的名字
    private String cron; //定时器任务的cron表达式
}
2).创建mapper层
public interface ScheduledMapper extends BaseMapper {

    @Select("select cron from scheduled where cron_id = #{id}")
    public String getCron(int id);
}
3).创建任务类。
@Component
public class ScheduledTask implements SchedulingConfigurer {

    @Resource
    protected ScheduledMapper scheduledMapper;

    @Override
    public void configureTasks(ScheduledTaskRegistrar scheduledTaskRegistrar) {
        scheduledTaskRegistrar.addTriggerTask(() -> process(),
                triggerContext -> {
                    String cron = scheduledMapper.getCron(1);
                    if (cron.isEmpty()) {
                        System.out.println("cron is null");
                    }
                    return new CronTrigger(cron).nextExecutionTime(triggerContext);
                });
    }

    //这里写定时任务要做的事情...
    private void process() {
        System.out.println("hello,world!");
    }

}
4).测试运行
在scheduled表里面,添加一个定时任务记录,如下图:

我们发现控制台,每隔10秒钟输出一次"hello,world!"。说明定时任务启动成功!我们可以在不重启应用的基础上,随意修改数据库里cron表达式从而达到修改定时任务的效果。
hello,world!
Creating a new SqlSession
SqlSession [org.apache.ibatis.session.defaults.DefaultSqlSession@5effd94] was not registered for synchronization because synchronization is not active
JDBC Connection [HikariProxyConnection@2099173083 wrapping com.mysql.cj.jdbc.ConnectionImpl@b6175e5] will not be managed by Spring
==>  Preparing: select cron from scheduled where cron_id = ?
==> Parameters: 1(Integer)
<==    Columns: cron
<==        Row: */10 * * * * ?
<==      Total: 1
Closing non transactional SqlSession [org.apache.ibatis.session.defaults.DefaultSqlSession@5effd94]
3.Quartz
Quartz是一个java编写的开源任务调度框架其主要调度元素有:
- Trigger(触发器):触发任务任务执行的时间或规则。在任务调度Quartz中,Trigger主要的触发器有:SimpleTrigger,CalendarIntervelTrigger,DailyTimeIntervalTrigger,CronTrigger
- Scheduler(任务调度器):Scheduler就是任务调度控制器,需要把JobDetail和Trigger注册到schedule中,才可以执行 ;Scheduler有两个重要组件:ThreadPool和JobStore。
- Job(任务):是一个接口,其中只有一个execute方法。开发者只要实现接口中的execute方法即可。
- JobDetail(任务细节):Quartz执行Job时,需要新建Job实例,但不能直接操作Job类,所以通过JobDetail获得Job的名称,描述信息。
实例:
项目结构图如下:
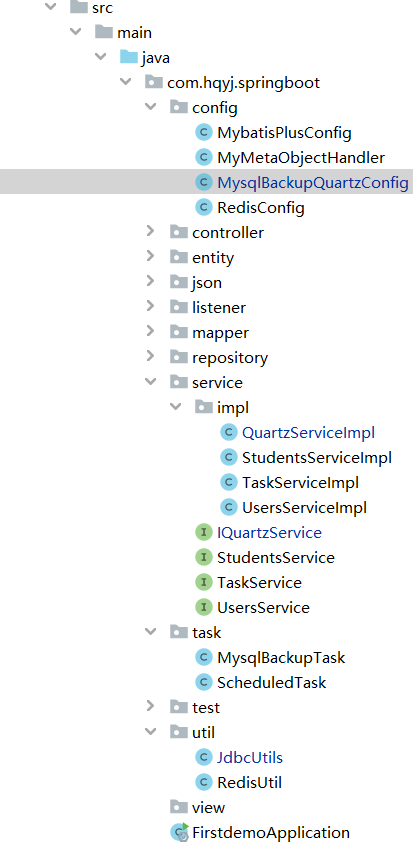
Springboot+Quartz实现Mysql数据库定时备份。实现步骤如下:
1).pom.xml中添加依赖
<properties>
  <spring-boot.version>2.3.7.RELEASE</spring-boot.version>
</properties>

<dependencies>
  <dependency>
     <groupId>org.springframework.boot</groupId>
     <artifactId>spring-boot-starter-quartz</artifactId>
     <version>${spring-boot.version}</version>
  </dependency>
</dependencies>
2).编写JdbcUtils数据库工具类
import org.springframework.beans.factory.annotation.Autowired;
import org.springframework.beans.factory.annotation.Value;
import org.springframework.core.env.Environment;
import org.springframework.stereotype.Component;

import java.util.HashMap;

@Component
public class JdbcUtils {

    @Value("${spring.datasource.url}")
    private String url;
    @Value("${spring.datasource.username}")
    private String username;
    @Value("${spring.datasource.password}")
    private String password;

    public HashMap<String, String> getDBInfo() {

        String url = this.url;
        String username = this.username;
        String password = this.password;
        String[] split = url.split(":");
        String host = String.format("%s:%s:%s", split[0], split[1], split[2]);
        String[] portSplit = split[3].split("/");
        String port = portSplit[0];
        String[] databaseSplit = portSplit[1].split("\\?");
        String dbName = databaseSplit[0];
        HashMap<String, String> result = new HashMap<>();
        result.put("url",url);
        result.put("host",host);
        result.put("port",port);
        result.put("dbName",dbName);
        result.put("userName",username);
        result.put("passWord",password);
        return result;
    }
}
3).编写Quartz接口
IQuartzService.java
public interface IQuartzService {
    //执行数据库的备份任务
    void mysqlBackupTask();
}
QuartzServiceImpl.java
import com.hqyj.springboot.service.IQuartzService;
import com.hqyj.springboot.util.JdbcUtils;
import org.springframework.stereotype.Service;
import lombok.extern.slf4j.Slf4j;
import cn.hutool.core.date.DateUnit;
import cn.hutool.core.date.DateUtil;
import org.springframework.beans.factory.annotation.Autowired;

import java.sql.Date;
import java.time.LocalDate;
import java.io.File;
import java.util.Map;

@Slf4j
@Service
public class QuartzServiceImpl implements IQuartzService {
    @Autowired
    private JdbcUtils jdbcUtils;

    @Override
    public void mysqlBackupTask() {
        String resourcePath = "E:/java2302_springboot_course/taskdemo/db_bak";
        log.info("======执行定时器:定时备份数据库=======");
        String backUpPath = resourcePath + "/sql/" + java.sql.Date.valueOf(LocalDate.now());
        File backUpFile = new File(backUpPath);
        if (!backUpFile.exists()) {
            backUpFile.mkdirs();
        }
        File dataFile = new File(backUpPath + "/springboot" + System.currentTimeMillis() + ".sql");
        //拼接cmd命令
        StringBuffer sb = new StringBuffer();
        Map<String, String> dbInfo = jdbcUtils.getDBInfo();
        sb.append("mysqldump");
        sb.append(" -u" + dbInfo.get("userName"));
        sb.append(" -p" + dbInfo.get("passWord"));
        sb.append(" " + dbInfo.get("dbName") + " > ");
        sb.append(dataFile);
        log.info("======数据库备份cmd命令为:" + sb.toString() + "=======");
        try {
            Process exec = Runtime.getRuntime().exec("cmd /c" + sb.toString());
            if (exec.waitFor() == 0) {
                log.info("======数据库备份成功,路径为:" + dataFile + "=======");
            }
        } catch (Exception e) {
            log.info("======数据库备份失败,异常为:" + e.getMessage() + "=======");
        }
    }
}
4).编写Quartz任务类
import com.hqyj.springboot.service.IQuartzService;
import org.quartz.JobExecutionContext;
import org.quartz.JobExecutionException;
import org.springframework.scheduling.quartz.QuartzJobBean;

public class MysqlBackupTask extends QuartzJobBean {
    @Override
    protected void executeInternal(JobExecutionContext jobExecutionContext) throws JobExecutionException {
        //获取JobDetail中传递的参数
        IQuartzService quartzService = (IQuartzService) jobExecutionContext.getJobDetail().getJobDataMap().get("quartzService");
        quartzService.mysqlBackupTask();
    }
}
5).注册Quartz定时任务
import com.hqyj.springboot.service.IQuartzService;
import com.hqyj.springboot.task.MysqlBackupTask;
import org.quartz.*;
import org.springframework.beans.factory.annotation.Autowired;
import org.springframework.context.annotation.Bean;
import org.springframework.context.annotation.Configuration;

@Configuration
public class MysqlBackupQuartzConfig {
    private static final String MYSQL_BACKUP_JOB_GROUP_NAME = "MYSQL_BACKUP_JOB";
    private static final String MYSQL_BACKUP_TRIGGER_GROUP_NAME = "MYSQL_BACKUP_TRIGGER";

    @Autowired
    private IQuartzService quartzService;

    @Bean
    public JobDetail mysqlBackupJobDetail() {
        JobDataMap jobDataMap = new JobDataMap();
        jobDataMap.put("quartzService", quartzService);
        JobDetail jobDetail = JobBuilder.newJob(MysqlBackupTask.class)
                .withIdentity("mysqlBackupJobDetail", MYSQL_BACKUP_JOB_GROUP_NAME)
                .usingJobData(jobDataMap)
                .storeDurably()
                .build();
        return jobDetail;
    }

    @Bean
    public Trigger mysqlBackupTriggerQuartz() {
        CronScheduleBuilder cronScheduleBuilder = CronScheduleBuilder.cronSchedule("0 58 13 * * ?");
        Trigger trigger = TriggerBuilder.newTrigger()
                .forJob(mysqlBackupJobDetail()) //关联上Test述的JobDetail
                .withIdentity("mysqlBackupJobDetail", MYSQL_BACKUP_TRIGGER_GROUP_NAME) //给Trigger起个名字
                .withSchedule(cronScheduleBuilder)
                .build();
        return trigger;
    }
}
6).启动项目测试运行。